HATTERAS YACHT PARTS
CABO YACHT PARTS
Sam's is your source for Hatteras and Cabo Yacht parts.
You are using an out of date browser. It may not display this or other websites correctly.
You should upgrade or use an alternative browser.
You should upgrade or use an alternative browser.
1965 41 DCMY Refit
- Thread starter DCMY #92
- Start date
- Replies 217
- Views 130,387

DCMY #92
Well-known member
- Joined
- Jul 22, 2007
- Messages
- 855
- Status
- OWNER - I own a Hatteras Yacht
- Hatteras Model
- 41' DOUBLE CABIN (1962 - 1965)
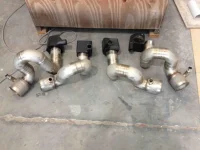
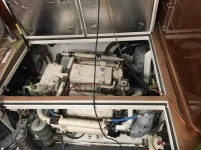
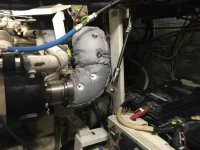
Update on new risers: I've attached a few photos on the new risers. One shows the new 316 SS schedule 40 pipe risers temporarily installed on the JetHot coated exhaust flanges. The problem here is that it's impossible to screw the risers tightly into the flanges and have them aligned properly to joint the exhaust hoses. I sent the risers to DeAngelo Marine Exhaust in Ft Lauderdale where they cut they installed a Marmon flange on each riser and fabricated insulation blankets. This permitted us to screw the threaded nipple of the riser tightly into the exhaust flange, then alight the riser to the hoses before tightening the V-clamp on the Marmon flange.
The other photos show the risers installed. The threaded nipple is not insulated in these photos. We will install the insulation blankets on these after we splash, run up the engines and make sure there are no leaks at the Marmon flanges.
The weight of the Sch 40 SS pipe required installation of the threaded struts you see in the photos to keep excessive stress of of the Marmon flanges.
You can see various items in these photos that would be inappropriate, embarrassing, or unsafe if the boat was in service. These things will be dealt with before we splash.
Attachments
q240z
Legendary Member
- Joined
- Nov 12, 2008
- Messages
- 1,678
- Status
- FRIEND
- Hatteras Model
- Not Currently A Hatteras Owner
Looks great!
There's a thread on risers over on the Cummins forum at boatdiesel.com where Tony indicated that solid riser supports can cause fractures. Instead of a solid strut, his solution is to use two pieces of metal tubing with a length of hose between them to permit the riser to move a bit as it heats up.
There's a thread on risers over on the Cummins forum at boatdiesel.com where Tony indicated that solid riser supports can cause fractures. Instead of a solid strut, his solution is to use two pieces of metal tubing with a length of hose between them to permit the riser to move a bit as it heats up.
DCMY #92
Well-known member
- Joined
- Jul 22, 2007
- Messages
- 855
- Status
- OWNER - I own a Hatteras Yacht
- Hatteras Model
- 41' DOUBLE CABIN (1962 - 1965)
I suspect Tony is right. The bread and butter in my consulting work on power plant equipment is the consequences of restrained differential thermal expansion.
These engines are rigidly mounted to the steel engine beds attached to the stringers. When at speed in a chop the engines look like they are moving a lot. This is why I added flexible shaft couplings 33 years ago. No problems have ever occurred due to the apparent engine movement, but I'm wondering if the cabin sole support joists that these riser struts are mounted to will move exactly in time with the engine mounts as things flex in a seaway.
I'm going to watch them closely and hope to identify any problems before any failures occur. There is a sensor called a string potentiometer that is inexpensive and relatively sensitive in measuring linear movement. Imagine a small retracting tape measure were the movement of the tape is transmitted. I'm considering installing one between each riser and the cabin sole joist above to record actual movements.
If necessary, I'll cut/shorten the strut's threaded SS rod in the middle and couple the ends with heavy rubber hose as Tony suggests.
DCMY #92
Well-known member
- Joined
- Jul 22, 2007
- Messages
- 855
- Status
- OWNER - I own a Hatteras Yacht
- Hatteras Model
- 41' DOUBLE CABIN (1962 - 1965)
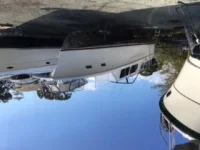
Update: Loose Change is scheduled for transport from Rivolta Yachts to Cortez for launching Tuesday. Touchup of topsides and hull paint, bottom paint, and assembly of items too tall for transport (windshield, masts, etc.) will probably take a couple of days in the yard. Launch should occur Thursday or Friday.
I'll make another update after she is floating and back in her home slip.
I'll make another update after she is floating and back in her home slip.
Vincentc
Legendary Member
- Joined
- Jun 3, 2008
- Messages
- 1,514
- Status
- OWNER - I own a Hatteras Yacht
- Hatteras Model
- 43' DOUBLE CABIN (1970 - 1984)
I look forward to seeing more photos of the boat. It looks like the last images posted (other than some impressive parts) was in April 2015. Hope you can splash soon.
Regards,
Regards,
DCMY #92
Well-known member
- Joined
- Jul 22, 2007
- Messages
- 855
- Status
- OWNER - I own a Hatteras Yacht
- Hatteras Model
- 41' DOUBLE CABIN (1962 - 1965)
Update: The photos speak for themselves. I estimate a week or two in the yard to assemble the topsides, paint the bottom, etc. Having said that, I thought the refit would be several months, not 8 1/2 years. I have no idea why the photos are not right side up. Sorry.


DCMY #92
Well-known member
- Joined
- Jul 22, 2007
- Messages
- 855
- Status
- OWNER - I own a Hatteras Yacht
- Hatteras Model
- 41' DOUBLE CABIN (1962 - 1965)
SKYCHENEY
Legendary Member
- Joined
- Apr 12, 2005
- Messages
- 15,545
- Status
- OWNER - I own a Hatteras Yacht
- Hatteras Model
- 53' EXTENDED DECKHOUSE (1983 - 1988)
Anyone know why the photos aren't right side up. They are before I upload them.
Is your computer right side up?
34Hatt
Legendary Member
- Joined
- Apr 13, 2005
- Messages
- 3,909
- Status
- OWNER - I own a Hatteras Yacht
- Hatteras Model
- 34' CONVERTIBLE (1965 - 1969)
Anyone know why the photos aren't right side up. They are before I upload them.
Is it a Iphone your using to post?
DCMY #92
Well-known member
- Joined
- Jul 22, 2007
- Messages
- 855
- Status
- OWNER - I own a Hatteras Yacht
- Hatteras Model
- 41' DOUBLE CABIN (1962 - 1965)
Is it a Iphone your using to post?
I took the photos with a iPhone, but posted from my computer. I've posted many photos taken with the iPhone previously without this problem.
Forum statistics
Latest Posts
-
-
Any recent advice on how to retrofit Cruisair Split units
- Started by Cap'n Kirk
- Replies: 6
-
-
-

Trending content
