Sam's is your source for Hatteras and Cabo Yacht parts.

Enter a part description OR part number to search the Hatteras/Cabo parts catalog:

Email Sam's or call 1-800-678-9230 to order parts.

replacing the floor

jim rosenthal

Super Moderator
Joined
Apr 12, 2005
Messages
11,050
Hatteras Model
36' CONVERTIBLE-Series I (1969 -1977)
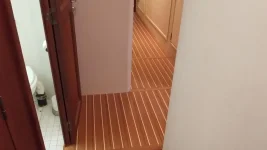
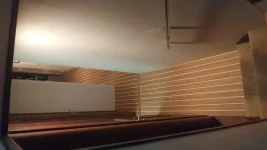
About a month ago, motivated by 1) photos of beautiful flooring in other Hatteras yachts, including MikeP's 53MY, and no, I can't afford to buy it for the floor, and he doesn't hire out, sadly 2) the shabby state of the carpet in the salon of my 36C, I decided to put a new floor in my boat. After some thinking and inspection of various samples on the boat, I decided on Lonseal in a mahongany and holly look- obviously, this is not real wood, but it will match fairly well, and be a lot easier to clean and maintain. Carpet doesn't seem to last a long time. We have enough to do the salon and the head. The carpet in the galley and stateroom has held up well enough, since it isn't in the sun ever and doesn't get walked on as much.

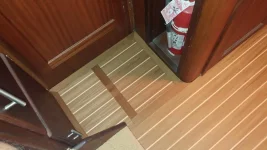
So today, with my installer otherwise occupied and too busy to return phone calls, and the day off, I began removing the carpet. Under the carpet, as it turns out, is vinyl flooring- possibly even two layers of it, over what looks like 3/4" plywood. I'm not sure this is in good enough shape to put the Lonseal on top of. Since the hatches were trimmed to allow the carpet to wrap downwards and staple to the side of each hatch, they are also loose and will have to have wood strips added to them at least on some sides, so that they won't rattle and so there won't be visible gaps between them.

I can tell already that this job will be the gift that keeps on taking, not giving. This will be interesting. It will certainly solve the problem of what to do with my spare time for the next few weeks.
 
Jim, do you know whether or not the vinyl is that asbestos shizzle they used back in the day?
 
FWIW, if OEM linoleum flooring, any Hatt of the age most of us here own/are interested in, will probably have had asbestos-backed linoleum. Armstrong was a standard lino on Hatts; their linoleum, (as well as that of most other companies) commonly contained asbestos though the mid-'80s. Adhesives sometimes contained asbestos as well.
 
Last edited:
Putting this down now. 12 mm with 1 mm teal and maple veneer. The edging and joints are all solid stock teak.
 

Attachments

  • 20170602_141745.webp
    20170602_141745.webp
    48.7 KB · Views: 500
Looks fantastic!
 
Panels are screwed down over a vapor barrier. Screws will be hidden by 1/2 inch flex shoe molding
 

Attachments

  • 20170602_195641.webp
    20170602_195641.webp
    58.9 KB · Views: 485
Great job. Looks fantastic
 
FWIW, if OEM linoleum flooring, any Hatt of the age most of us here own/are interested in, will probably have had asbestos-backed linoleum. Armstrong was a standard lino on Hatts; their linoleum, (as well as that of most other companies) commonly contained asbestos though the mid-'80s. Adhesives sometimes contained asbestos as well.

Uh oh. Well, I haven't removed any linoleum yet, I've just removed the carpet and pulled the staples out of the hatches. But I'm glad you mentioned it. I have not been wearing a mask, but I will now.

The plywood top of the three hatches I did so far is pretty deteriorated at the edges. I am starting to think that we should just take the plywood tops off the hatches and replace them altogether.
 
If you use heat - a heat gun or an old clothes iron - to soften the adhesive, the old stuff will peel up without any drama or dust. I used both heat sources when I pulled all of the old Lino from our 53. Do NOT use any sort of grinder/sander to remove anything associated with the flooring. There may be a layer of adhesive left on the following after lino removal. That can be removed with paint thinner or, if you want to do it faster and nearly die from the fumes, use acetone! For some reason, on our 53, the Lino in the galley was glued down with a fairly thick black adhesive while the adhesive in the rest of the Lino-areas was thinner, more brittle grey adhesive. But heat worked fine on both.

If the old Lino is firmly attached, you could lay the new on the old but that is not usually recommended for best appearance/long life. You could also lay 1/4 plywood over the Lino and attach the new stuff to that. It's important that the substrate, whatever it is - original Lino, original plywood, new 1/4" plywood - be smooth/level. Any surface unevenness will show in the final flooring, more visibly than it does prior to installing the new flooring.
 
If the plywood is not real smooth, every defect will show through the Lonseal.
You wouldn't think so with the thickness of the being what it is, but it does.
 
We put in lonseal in the heads and did as Mike sugested payed 1/4 ply over Lino. Used a good sanded ply and the lonseal looks completely smooth. John
 
IDK, I haven't used the plastic flooring, but this stuff is easy to use and hides subfloor imperfections.
 

Attachments

  • 20170603_153335.webp
    20170603_153335.webp
    82.1 KB · Views: 267
My thinking now, before we really get into the meat of this, which begins Monday, is to peel the lino off the hatches, and replace the 3/4" plywood which makes up the hatch tops. New flat plywood would be a good substrate for the Lonseal, and we could tailor the fit so the hatches fit snugly. We'll see. Thanks to all for help/advice. Photos will follow, as soon as there's anything worth showing.
 
Today we got all the carpet out of the boat (and into my truck, where after getting rained on, it's going to the dump) and all the hatches out of the boat. There are six hatches, and the plywood tops are deteriorated enough that it will be easier to just replace them rather than try to strip the flooring off them. They will get new plywood on top, and then fitted into the boat, after which the Lonseal goes on them. Moving along.
 
We need the before during and after pics.
 
I don't have before photos, but I snapped some today with all the hatches out, so you can see that my engine room is not nearly as clean as MikeP's- but very few are. The hatches are off getting stripped and will get new plywood tops, then we start fitting it all together.
 
Today we got all the carpet out of the boat (and into my truck, where after getting rained on, it's going to the dump) and all the hatches out of the boat. There are six hatches, and the plywood tops are deteriorated enough that it will be easier to just replace them rather than try to strip the flooring off them. They will get new plywood on top, and then fitted into the boat, after which the Lonseal goes on them. Moving along.
Check the ply-wood mine was 7/8" found out after I bought the 3/4" I had to buy a pice of 1/8" and glue and screw together. Could not find 7/8" anywhere
 
We did measure the old plywood and it is 3/4. Thanks, though.
 
Today we got all the carpet out of the boat (and into my truck, where after getting rained on, it's going to the dump)

You could probably get the carpet dry enough by putting it out in the sun for the afternoon and then throw it up in the for sale section here.
 
If it's me I would seal the edges and bottom on the new hatches with epoxy and also paint them before covering the tops so they're nice and pretty and also remain stable. Might even seal the tops too depending on how the new stuff gets put down.
 

Forum statistics

Threads
38,156
Messages
448,754
Members
12,482
Latest member
UnaVida

Latest Posts

Trending content

Back
Top Bottom