egaito
Legendary Member
- Joined
- Jun 27, 2005
- Messages
- 1,153
- Status
- OWNER - I own a Hatteras Yacht
- Hatteras Model
- 41' CONVERTBLE-Series I (1964 - 1971)
So, with the evening coming to a close, I've finally managed to replace the impellers on Sanctuary.
I'm embarrased to say it took the better part of two days, but thought I would share the lessons learned.
First, the impeller puller sold for this purpose leaves something to be desired. Granted, the job would have been much harder without it (thank you Pascal), but the "prongs" on this thing only go about half way down the impeller, and are designed to bite into the rubber to pull the impeller out. Invariably, one side lets go, and it took several passes on each impeller to get it out. On the 2nd one, I learned to put pressure on it with the impeller puller, then use the old technique of screw drivers to "inch" it out. It went much faster this way.
Putting them back in was a bit of a challenge, but not terribly bad. One thing I learned here is that I don't like KY as a lubricant (for this job anyway). Besides not offering the "sliperiness" (sp?), I prefer to have some type of grease on the shaft as I'm convinced the lack of this was part of the difficulty pulling this set of impellers out. So for the 2nd impeller, I used a light grease, which seemed more slipery going in as well as making me feel better about the impeller perhaps not siezing to the shaft as easily next time.
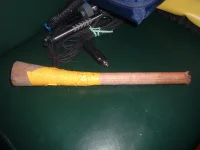
Beyond the lubrication, getting the new impellers in proved quite a challenge. Several wire ties around the blades to "pre-orient" them worked well. Unfortunately, there's just not much room to work behind these engines, and the room that is available is tangled with exhaust cross-over hoses. Finding the leverage to tap the impeller in on the first engine was tough as the starboard engine room has the air conditioner rack on the aft wall, and ultimately took two people, one to hold the screw driver (we were using the handle to drive it) and the other to tap it. On the 2nd engine, I was able to accomplish it myself, but not without the aid of the specially designed, and patent pending, "Articulating Impeller Driver" (see attached picture). With a little grease, and this amazing tool, I was able to seat the 2nd impeller on my own by going in at various angles around the intruding hoses. Since you all are our friends, I'll share the plans...duct tape a dowel cut to the appropriate length for your boat, to the end of a bung, and bang away.
Of course, another lesson learned is to vacuum out the bilge before you start as I spent a good amount of time wiping nasty water and oil off tools, screws, and myself during the course of the job. But you already knew that, as did I ;-)
Oh yea, and when "bump" the starter to move the impeller a bit....make sure your finger is on the "shutdown" button! These engines start WAY too easily.
After all of this, the impellers that I pulled weren't all that bad, but at least we have the piece of mind of knowing when they were replaced, and one of them came out in good enough shape to become a spare.
So that's the story, suggestions and questions welcome!
I'm embarrased to say it took the better part of two days, but thought I would share the lessons learned.
First, the impeller puller sold for this purpose leaves something to be desired. Granted, the job would have been much harder without it (thank you Pascal), but the "prongs" on this thing only go about half way down the impeller, and are designed to bite into the rubber to pull the impeller out. Invariably, one side lets go, and it took several passes on each impeller to get it out. On the 2nd one, I learned to put pressure on it with the impeller puller, then use the old technique of screw drivers to "inch" it out. It went much faster this way.
Putting them back in was a bit of a challenge, but not terribly bad. One thing I learned here is that I don't like KY as a lubricant (for this job anyway). Besides not offering the "sliperiness" (sp?), I prefer to have some type of grease on the shaft as I'm convinced the lack of this was part of the difficulty pulling this set of impellers out. So for the 2nd impeller, I used a light grease, which seemed more slipery going in as well as making me feel better about the impeller perhaps not siezing to the shaft as easily next time.
Beyond the lubrication, getting the new impellers in proved quite a challenge. Several wire ties around the blades to "pre-orient" them worked well. Unfortunately, there's just not much room to work behind these engines, and the room that is available is tangled with exhaust cross-over hoses. Finding the leverage to tap the impeller in on the first engine was tough as the starboard engine room has the air conditioner rack on the aft wall, and ultimately took two people, one to hold the screw driver (we were using the handle to drive it) and the other to tap it. On the 2nd engine, I was able to accomplish it myself, but not without the aid of the specially designed, and patent pending, "Articulating Impeller Driver" (see attached picture). With a little grease, and this amazing tool, I was able to seat the 2nd impeller on my own by going in at various angles around the intruding hoses. Since you all are our friends, I'll share the plans...duct tape a dowel cut to the appropriate length for your boat, to the end of a bung, and bang away.
Of course, another lesson learned is to vacuum out the bilge before you start as I spent a good amount of time wiping nasty water and oil off tools, screws, and myself during the course of the job. But you already knew that, as did I ;-)
Oh yea, and when "bump" the starter to move the impeller a bit....make sure your finger is on the "shutdown" button! These engines start WAY too easily.
After all of this, the impellers that I pulled weren't all that bad, but at least we have the piece of mind of knowing when they were replaced, and one of them came out in good enough shape to become a spare.
So that's the story, suggestions and questions welcome!