Sam's is your source for Hatteras and Cabo Yacht parts.

Enter a part description OR part number to search the Hatteras/Cabo parts catalog:

Email Sam's or call 1-800-678-9230 to order parts.

Adding Amtico

  • Thread starter Thread starter MikeP
  • Start date Start date
  • Replies Replies 70
  • Views Views 29,035
I forgot to mention that he didn't read any of the instructions on any of those jobs, either.

"This is a man cave"

Nice! room for a pool table and a couple of cars and bikes, too.
 
I forgot to mention that he didn't read any of the instructions on any of those jobs, either.

"This is a man cave"

Nice! room for a pool table and a couple of cars and bikes, too.

Boat was in the paint booth.
 

Attachments

  • 20140428_105458.webp
    20140428_105458.webp
    93.5 KB · Views: 200
Some more
 

Attachments

  • 20140428_105728.webp
    20140428_105728.webp
    78.3 KB · Views: 199
I did pull my old Amtico info and their adhesive is a urethane. Not surprised it is not coming up very easy!
You are also right about mechanical fasteners for underlayment. Glue to joists is great for subfloors but not for underlays.
The product is vinyl and will melt at a fairly low temperature. They also have a memory. Vinyls will always attempt to return to the size they are made at, i.e. they can change dimensionally due to temperature changes. I have inspected more than a few vinyl floor failures due to thermal shock issues.
 
Here are some pics.

First of the salon with sofa upended onto existing amtico at helm.

Second is carpet removed

3rd is first "possibility" for joining old/new. The underlayment has not been laid yet.

More pics coming...
 

Attachments

  • P6030004.webp
    P6030004.webp
    42 KB · Views: 185
  • P6030005.webp
    P6030005.webp
    43.2 KB · Views: 184
  • P6030007.webp
    P6030007.webp
    36.2 KB · Views: 186
3 possibilities for the joint to avoid messing with the existing amtico:
 

Attachments

  • P6030013.webp
    P6030013.webp
    23.5 KB · Views: 183
  • P6030014.webp
    P6030014.webp
    24 KB · Views: 184
  • P6030015.webp
    P6030015.webp
    20.9 KB · Views: 183
But I didn't like any of those so I decided to continue with the random cut boards which meant lifting/cutting sections of the Amtico. :(

First pic is of initial work doing that. The first removal I did took probably 15 minutes; by the time I figured out the best technique - heat gun on amtico/pull it up with pliers (and a lot of effort)/heat gun on remaining adhesive using scraper and plane blade - I was down to maybe 2-3 minutes per removal. Some were removed all the way to a previous board joint. Others were cut using: heat gun to soften amtico slightly and then using a plane blade/hammer to make the square cut. After cut, the throw-away part of the amtico was heated more and peeled up. The dremel Fein tool clone in the pic turned out to be useless. HEAT was the key to remove the old stuff.

Second pic is a dry-lay "test" of the continuous boards. The original amtico joins at approximately a line between the top of the light shade at the left of the pic to a couple of inches "south" of the white patch at the right in the pic.

That's where I am now. I plan to start applying the adhesive/laying the Amtico for real shortly.
 

Attachments

  • DSC_0084.webp
    DSC_0084.webp
    43.1 KB · Views: 184
  • P6030016.webp
    P6030016.webp
    39.3 KB · Views: 187
Last edited:
The random cuts look very good.
I agree with your choice. The other options would have looked fine, but not to you.
That is a serious project.
 
Wife wants to get rid of the carpet. So the question is;
can you just glue it down to the existing fiberglass flooring, or do you have the have some type of sub-floor to lay it on.
same with the aft deck. can you lay it on the non-skid or will that have to be sanded down etc

That work looks awesome.

Thanks

The adhesive should stick to the fiberglass but the concern would be if it is flat enough. You want it flat to 1/8 inch in 6 feet. I would rough the substrate up before applying adhesive.
 
I tore out all the carpet to revarnish the salon. Now to choose the new flooring. I ordered samples of Lonseal and Amtico marine wood colors. Mike, I love the pictures! Do you have installation instructions? Are your stairs Amtico? What kind of underlaymebt did you use? What shade is the "holly". Did Amtico cut the holly strips?

Thanks!


The "holly" is Amtico White Oak - AROW7520. The rest of the boat's "holly" - Which I amticoed back in '05 used their "warm Beech" but they don't have that any more. The W Oak is close enough that the difference is not noticeable where they meet unless you get down on your knees and look; the texture is slightly different. Obviously if you are doing it all with current material, there is no "matching" to worry about!

I used standard 1/4" underlayment plywood (one side has a sanded face).

Yes, I did Amtico on the stairs in the same pattern. BUT…if I had it to do over, personally, I would do the galley stairs in solid teak treads as opposed to the teak/holly look. Because the stairs curve, IMO the T/H looks a bit "busy." I installed them with the seams aligned with the edges of the stars themselves so the seams on the two top stars align with the TH everywhere but the seams on the two bottom stairs do not. I have never liked the look but have lived with it. I tried the Amtico on the lower stairs oriented fore-aft but it didn't look right either because it seemed to conflict with the stair edges. IMO, either method looks wrong but other folks say it looks fine so just experiment with the Amtico and align it however you prefer…or don't use it! :)

Amtico will supply the holly (or any other "wood") pre-slit in 1/4" strips. It will come as 4" wide board with the cuts completely through the "wood" surface but still joined by a thin portion of the rubber backing; you just peel each 1/4 strip from the board as you need it. IMO, it would not be feasible to cut the Amtico yourself into strips unless you had an industrial slitter for that purpose.

You can get the installation instructions on line - just google "Installing Amtico" and you will find something. I posted an extensive report of installation, including some things I learned, on this site many years ago. Here's a link: http://www.samsmarine.com/forums/archive/index.php/t-1624.html? I don't think there is any "new information" that I would add to what I wrote then.

Oh…one thing that I covered in other old threads re this but which is not in the one I linked to…

Depending on the year of your boat (ours is an '80) the flooring in the galley is asbestos-backed, which was pretty much normal back then. So if you are removing the galley flooring, be aware of that and do not use grinders/sanders. The flooring will come up with no problem using a heat gun and a wide-blade putty knife or something similar.
 
Last edited:
Mike, thanks! Great help!

Thanks for the tips about the stairs. Does Amtico make tread caps? Speaking of stairs, when I pulled up the carpet and removed 9,472 staples, tacks and nails, I noticed one stair was teak and screwed down. Is there something special under there?

I'm having salon floor envy after seeing your pictures!

Where did you buy the flooring? I'm not good with precision work like this, wonder if a local Mannington supplier would have an installer?

We have owned the boat 5 weeks and reviewed the surveyors list today happily crossing things off! Oh and cim tired and sore too! No judgement from me if you want to borrow my tools!

Thanks again,
Lisa
 
Thanks for the offer to let me borrow tools but I rely on Cheryl for my heavy tool needs! :)

I don't know if Amtico makes tread caps; all the steps from our salon to galley were plywood/carpeted. The only teak step was the one from galley to bow compartment. It was carpeted but after pulling the carpet it looked perfectly good after cleanup. There are some staple holes from the carpet pad and nail holes around the edges for the carpet tack strip but you can't see them unless you get down on your knees to look at that step.

We bought the flooring back in '05 directly from Amtico in GA. Now, as you noted, Amtico is handled by Mannington so the new Amtico was ordered from them and shipped here to the marina. I'm sure there are installers available; I would expect Mannington to have a list of suitable people. But it's worth noting that this teak/holly/random cut installation is much more involved than a typical flooring installation and I suspect that many installers would opt out of installing this! ;)

It IS very work intensive operation to install the boards in a random cut fashion. There are a lot of individual pieces involved and it's very fiddly - it's not a matter of putting down some adhesive and then laying squares of flooring rapidly, one after the other. I'm sure that someone who does this particular operation regularly could do it a lot faster but it is just barely related to laying normal floor tile squares or real wood floors. Frankly, laying real wood boards is much easier because there is no adhesive involved. Of course, I would have used real teak boards/holly strips in a heartbeat but the price of the product was 5+ times that of the Amtico. Real teak/holly tongue/groove boards would cost around 10.50 per linear foot with each board being 2.5" wide - roughly 40 bucks/square foot. I ordered 132 sq ft of material so real wood for the same space would cost well over 5k USD.

The price of the Amtico was $932, which included three 1/2 gal cans of Amtico two-part adhesive. Of course, the advantage to the Amtico is that there is essentially no maintenance and it is extremely durable. The Amtico I laid in '05 still looks just like the new Amtico boards that I'm installing.

There are other options, of course, like teak/holly plywood. I'll guarantee you that the plywood is orders of magnitude easier to install! But it all comes down to which "look" you prefer.

Good Luck!
 
I installed Amtico T&H in the galley in BUFFALO GAL a couple of years ago. I would echo what Mike P said. It's great stuff, looks good and wears like iron, but it is definitely one of the more difficult jobs I have done. Not because it's technically difficult, and not because of the process of cutting and fitting all the little pieces around all the corners and edges in the galley/dinette area. That was actually kind of fun. What wasn't fun was taking up those little pieces in proper order, laying down the adhesive, putting them back properly and rolling them down without smearing the adhesive all over and before it flashed off.

Bear in mind that what you will get from Amtico is a box of four foot "teak" strips and a box of "holly" strips. You will have to cut it all up and put it together in such a way that you get that random plank look. The adhesive is a two part product with a pot life of about a half hour, so you will have to move fast.

I don't say the foregoing to discourage you, just to prepare you for the fact that installing this stuff was, for me at any rate, much more difficult than I thought. Professional installers probably have tricks they use to avoid the problems I had. In retrospect it's one of those jobs where I should have used a pro. At the end of the day, however, I did get it done and it looks great.
 
If it helps anyone, a tip I was told by the Local rep was to make 2 or 3 batches because of the cook time if the installer was not a pro or working in tight spaces. I did not learn this until I ordered my second batch of adhesive. It does wear incredibly well, like concrete. That was a great investment. If such a thing exists on our boats.
 
I agree with mixing small batches of the glue. I did all three heads so I only mixed what I needed for each one. No problems, but I could see how it could become a problem if trying to do a larger area.
 
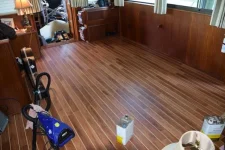
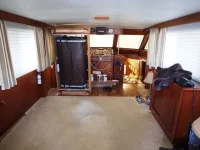
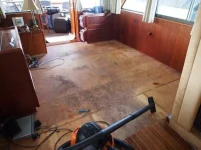
Yes, what I do is open pour the resin and the hardener into separate containers and then mix portions as needed. A mixed quart at a time seems to work pretty well. I TOTALLY CONCUR that this job it is far more difficult than laying normal tile. I could have easily laid normal floor tile in the entire salon in a couple of hours at most; I managed to get about 1/3 done in most of a day.

Re random cutting:

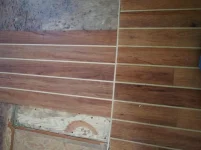
The easiest way to get the random cut look is to random- cut the first boards (including the 1/4 "holly") that start at a wall. Then, no more cutting is necessary for general laying because the random cut is established. True, the "random cut" is actually a repeating pattern but because each Amtico board is a different grain/coloration, the eye won't pick it up.

For truly random cut, a trick I came up with - probably been done before but I had never seen it - re the random pieces and placing them correctly is: Dry lay the floor - which you will have to do for a true random-cut. Then take some strips of masking tape and lay strips of tape about a foot or 18 inches apart across the floor. Do that in sections about 2 feet wide and a 3-4 feet long. You can then "roll up" the floor sections and easily lay it back down as it was when dry-laid. (I figured that out after our first attempt back in '05 where we tried numbering the pieces. FORGET THAT!) :)

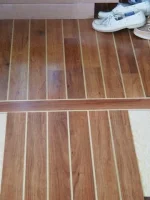
Also, re the adhesive…as I have stated before, Amtico recommends the 2-part adhesive for moist areas and areas of wide temp spread. The boat seems to be a perfect example of that environment. However, I laid Amtico in the bow compartment in '07 using standard adhesive from the local hardware store and it has held up just as well as the rest of the boat that I did in 2-part in '05. I'm not recommending single part because Amtico doesn't, I'm just relaying a personal experience. THe reason I did that is because we had some Amtico left over from the other work (helm area, galley, passageway, heads) and we later decided we wanted it in the bow. So, rather than order the 2-part adhesive, I decided to try the normal stuff. So far, it's been fine. So that's a "FWIW" bit of info.

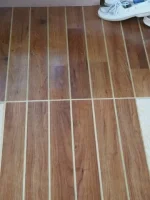
But I ordered the 2-part for the salon. However, if I ran a bit short, I wouldn't hesitate to finish using regular adhesive but I would ensure I used the two part in the areas of heavier traffic/potential heavy moisture and use the regular stuff against the side walls/other areas where there is no traffic. As I said, the bow compartment/regular adhesive has been fine and it sees a considerable bit of traffic and wet gear on occasion.
 
Hey Mike - How's this coming? Is it finished? We need to see the pics!
 
Yep - done…or almost done. Here's a pic after the floor was completely laid. At the moment everything is back in place because we are having visitors shortly but I still need to do trim work at the walls. Since 90% of that area is not visible due to furniture, it can wait a while. The part that is visible is trimmed.
 

Attachments

  • DSC_0114.webp
    DSC_0114.webp
    43.6 KB · Views: 205

Forum statistics

Threads
38,156
Messages
448,745
Members
12,482
Latest member
UnaVida

Latest Posts

Trending content

Back
Top Bottom