Sam's is your source for Hatteras and Cabo Yacht parts.

Enter a part description OR part number to search the Hatteras/Cabo parts catalog:

Email Sam's or call 1-800-678-9230 to order parts.

Winter Service, Injector re-build re-tip, coolant filter add

  • Thread starter Thread starter rustybucket
  • Start date Start date
  • Replies Replies 33
  • Views Views 9,104
Sunday mornin, after everything cooled off I was doing my post-seatrial check. Found the sources of 2 oil leaks we've known about for a while but were never able to locate, I'm super stoked about getting those stopped and one step closer to a clean, oil free bilge!

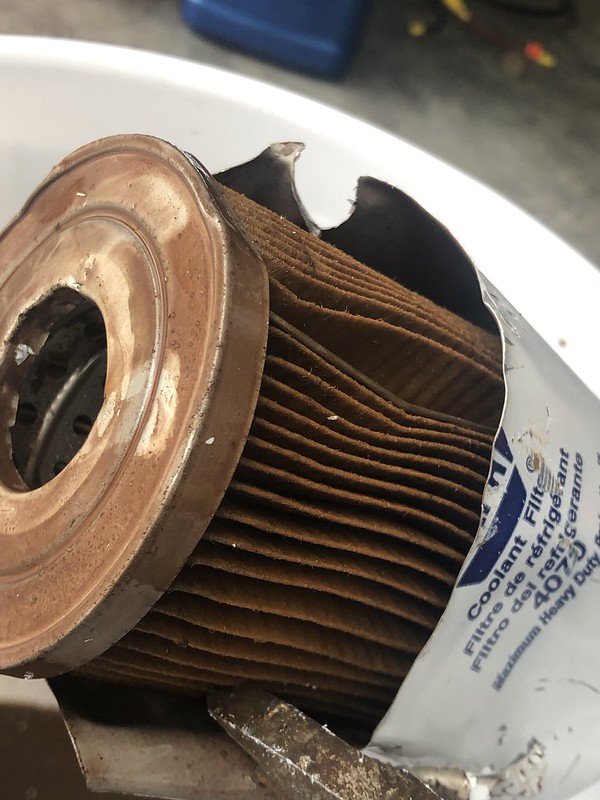
I checked the coolant tank levels, everything looked good, and I swear the coolant looked slightly 'clearer'. So I pulled off the two new coolant filters and dumped them into a bucket (that had previously had some diesel fuel in it, if you see any sheen in the pics that is where it came from)

49450349146_ace720570f_c.jpg


49449867638_2ee7dd6959_c.jpg


49449867438_a4f3d2ba92_c.jpg


What came out of them I would describe as silty/muddy and slightly rusty. There was definitely some sediment.

I could not seem to locate my filter cutter, so I've ordered a new one, it should be here by the end of the week and I'll cut the filters apart so we can see what is caught in the actual filter media. I'll post results here of that as well.

I'm not surprised at what they pulled out, even after only being ran for a couple of hours. I've seen similar results in almost every vehicle we've put these on.

The filters are not cheap, $20/ea but I'll probably change them after every run until they start showing cleaner on change.

For reference this fresh water coolant side was acid flushed, baking soda'd and water flushed 3 times 2 yrs ago. If you look at the coolant in the reservoir it looks a little cloudy but it is still nice and pink in color. It does not look anything like this nastiness that came out of the filters lol.
 
Last edited:
awesome Rusty
 
Filter cutter came in, popped the top off of one of them, pretty much what I expected, nothing large just lots of fine particulates. Feels like sandy/gritty mud between your fingers.


The filter element itself still had quite a bit of life to it, it was by no means stopped up. I will leave them on for a little longer next time, but glad I changed quick this time.

49460857628_6fd6c6b39c_c.jpg


49460857548_87c905cbab_c.jpg


49461337436_cc083d24a5_c.jpg
 
The sediment that had settled into the bottom of the bucket was pretty NASTY!! This stuff can't be good for a cooling system. It had quite a bit of grit to it, not sure if it was sand from original bock casting or what.

49461569077_82c4ca395f_c.jpg


49460857608_5c1fb10f91_c.jpg


49460857413_596442019e_c.jpg
 
Crazy it pulled that much out in 3 or 4 hrs of run time. Makes me wanna go run the boat more to pull out more! I mean, that sounds like a good reason to have to run the boat to me, whatcha think? ;):cool:
 
Crazy it pulled that much out in 3 or 4 hrs of run time. Makes me wanna go run the boat more to pull out more! I mean, that sounds like a good reason to have to run the boat to me, whatcha think? ;):cool:
I had that issue on starboard motor. Two or three flushes with Penray over three years didn’t do much. Last summer, while rebuilding the water pump, I ran about a half box of cascade through the system (24 gal cap) for an hour. I dissolved the stuff in boiling water then added and filled. Did it twice same day. Don’t know how many years the stuff accumulated, but it’s been nice and purple since.
 
Got down to the boat Sunday. We pulled the props off and got our primary and our spare set over to Intercoastal Prop in Gulf Shores, AL. My local prop shop seems to have closed their doors for good, so Intercoastal is new to us.

He was scanning our primary set yesterday afternoon, should hear something from him today. He thinks we should be able to get the rpm's we need out of one of the sets. Both sets look good and are good quality Nibral props. Our primary set is a 32x32.5, our backup set is 31x33.

We need to pickup approx 200rpms to reach our rated rpm of 2350 heavy.
 
Shot down to the boat Late wed night, picked up the props Thursday and installed them thursday afternoon. Intercoastal was able to pull about 2" of pitch out of them and removed some cup.

COLD and windy seatrial early Friday morning and we are definitely moving in the right direction!!

We were medium loaded and hit 2300rpm at WOT. EGT's at wot were down from 1000ish to 800ish. Little/no black smoke was visible in our trail. The engines sounded and felt happier.

We are about 50-100rpm's off where I want to be, which is 2350 loaded heavy. So we are going to pull the props off again and have Intercoastal shave some diameter off for us.

Hope to get down this weekend to pull the props.

Here are our current numbers with 32 x 30 - 3 blade props

Wot 2300rpm @ 23.5knt
2000rpm @ 19.5knt
1950rpm @ 19knt
500rpm twin 5.7
500rpm single 4.5


Looks like we should end up cruising around 18.5 or so which is good for me! I'm super stoked about the slower 500rpm single troll speed of 4.5.
 
Thanks for this thread. The coolant filters really appeal to me. I'm going to copy you.

Coolant Filter Head.webp
 
Got 2 coolant filters installed on the main engines. Was easy enough. I tied into an existing/empty plug after the water pump and returned to the top of the tank. I mounted the filters forward of the engines on the floor support cross members.

Filter mounting location, very easy access when in the ER.
49280794498_ac1b20e6de_c.jpg


This is the supply line. I did NOT drain the coolant to add this fitting. I had a crimped/zip tied short length of hose affixed to it. I unscrewed the existing plug and screwed this one in as quickly as possible. I estimate I lost less than half a cup of coolant in both engines combined (WEAR EYE PROTECTION if you do this, gravity is def against you and the coolant wanted to spray more than I had expected.

49280794543_75b014da20_c.jpg


Here is the return location. I had to use heat on every single plug I removed, hence the burned paint around them. Amazing how a little heat makes them so easy to remove.

49280794523_1be12bc34b_c.jpg


No pics of the filters attached but NAPA 4070 did indeed fit these filter heads.

Did not run the engines any to test for leaks (still waiting on a few tuneup parts), will update with progress when I do. Also, I plan on running these filters for approx 100hrs and then cutting them open. Will post pics here when I do.


My 8v71s have 1/4” plugs on each side of the Heat Exchanger, none on top. Im surprised you got enough flow through that. Also it seems like it would get plugged up with all the crap. Are your plugs larger?
 
My 8v71s have 1/4” plugs on each side of the Heat Exchanger, none on top. Im surprised you got enough flow through that. Also it seems like it would get plugged up with all the crap. Are your plugs larger?

Also, why did you tap into two plugs on top?
 
My 8v71s have 1/4” plugs on each side of the Heat Exchanger, none on top. Im surprised you got enough flow through that. Also it seems like it would get plugged up with all the crap. Are your plugs larger?

I don't think I'm following you. I returned my coolant to the top of the tank. It was fed from after the water pump. I would think you should be fine returning to the side/bottom..etc of the tank.

I have not noticed any clogging yet, you really think there is that much large particle junk flowing through the system?
 
Last edited:
Also, why did you tap into two plugs on top?

I did not tap either of the plugs in the top of the tank, both were there/plugged before I started.

In my pic the close fitting is coolant return, the far fitting is coolant tank pressure sensor. The goal for it was to trigger an alarm if coolant tank pressure dropped (indicating a blown hose and loss of coolant)
 

Forum statistics

Threads
38,156
Messages
448,739
Members
12,482
Latest member
UnaVida

Latest Posts

Trending content

Back
Top Bottom