Sam's is your source for Hatteras and Cabo Yacht parts.

Enter a part description OR part number to search the Hatteras/Cabo parts catalog:

Email Sam's or call 1-800-678-9230 to order parts.

Water intrusion with a horrific finding

  • Thread starter Thread starter ageless
  • Start date Start date
  • Replies Replies 16
  • Views Views 1,438

ageless

Well-known member
Joined
Apr 29, 2017
Messages
895
Status
  1. OWNER - I own a Hatteras Yacht
Hatteras Model
Not Currently A Hatteras Owner
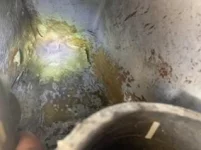
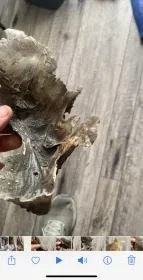
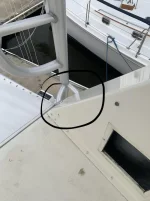
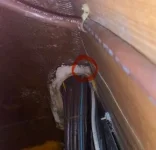
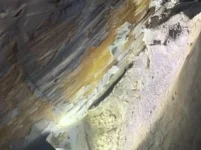
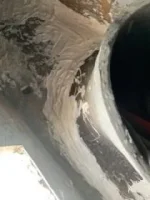
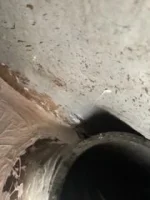
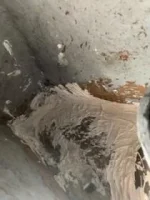
I'm running new steering lines from the engine room to the steering ram and notice some water on wires going into the AC breaker panel. Further inspections find water intrusion into panel, who knows how many electrical problems this could be causing. Intrusion is aft of where the wiring and cables run from the bridge. I noted what looked like some caulk so I commenced to digging it out and couldn't believe what I pulled out of there, no way Hatteras did that??!! My plan is to take a bore scope camera to try to visualize exactly where the intrusion is and epoxy it. Is there anything I'm missing here, other than some room to work?
 

Attachments

  • IMG_6110 Small.webp
    IMG_6110 Small.webp
    11.6 KB · Views: 295
  • IMG_8178764D5B60-1.webp
    IMG_8178764D5B60-1.webp
    9.6 KB · Views: 294
  • IMG_6111.webp
    IMG_6111.webp
    72.3 KB · Views: 303
That piece you found looks like the skeleton of an alien.
 
Why do you think that couldn't be factory work? They are great boats, better than the majority but they aren't hand built Bugattis either. I'm pretty sure the hatt factory had work hours on early Monday and late on Friday too
 
If it makes you feel any better, I found "made in china 1972" with a smiley face scribbled on the back of a few panels and one bulkhead. At least they had a decent sense of humor.
 
I don't know how relevant this is, but on my '84 52C there is a gutter and drain on the flybridge seating forward of your image.

Once when someone was washing my boat I heard gurgling above the salon windows from water flowing inside the walls.

It turned out that previous techs had accessed the opening inside the flybridge walls (behind the seating) from the forward hatch and kicked loose the drain tube from the gutter.

That was how water was arriving at a location near where you imaged. Just FYI.
 
My salon AC evap unit was mounted under the upper helm in what looked like a cartop camper box. The "drain" lines ran out and thru a deck penetration to the port engine room except that due to clogging the drain line didn't drain - the water accumulated until it overflowed and dripped into the salon. I actually installed a small baitwell pump and float switch and a drain line that ran out thru a thru-hull fitting into the scupper on the aft part of the flybridge. Then 2 months later I removed all of that because that AC unit had died and the evap unit and compressor were in the harbormaster's scrap metal bin.
 
I think most of us have had the leaky flybridge thing at some point, it's either the cumulative effect of needing to rebed the screws attaching it to the cabin top and/or the drains are blocked. The bridge has drains that run through the structure and out the sides, with little channels for the water to run through. If they're plugged water will overflow the channels and find its way into the cabin. I would start with clearing out the drains and see if you find a blockage and see whether that makes a difference. If it doesn't, then take a hose up there, position your buddy below, and start spraying to see where it's coming from. This is the only way I could ever really figure it out on my boat, rainwater can enter one place and pop out another, it's not always obvious. I will say this is a problem you want to take care of sooner than later, a little is okay, but after months/years of this, it soaks and rots out the coring in the cabin top. That is an expensive job.
 
Why do you think that couldn't be factory work? They are great boats, better than the majority but they aren't hand built Bugattis either. I'm pretty sure the hatt factory had work hours on early Monday and late on Friday too


LMAO--fair enough.
 
for those responses related to the drain hole there, I'm aware of it, HATE HATE HATE it. It never seems to stop draining after a wash. I sprayed water where the chunk of silicone(?) was and see the intrusion point behind the panel.

I was at the boat most of the day yesterday, Mother Nature had a different plan for me so I really didn't get anywhere.

CWW--I think you may be on to something here regarding the bridge to cabin connection. I really need to get that camera in there.
 
Camera didn't give me any OBVIOUS intrusion point from the bridge. In the pic the circle is indicating where water is seeping from that "caulk"? I can see to the right of that there is indication of water seeping in and down the wall the clamp is corroded. The caulk is for an 8" round rubber hose(?) Hatteras used for the cables and wires to feed through. What was odd, when leak testing, water sprayed around the hose didn't produce any intrusion, it didn't seem to appear until water was at the aft part of the space.
I really need some guidance here. I don't see any way to access the area in the pic to replace the caulk which would mean doing so from the bridge, which in itself poses the issue of access. There's an 8x8 square access to work through; my gut tells me to smooth out the aft area where the drain hole is and lay down some resin (low density ?). The area around the rubber hose appears intact in the areas I can see but it feels pretty ragged on the outboard side I can't see. I REALLY dread trying to dig out all the caulk from around the hose so I may seal the aft section, leak test again and see how things look.
 

Attachments

  • CC51A559-CE39-4C6A-AD06-BE4141C8D896.webp
    CC51A559-CE39-4C6A-AD06-BE4141C8D896.webp
    9.5 KB · Views: 94
I had water coming down from the bridge in a similar manner. I just caulked around the top. There was a piece of rubber hose wrapped around the wire bundle and stuffed into the hole that was cut through the hardtop. It was caulked in and the wires ran through that. I added caulk around that hose; didn't dig out any, just added more. I'm not sure if the caulk sealed the hose to the deck or just made a dam for the water to run around instead of going down there. But it worked.
 
I had water coming down from the bridge in a similar manner. I just caulked around the top. There was a piece of rubber hose wrapped around the wire bundle and stuffed into the hole that was cut through the hardtop. It was caulked in and the wires ran through that. I added caulk around that hose; didn't dig out any, just added more. I'm not sure if the caulk sealed the hose to the deck or just made a dam for the water to run around instead of going down there. But it worked.

LOL--results are what count.
 
On the 55c the water typically gets in from the bench drain mentioned previously. That drain free flows into the area under the helm with an intent for it to flow through to the small drain hole at the rear of the fly bridge. If you stand in the cockpit and look up where the bridge hangs over the bridge deck a couple of inches you will see it. The issue is the caulking around the hose where the wires go to the panel below deteriorates letting the water go down there. You may even find it leaks to the engine room as well.

look up R A Clarksons post on this. He fabricated a trough for the water to run in to get to the hole. I fixed my 55c by running a copper pipe from the bench drain to the drain hole. You probably won’t be able to easily fix the area where th wires penetrate unless you use foam or similar but then you have to dig it out when you pull new wires or cables
 
I was finally able to get a good view of what I'm dealing with. The second pic is what I believe represents the culprit, I'll be doing some caulking today.
 

Attachments

  • IMG_6187 Small.webp
    IMG_6187 Small.webp
    9.4 KB · Views: 55
  • IMG_6193 Small.webp
    IMG_6193 Small.webp
    14.5 KB · Views: 56
it sure isn't pretty but I'm confident it's useful. Sanded a lot of paint and dirt around the edges, shop vac, acetone cleaning, 1 tube of gorilla heavy duty construction adhesive. After sealing all the places I thought intrusion could occur, I utilized the remainder of product and built a dam on the fore side of the rubber hose to hopefully detour the water toward the drain with no means to travel behind the hose. I find caulk easier to clean up dry so I'll get a lot of the slop cleaned up, once leak test is passed, slap on a Coat of white paint.
 

Attachments

  • 3BE12BFD-DEC7-4B53-9EF9-EDC5ACBA391B_4_5005_c.webp
    3BE12BFD-DEC7-4B53-9EF9-EDC5ACBA391B_4_5005_c.webp
    8.3 KB · Views: 33
  • 7601291C-FEA6-4C19-BAB2-D96FF95397A6_4_5005_c.webp
    7601291C-FEA6-4C19-BAB2-D96FF95397A6_4_5005_c.webp
    8.6 KB · Views: 33
  • F5AAFCD7-523B-433E-9BB9-331710DF533E_4_5005_c.webp
    F5AAFCD7-523B-433E-9BB9-331710DF533E_4_5005_c.webp
    10.6 KB · Views: 33
Last edited:
Looks good. Hopefully that does it.
 

Forum statistics

Threads
38,156
Messages
448,748
Members
12,482
Latest member
UnaVida

Latest Posts

Trending content

Back
Top Bottom