Sam's is your source for Hatteras and Cabo Yacht parts.

Enter a part description OR part number to search the Hatteras/Cabo parts catalog:

Email Sam's or call 1-800-678-9230 to order parts.

Stupid is as stupid does!

  • Thread starter Thread starter danshat
  • Start date Start date
  • Replies Replies 17
  • Views Views 6,096

danshat

Active member
Joined
Jun 16, 2007
Messages
143
Status
  1. OWNER - I own a Hatteras Yacht
Hatteras Model
34' DOUBLE CABIN (1963 - 1966)
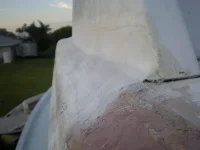
So in my infinite wisdom I figured it would be a pretty easy job to take my non flybridge model 34DC and make it......wait for it.....yup a flybridge model. I put the flybridge up yesterday (and yes that was fun.) Won't do that with two guys and a rope again :) I quickly noticed that it was not a flush fit. Evidently the top sloped down to the original windshield location. Oops. Now I have a 1" gap from the bottom of the flybridge to the top of the roof. My thought is that it won't be to difficult to fix with some high density filler but then i've been wrong before
 

Attachments

  • P9230003-1.webp
    P9230003-1.webp
    11.3 KB · Views: 215
  • P9230004-1.webp
    P9230004-1.webp
    11.5 KB · Views: 213
How were you planning on attaching it. That could help with guidance on what to do next.

If I were glassing it in smooth I would level everything fore, aft and athwardships before I scribed the cut line. After that I would glass it in on both sides and make it smooth. make sure it is exactly in place before you cut.
 
I feel your pain.

Had a similar project on Passages but not on the scale of yours. 2 ways to approach this. First is to see if you can contour the base of the peak by grinding the bottom. It'll be a PITA but may save considerable effort by not having to build up the sides.

Second option is to leave the forepeak as is and use HD filler to build up the sides. You will be surprised by how much filler this will consume. Because of this, I would suggest coring with Baltec and covering with epoxy. You could use Dyvinicel (sp?) for the core. It will be easier to shape but that material has weak structural integrity. You'll need to reinforce it with strong support pillars around the sides.
 
I would love to glass it in smooth and not have all of the screw heads sticking out. Just personal preference. My big concern is that if I permanently attach the FB then it will put me above the 13' 6" or whatever it is for transport. I think if I cut a piece of 1" pvc in half and glass it down at the low spot (for drainage) and then fill the gap with HD filler I should be ok. I guess I could put a layer of plastic between the FB and the filler so that it wouldn't be permanent yet. Am I overthinking this?
 
Remember there is the easy way, The fast way, The right way and the Hatteras way. Why would you need to take the bridge off to transport it. Where to?

I would either scribe the base and make a flange if It has to come off later or glass it in.

As for PVC and other hard fillers. I try to stay away from them as they offer very little. Try Coosa or some other closed cell foam products that adhere better and will not de-laminate later.
 
Hey Dan...
Jims correct about placement before you do anything. Both of my boats have the bridge secure around the outside and inside with exposed screws.
I purposely did my Roamer like that with finish washers.
I would locate it and secure it with a screw on each corner. Thats at the least a datum point. My Roamer had the same gap... it was off of a Uniflite and was merely a close fit. After locating it, I continued with 1/4-20 machine screws drilled and tapped into the roof. After about 2 days of going around and around with a half turn on each screw, it pulled together at LEAST 90 percent if not better. Between the two parts, theres a lot of flex.
If after that, youre not satisfied, raise it up and skin off whats high. I bedded mine with 5200, but never intend on moving it; at least not on this planet! ws
 
I just re-read your second post about no screws. Id still fit and bed it, then pull the screws and do your fairing from there. I just happen to like the industrial look of exposed fasteners; all polished Stainless heads of course.
ws
 
Hey Bill do you line up the slots in the screw heads too?

I had to do a project like that a while back. The owner wanted all the slots to line up. I used TORX heads and it was easy. Fixed him good. I also had a guy with the "plugs go across the grain at 90 degrees" idea. Needless to say my helper back then was of no help. He put in the pugs at random.

Oh no. I may be guilty of those types of things. Is that bad?
 
Damn amatuers!! I run my plugs at 45s !! Unless you really need them hidden, then they come out of the same board. ANAL people really suck dont we, er I mean they. The worst part is they are all self appointed judges ---
Just wait till November ! No more patronidge or nepotism; yea right! ws
 
It's fine if you pay me by the hour.
 
Hey Bill do you line up the slots in the screw heads too?

Slotted screws are SOOOO barbaric ! I go along and replace them as needed! You shouldve really thrown that guy a curve and used tamper proof torx! ws
 
My factory installed aluminum rub rails have all the slotted screws all lined up. How did they do that!?! How could they predict when all the screws would be down flush, tight, and lined up? I gotta say, I am baffled.
 
My factory installed aluminum rub rails have all the slotted screws all lined up. How did they do that!?! How could they predict when all the screws would be down flush, tight, and lined up? I gotta say, I am baffled.

They just install the screws that are too small for the holes. It's easy, you just push them in, no twisting involved. :)
 
Years ago when I started to do antique show cars I to was amazed that you could line up all the slot heads and even the hex head bolts. Then I realized that they were lined up whether they were too tight or normally , because you don't want to crack the expensive chrome job you did, you leave them loose. These cars I realized are only driven on the showground for a few minutes and can never be run again on the road without retightenning every nut and bolt on the car. Another thing that is routinely done is that much heavier grades of oil are used so that there isn't any unsightly leaking, and sometimes oil is completelely omitted in places like the old shocks and gearboxes so there isnt any leaking.
So now when I see every nut and bolt or screw lined up I chuckle to myself and realize that it is not a mark of quality , but a mark of vanity. Give me the unlined up look anyday and give me properly torqued screws and nuts.
Just my opinion---Pete
 
Well I opted to not have to worry about lining the slots up. Not bad for my first piece of fiberglass work.
 

Attachments

  • P9250001.webp
    P9250001.webp
    14.4 KB · Views: 55
  • P9250004.webp
    P9250004.webp
    10.6 KB · Views: 55
Properly aligned screw slots has a long proud history and with all due respect Pete, you may be correct today, but in the "olden" days when craftsmen actually took pride in their work, it was considered a requirement in high quality workmanship.

My father-in-law was a good case of point. He an his wife and daughter came to the US from Holland (Rotterdam) a few years after the end of WW 2. He was a mechanical engineer by profession and could have had a very good life in Holland but he had a soft spot for the US since he was rescued from a Nazi prison camp by US troups. Upon his arrival here he went to work for Englehardt industries and quickly was recognized as a true craftsman.

One of the many things he taught me was the importance of details when doing quality work. Aligning the screw slots was extremely important but time consuming. Assuming you had 15 or 20 screws which needed to be installled, you started out with maybe 50 or more. The idea was that you hand tighten all the screws to the same torque by feel, if a screw slot was not in proper allignment, out it came and another was inserted and so on until all slots matched. Does that make for a better bonding of parts? No, but it looked good and was a sure sign of high quality...........

Walt
 
You are sooo right Walt ! The only point I digress is that although extremely high in quality a yacht is even more tedious when you consider all the maintenace that yachts require. The redundancy here is not meant to include clorox boats.
Sometimes those dang square head screws are hard to line up, but thank goodness the judges have a gauge to check all the heads on a walkthrough.
;-) ws
 

Forum statistics

Threads
38,154
Messages
448,719
Members
12,482
Latest member
UnaVida

Latest Posts

Trending content

Back
Top Bottom