Sam's is your source for Hatteras and Cabo Yacht parts.

Enter a part description OR part number to search the Hatteras/Cabo parts catalog:

Email Sam's or call 1-800-678-9230 to order parts.

*siboney 2.0* structural repairs - 1972 58' yachtfisherman

  • Thread starter Thread starter MarioG
  • Start date Start date
  • Replies Replies 73
  • Views Views 157,469
That looks great! Its real piece of mind having that project complete. Did you support the lower skin/battens while you had all that weight holding down the lose top skin and core? I recall on mine the bottom skin was nowhere as thick as the top skin and I couldn't see weight as my solution for fear of distorting the camber.

the bottom skin was pretty solid enough to build upon with little flexing im guessing due to the framing on the underside where the lighting and headliner is attached to. on the YF the camber in the forward deck isn't that pronounced. it was no factor and any remining irregularities was resolved during fairing in prep for paint..
 
Re: *Siboney 2.0* structural repairs - 1972 58' yachtfisherman UPDATE!

Hi guys! sorry for not posting updates more frequently, but it has been a marathon to complete the structural repairs ahead of the engine installation {next week}.

this portion of the thread is specifically about the dreaded rooftop core rot and water leaks and how I tackled this major problem that many of us know very well. it all started a long time ago when I would notice water dripping down in the corners above the side salon doors and also out of the outboard wire conduits in the ceiling of the engine rooms, usually shortly after a hard rain shower we typically get down here in south Fl. I did the usual recalking of all the flybridge screws but will little success. I suppose for a while I just "delt with it" until a better solution was found. Yes, there was a deep "sag" in the salon ceiling that was visible above on the flybridge and below in the salon about mid ways going forward. Unfortunately my OCD had other ideas that lead me down one hell of a rabbit hole.
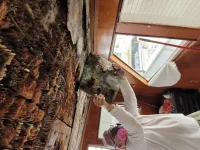
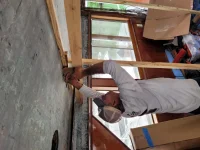
So in the beginning of this year, after I pulled out the old engines, and contemplated my next moves as I staired down into the abyss of the two now empty engine rooms, I came to the conclusion that before i embark on putting in two shiny brand new engines, and everything that goes with that, I must address what's above me before what's below me happens. So with that said, I reinstalled the engine room sole hatches and focused on tackling the rooftop problem. But first, let me back up a little bit, about 10 years ago, I really wanted to solve the rain water "pooling" issue that 53MY/58s and up seem to have. apparently, and I could be wrong on this {please fact this} but it seems that the factory in order to 'help" with water drainage from the bridge, small holes were constructed into the bridge wall where the wall meets the rooftop. I assume the idea was that any water pooling would flow through these holes, into the inside of the flybridge and then migrate to another hole on the outside bridge wall and flow out and down over the sides. little did I know that this process was the leading cause of core rot. So in an attempt to solve this seemingly silly solution, I proceeded to remove all the screws holding down the bridge and glassed in the bridge to the rooftop permanently. then glassed in approximately a 2' section of 1.5 inch dia fiberglass tubing into each forward corner on each side of the flybridge. This did solve the water pooling issue, but it did teach me a lot of the major underlying problems that I would find later. while I was inside the flybridge glassing in the fiberglass tubes, I noticed that the backside of the flybridge wall that met the rooftop deck was essentially bare of any sign of calking or sealant. that thought never left my mind. for a while the leaks seemed to slow down but I knew that was a ticking time bomb. eventually after a few seasons, the leaks were back. this time, I knew where I needed to go. so with a 2" hole saw in hand I headed back up to the fly bridge and proceeded to drill a series of holes along the bridge wall starting drilling just aft of the drain tube and worked my way aft along the wall. immediately, upon drilling out the first hole I noted that the core was essentially gone. literally hollowed out and wet. the subsequent holes drilled further aft were the same until I reached as far back as the flybridge hatch. I knew at that moment that the roof core was gone and there was no easy way to fix it.
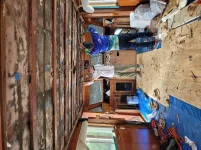
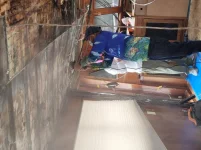
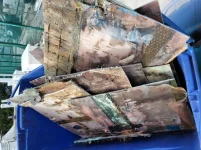
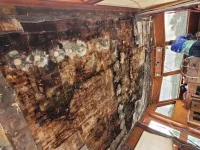
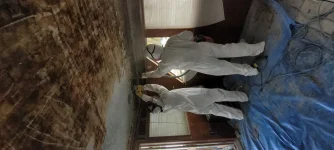
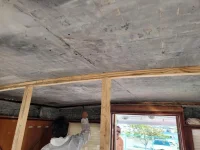
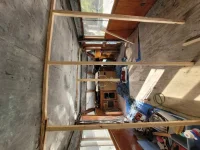
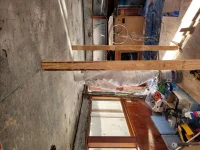
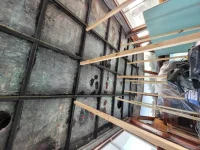
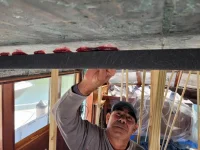
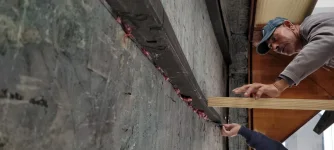
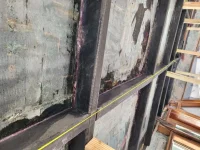
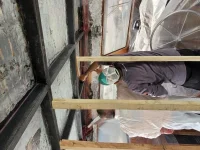
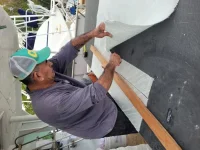
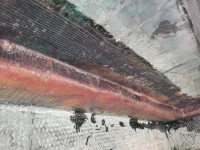
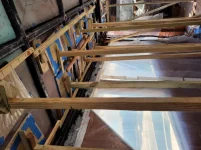
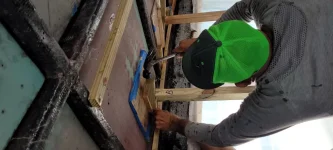
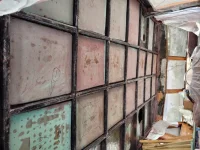
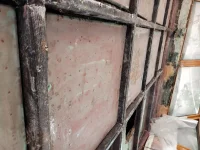
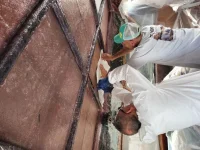
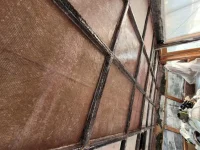
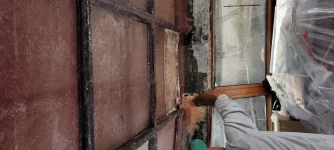
Fast forward back to now, since I already had the entire salon interior removed to facilitate the engine removal process and having the salon floors already covered and protected, I proceeded to rip down the entire headliner. it was evident that the bottom side of the fiberglass of the roof was showing signs of moisture with patches of brown stains and water marks. my plan was straight forward, cut off 3 foot square sections of the bottom skin of the fiberglass roof and see where it all goes. well, as you will see in the pictures, it quickly turned into a major nightmare.

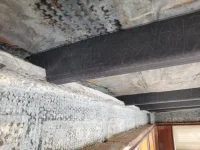
BE ADVISED, THE FOLLOWING PICTURES OF THE INSIDE OF WHATS LEFT OF THE BALSA CORE IS NOT FOR THE FAINT AT HEART! I SUGGEST YOU SIT OR LIE DOWN. :) :)
 

Attachments

  • 20240122_085945.webp
    20240122_085945.webp
    111.5 KB · Views: 107
  • 20240122_092423.webp
    20240122_092423.webp
    109.7 KB · Views: 106
Last edited:
Cutting off the bottom fiberglass layer.

sorry about the sideways pictures. this forum cannot edit uploaded pictures.
 

Attachments

  • 20240122_140907.webp
    20240122_140907.webp
    92.9 KB · Views: 106
  • 20240122_133305.webp
    20240122_133305.webp
    112.8 KB · Views: 103
eventually the entire ceiling needeed to be cut away exposing the major damage. the rot and mold was horrible and disgusting. but we pressed on regardless.
 

Attachments

  • 20240122_142640.webp
    20240122_142640.webp
    104.4 KB · Views: 105
  • 20240122_142616.webp
    20240122_142616.webp
    118.5 KB · Views: 110
after getting over the inital shock of the immensity of the size of the problem, we proceeded to grind away all the rot all the way smooth to the upper fiberglass surface.
 

Attachments

  • 20240124_105247.webp
    20240124_105247.webp
    76.8 KB · Views: 104
  • 20240124_114844.webp
    20240124_114844.webp
    89.3 KB · Views: 104
  • 20240124_153349.webp
    20240124_153349.webp
    106.9 KB · Views: 106
and more grinding
 

Attachments

  • 20240124_153421.webp
    20240124_153421.webp
    62.1 KB · Views: 107
  • 20240127_095808.webp
    20240127_095808.webp
    94.5 KB · Views: 105
  • 20240127_095749.webp
    20240127_095749.webp
    98.1 KB · Views: 105
if you notice in the last picture above, you will notice that i used a floor jack to push up the sagging rooftop back up close to where it belonged. note, the ceiling has a radius that is more pronounced over the aft salon doors and shallows out as you move forward. the fwd section above the helm is a very shallow radius when compared to the aft section. go easy on the jack so you don't rip off the roof top from the salon sides! in order to keep the rooftop from sagging in further, we placed a series of 2" studs to stabilize the roof.
 

Attachments

  • 20240127_090624.webp
    20240127_090624.webp
    101.5 KB · Views: 108
So now that the entire roof was cleaned of all the rot. i designed a truss interlocking grid system made of 1.5" thick Cusa board. we traced out each individual truss to take into account the specific radius and uneven imperfections that each truss required. we did this by simply nailing a length of 4" board to the very top of each stud holding up the roof. then with a pencil and a cardboard cut out to track along the ceiling while the pencil transposed the pattern onto the board. I numbered each board to keep them in order then took the boad off and with a jigsaw cut out each unique pattern. from there, i took the patterns to by cousins CNC machine, we traced the patterns onto a large paper and took a digital picture of it and uploaded it to the CNC machine. after a few test cuts, we proceded to cut out the trusses on the CNC. the CNC did etch the numbers on each truss
 

Attachments

  • 20240127_174446.webp
    20240127_174446.webp
    90.2 KB · Views: 107
  • 20240127_232913.webp
    20240127_232913.webp
    102.4 KB · Views: 107
from, this moment forward we were all cheering up do to the fact that we were finally constructing and not demolishing. it was nice and fun to see my grid system go up easily. they all snapped together like Legos. very satisfying.
 

Attachments

  • 20240127_120634.webp
    20240127_120634.webp
    83.9 KB · Views: 100
  • 20240129_122535.webp
    20240129_122535.webp
    97.3 KB · Views: 103
  • 20240129_122756.webp
    20240129_122756.webp
    95.9 KB · Views: 100
nice fit
 

Attachments

  • 20240130_154137.webp
    20240130_154137.webp
    107.7 KB · Views: 99
we made a mix of vinylester resin and chopped glass to make a structural putty and bonding agent.
 

Attachments

  • 20240129_132936.webp
    20240129_132936.webp
    92.7 KB · Views: 99
  • 20240129_133503.webp
    20240129_133503.webp
    84.4 KB · Views: 101
the grid with only the vinylester resin glass mix already gave the roof a much more solid feeling. we were definitely on the right track.
 

Attachments

  • 20240130_154351.webp
    20240130_154351.webp
    106.9 KB · Views: 102
  • 20240201_113159.webp
    20240201_113159.webp
    102.9 KB · Views: 99
sections of Cusa board and fiberglass was used to give structure to the rooftop to the salon wall sides meets. this is particularly important that this be done correctly because of the need to structurally reattach the roof to the salon walls and also very importantly the Cusa needs to reach deeply approximately 5 inches into the core that extends from the inside of the salon/rooftop and into the previously hollowed out and cleaned void extending outwards into the passageway overhang outside.
 

Attachments

  • 20240201_102900.webp
    20240201_102900.webp
    105 KB · Views: 101
once the cusa trusses were in place, we proceeded to glass in the cusa using 4 or 5 dayers 1708 and mat.
 

Attachments

  • 20240201_120700.webp
    20240201_120700.webp
    96.6 KB · Views: 102
fiberglass bonding
 

Attachments

  • 20240201_110002.webp
    20240201_110002.webp
    114.2 KB · Views: 96
  • 20240201_105949.webp
    20240201_105949.webp
    108 KB · Views: 101
once the entire grid structure was glassed to the roof and sidewalls, we began the coring process. this involved the use of approximately 2' squares of 5/8" scored and perforated 8 Lb closed cell foam to fit tightly inside each individual squares in the truss grid. NOTE, in my opinion, the foam board should be scored in a 1" grid pattern about half way deep and also perforated. the reason for this is simple, during the laminating process the resin will fill in the groves of the scoring and the perforations, essentially adding strength and structure to the foam internally. each square section was given two layers of 1708 and two layers of mat on the topside, then each resin saturated square was lifted into place into the truss grid. pressure was added evenly to each section by using a plywood square with plastic and a wood stud pushing it up. this process was repeated for each truss square.
 

Attachments

  • 20240212_124044.webp
    20240212_124044.webp
    93.2 KB · Views: 95
  • 20240212_112822.webp
    20240212_112822.webp
    91.4 KB · Views: 98
  • 20240212_112710.webp
    20240212_112710.webp
    94.3 KB · Views: 98
once all the foam boards were in place we were confident that all the support studs could finally removed. at this point, which is about 3/4 of the way finished, I got to finally climbed up to the flybridge for the first time. and for the first time, in a long time, there was no more sagging or soft trampoline like bounciness like it used to be. in fact the flybridge sole felt solid as a rock. with this great news we proceeded to finish laminating the underside of the entire grid truss system.
 

Attachments

  • 20240211_114437.webp
    20240211_114437.webp
    101.8 KB · Views: 96
  • 20240211_114457.webp
    20240211_114457.webp
    101 KB · Views: 98
  • 20240214_131417.webp
    20240214_131417.webp
    108.7 KB · Views: 96
Last edited:
more laminating
 

Attachments

  • 20240213_153653.webp
    20240213_153653.webp
    115.7 KB · Views: 98
  • 20240213_153628.webp
    20240213_153628.webp
    110.2 KB · Views: 100
  • 20240214_131244.webp
    20240214_131244.webp
    107.7 KB · Views: 99

Forum statistics

Threads
38,156
Messages
448,726
Members
12,482
Latest member
UnaVida

Latest Posts

Trending content

Back
Top Bottom