Sam's is your source for Hatteras and Cabo Yacht parts.

Enter a part description OR part number to search the Hatteras/Cabo parts catalog:

Email Sam's or call 1-800-678-9230 to order parts.

Reviving the "Finally in the paint booth thread"

I'm sad to say we haven't made any headway. The plan was to be complete by Oct 31 but the hurricane has slowed me down. The owner of the business where the boat is stored has suffered considerable damage on his personal home and the trailer that I was using to stay in while working had a building fall on it. Luckily the trailer is usable but it had to be moved and we will have to find a place to set it back up.

I have an office in Wilmington NC and several of my employees there have lost their homes so I am trying to help them pick up the pieces before thinking about the boat. The boat was inside a building and did well in the storm so I was very lucky.

Plan is to be back in mid November and try to push hard to get it done by the end of the year. i will post pics as we get them. I appreciate you asking.
 
Sorry to hear about all that, but you’ve got your priorities straight. Good luck and we look forward to your continued progress on your great boat!
 
I finally got back to Beaufort and a little work has been done. I will say that driving back thru Morehead and Beaufort there was more damage from hurricane Florence to be repaired than I thought. So there are lots of people still putting their lives back together.

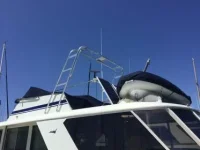
The davit is installed, got handrails back in place (2 coats West Marine clear epoxy, 7 coats or Alexseal clear), Got the structure for the tender in place and the stainless rails installed on the back deck.

got both port and starboard cabinets installed, now need to finish installing doors and icemaker. Still need to finish the ladder to the flybridge. Got doors installed at the pilothouse, now waiting for the hardware which was sent out to be re-chromed to come back.

Got lots of buffing and polishing to do on the new paint.

Plan is to be back in Wilmington in March.

I need some help from the crowd here with a couple questions:

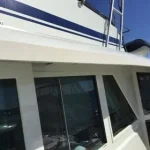
1. I was going to put teak trim around the (eyebrow???) or overhang on the side decks but I'm ready to get her done. I remember seeing on the forums someone had used a roll of RV trim that simply stuck on. I was looking for something like that but most everything I found was an inch tall or less. Does anyone know what this is and is there anything taller than 1"? The overhang is about 2" tall and I wanted to cover most of that distance if possible.

2. The surveyor said I need to change the receptacles to GFCI. The insurance company will not renew my policy until I do this. is it as simple as replacing the outlets with the new GFCI plugs or do I need to do something regarding grounding back at the panels?

3. I have fine mesh screen scoops on the engine intakes and strainers on the engines in the engine rooms. Surveyor recommends replacing the scoops to large mesh. Can I remove the strainers in the engine room and leave the fine mesh scoops under the boat or do I need to do as he says?


Appreciate any help

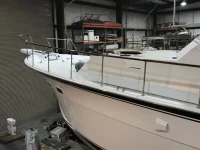
hand rails going back on
port side bow.webp

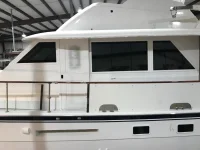
Pilot house doors on and dodger boards being installed
port side.webp
 
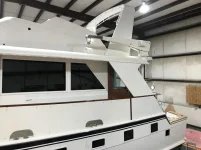
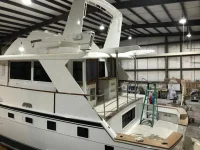
Davit finally installed, got a little more wiring to do to make it work.
port side stern low.webp

port side stern high.webp
 
Looks nice!

Changing a receptacle to a GFI protected outlet is as simple as replacing it with a GFI receptacle. If outlets are daisy chained the first one can protect the subsequent outlets. Make sure you put the right wire on the right "side" of the outlet. There's labels on the back to keep you from doing it wrong.

OR, you can replace the breaker on the panel with a GFI breaker for the entire circuit.... less work more $$.

Get yourself an outlet tester with GFI push to test to make sure you did it right, especially if you have to pay the surveyor to come back and verify.

https://www.amazon.com/Receptacle-T...&qid=1548186786&sr=1-5&keywords=outlet+tester
 
Last edited:
1. I was going to put teak trim around the (eyebrow???) or overhang on the side decks but I'm ready to get her done. I remember seeing on the forums someone had used a roll of RV trim that simply stuck on. I was looking for something like that but most everything I found was an inch tall or less. Does anyone know what this is and is there anything taller than 1"? The overhang is about 2" tall and I wanted to cover most of that distance if possible.

Assuming the 2" wide piece you want to cover isn't finish painted like the rest of the boat to not cover it?
Some ideas. Flatback stainless rubrail nicely polished. Very pricey.
New product, stainless wrapped around vinyl with flat back.
https://www.mate-usa.com/en/product/s-s-rub-rails-316l/by-the-bar-2

Sort of just like solid rubrail, no idea of the cost.
Solid vinyl half oval, or other shape. Maybe paint it to match or contrast color or faux teak it?
http://barbourplastics.com/wp-content/uploads/2015/10/Barbour-catalog-2015-WEB.compressed.pdf
Some sort of acrylic in white, or other color polished. Seems like lots of work.
Would be worried with any of the stick on products using 2 way tape, don't like the open edge on the top for water intrusion and UV damage. Also always afraid it will pull off paint if it comes loose.

2. The surveyor said I need to change the receptacles to GFCI. The insurance company will not renew my policy until I do this. is it as simple as replacing the outlets with the new GFCI plugs or do I need to do something regarding grounding back at the panels?

Should be able to just change to GFCI receptacles as long as you have all 3 wires to use.

3. I have fine mesh screen scoops on the engine intakes and strainers on the engines in the engine rooms. Surveyor recommends replacing the scoops to large mesh. Can I remove the strainers in the engine room and leave the fine mesh scoops under the boat or do I need to do as he says?

Removable screens on the scoops? Replace with larger mesh? Or drill out the holes making them bigger? Hate to see you have to take stuff apart at this point when its all about putting it back together to get back in the water. Boat looks great BTW.
 
I am the one who used the RV drip edge, problem was it did not hold enough water to keep it from dripping down my aft windows, took it off and replaced with a pvc board cut to 2 inches and painted to match the boat. Installed with 3M double stick heavy duty tape then caulked on the inside. Put drains on the aft corners. This works like a champ and looks good also. John
 

Attachments

  • 8EFB79D5-1C61-4DA1-8EB6-DB17F01D65CD.webp
    8EFB79D5-1C61-4DA1-8EB6-DB17F01D65CD.webp
    11.9 KB · Views: 167
  • EE3EA189-D29B-479C-ADBF-85EAE431FCBE.webp
    EE3EA189-D29B-479C-ADBF-85EAE431FCBE.webp
    10.9 KB · Views: 167
Hi John,

Could you please photograph or draw the profile of the PVC that you used??

Is it possible to take a photo closer up as its difficult to see where the PVC is set against the roof/flybridge rim. From a distance in the photos ist a great replacement for my corroded aluminium strips.

Thanks.
 
It is a 2 1/2 inch piece . The bottom lines up with the bottom of the edge of the deck and forms a trough for run off water to lay in. I stopped it just forward of the pilot house doors so it can drain and I put 1/2 inch pvc pipe drains in the aft corners. Painted it all same as the boat.
 
what a labor of love! Very impressive and inspiring!
Who made your cabinets and what did they cost? have one on my rear deck I need to replace.
 
Bring her to Baltimore Inner Harbor East Marina on Wednesday, Thursday, Friday and Saturday for the Hatteras Classic Club Annual Rendezvous the week after Labor Day weekend In September.
She would be tha Queen of the Rendezvous!
 
Scarlett, thanks for the update on rubber drip edge. I have cancelled my order and looking to do what you did.

Tomrealest, I made the cabinets myself. I think on one of my other threads I posted some pics of when I started them. I had the boat in the slip and used some cardboard to get an idea of what I wanted to do. Used 1/2" marine plywood and purchased 2" prefabbed radius corners. Its a thing! I didn't know you could buy those corners. I started fiber-glassing and finishing them and glued them in place. The guys at the shop did the final fairing and painting.

I have done all the wood work and finishing the tops which are teak veneer with several coats of west epoxy and Alexseal clear. The thing I really wanted to do with the cabinets is to pull in the distance the old ladder extended into the deck. The cabinets are 23" deep but the old ladder was about 30" deep extending into the rear deck. It "feel" a lot different when standing out back on the deck.
 
Looks nice!

Changing a receptacle to a GFI protected outlet is as simple as replacing it with a GFI receptacle.

Also, don't do what I did and buy a whole box before you know the depth of the receptacle boxes. On my boat Hatteras used pretty shallow boxes (the bulkheads are pretty thin) and the new GFCI's did not fit!

The search terms to get proper ones is "slim GFCI" :-)

DAN
 

Forum statistics

Threads
38,155
Messages
448,721
Members
12,482
Latest member
UnaVida

Latest Posts

Trending content

Back
Top Bottom