Sam's is your source for Hatteras and Cabo Yacht parts.

Enter a part description OR part number to search the Hatteras/Cabo parts catalog:

Email Sam's or call 1-800-678-9230 to order parts.

Replacing rudder shaft cutlass bearings

  • Thread starter Thread starter Gracious
  • Start date Start date
  • Replies Replies 10
  • Views Views 6,672

Gracious

New member
Joined
Dec 20, 2006
Messages
1
Hatteras Model
42' CONVERTIBLE (1971 - 1978)
I pulled the rudders on my 1975 42C yesterday. They appear in pretty good condition with some minor pitting in the packing area. I am just going to clean it up best I can and repack. The cutlass bearings look like they are the original bearings and are severely worn. I would like to replace them but did not see any obvious way to jack them out. There does not appear to be any set screws holding them in place. Are they just a press fit and the rudder itself holds them up in place? Any ideas out there on how to remove them without damaging the housing. Also, does anyone know of a source for this type of technical information for this boat. When I bought the boat several years ago I ordered the manual from Hatteras but it does not contain this type of info like bearing sizes etc. Is there a more comprehensive maintenance manual that goes above and beyond the regular owners manual that comes with the boat. Thanks for the help.
 
They are just a press fit. I have always sliced them with a saw blade and pushed them out with a drift. They can be a pain. Check for set screws as sometimes people add them after bearing replacement.
 
They can be a pain. Check for set screws as sometimes people add them after bearing replacement.

Correct on both and for the set screw I got it good last year. It looked like no set screws turned out someone put bronze screw in cut them flush then sanded them. With a couple coats of paint you could not tell. I suggest sand all the paint off the strut down around cutlass first.
 
If it is a 2" rudder shaft, it should take a 2-5/8" OD bearing.
 
If it's like the 53MY rudder glands, yes it's a press fit which is so tight it holds itself up, and it's a pain because there is a flange around the top of the case which prevents you from reaching it from the top using a drift to get the old one out after it is cut. I think the guys that had set screws were for propshaft bearings, not rudder bearings. You said "cutlass" when you asked, which is only on a propshaft. You can't reach rudderports to put setscrews into them, because they're surrounded by hull. Here's what I did to fix the top flange access problem and replace my rudder bearings, which are 2" rudder shafts on a 53MY:

1. Buy a 2" propshaft bearing from SAMs and cut in in half (machine shop type cut, not a hacksaw, or at least file the edges perfectly). The rudder bearings are exactly the same as 1/2 of a propshaft cutlass bearing.

2. Remove the rudders, like you already have,

3. cut the old bearings in half with a sawzall, being careful about that top flange, which can break your saw blades when you hit it coming up from the bottom. Since the bearing to sleeve fit is not a moving part, it doesn't matter that you'll nick it a lot with the saw blade when it goes through the bearing. You do have to cut it on both sides or the bearing will be too strong to get out. At least one side has to be all the way through the bearing from top to bottom.

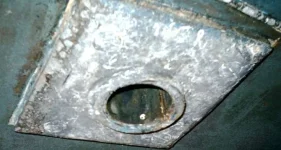
4. Drill a hole at the bottom of the bearing on one side, which you'll use to pull it down. After it's cut and drilled, it'll look like the picture "cut & drilled" below. If it's completely cut through on 2 sides, it may just fall out. I could only get it completely cut through on one side.

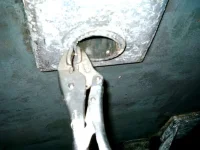
5. Use a punch or drift to lever it out a little, as in picture "punch removing". I hit the punch with a hammer after I had it set with a wood block to act as a lever. I only needed to get it out 1/4 inch.

6. Grab it with ViseGrips as shown and pull or lever it out.

7. Clean and smooth the inside of the sleeve. This is important! The press fit new one won't go in if there are any dings or cuts with edges or bumps sticking out past the original round tube surface. I just filed the cuts with a round metal file until the edges were below the sleeve tube sides. Also file and smooth the outside edge of the top of the new bearings a little so you can start them into the sleeves easier. Oil both the bearing and the inside of the sleeve.

8. Get a big honking jack, like they lift boats with. Put a big strong wood block on the jack and put the bearing on top of the wood block. Use the jack to press the bearing upwards into the sleeve. I put the original chamfered rubber ends down so it's easier to get the rudder back in the new bearing, but I don't think it matters. Be careful not to jack your boat off it's braces when you do this. The bearing takes a lot of pressure to press fit it in. It goes all the way in until it's even with the sleeve end.

Good Luck,

Doug Shuman
 

Attachments

  • cut & drilled.webp
    cut & drilled.webp
    40.4 KB · Views: 109
  • punch removing.webp
    punch removing.webp
    36.7 KB · Views: 104
  • vise grips.webp
    vise grips.webp
    44.8 KB · Views: 100
Last edited:
Having just been through this nightmare......I did learn something form the yard Monkeys. When they installed the rudder bearings......they polished both the housing and the bearings...all the way down to 600 grit. But then....and I thought this was pretty cool, they did a little "Dukes of Hazard" thing in their Golf Cart; booking from the shop to the boat.....

Come to find out, they put the new bearings in the freezer overnight, ran em out to the boat one at a time and were able to set them with a 3 lb sledge and a 2 X 6. They figured they had about 3 to 4 minutes total to set them before they "swelled" back to normal......

FWIW. Thx.
 
Dry ice works even better. You may not even need a hammer. We use regularly to put in bucket pins on the big excavators.
 
Double check with the bearing manufacturer, I know Morse warns against using dry ice as it may cause the rubber to seperate from the shell.
 
SKYCHENEY said:
Dry ice works even better. You may not even need a hammer. We use regularly to put in bucket pins on the big excavators.
I was told that dry ice is too cold and may cause the rubber to seperate from the metal in the bearing. I had the bearings in the freezer over night and in a cooler with dry ice for about an hour. The yard strongly suggested that I get the dry ice out of the cooler. It's been a year and so far no problems. These were shaft cutless bearings. The yard thought that the "slow" cool down is what saved the bearings (slow meaning freezer to dry ice, instead of ambiant air temp to dry ice). I used a 1/2 inch threaded rod with large washers on either end to crank the cutless bearings in. It helps to have an air powered wrench. My wrench didn't have enough torque so I had to use an 18" inch rachet. 5 - 10 minutes of cranking got the arms burning!

Mark
 
Good point regarding dry ice and the rubber components. We have only used it on solid steel pins. I guess I never really thought about the composition of those bearings. That's why it is always good to check here before tackling any project. You're sure to get some advice that you can use.
 
The rule of thumb for bearing,bushing,ring gear or any kind of shrinking is
.001-.002" of shrink per inch of diameter per 100F of UNIFORM cooling / heating. After the 100f mark, the average yield is reached so it doesn't do any good to go 200F and risk damage. A 24" flywheel ring gear should yield .024"+ with the gear typically ground .003-.004" smaller than the flywheel. Dis-assembly is the same.
BARRING CORROSION, I would still use never seize on the cutlass's for the next time!! Thats just powerplant mentality. :) ws
 

Forum statistics

Threads
38,156
Messages
448,741
Members
12,482
Latest member
UnaVida

Latest Posts

Trending content

Back
Top Bottom