Sam's is your source for Hatteras and Cabo Yacht parts.

Enter a part description OR part number to search the Hatteras/Cabo parts catalog:

Email Sam's or call 1-800-678-9230 to order parts.

Removing Slider Window Frames

  • Thread starter Thread starter Angela
  • Start date Start date
  • Replies Replies 20
  • Views Views 10,090

Angela

Legendary Member
Joined
Jul 8, 2005
Messages
3,879
Status
  1. OWNER - I own a Hatteras Yacht
Hatteras Model
58' MOTOR YACHT-Series I (1977 - 1980)
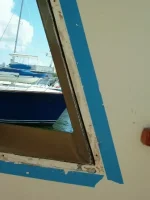
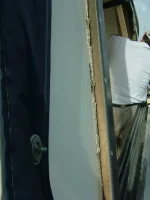
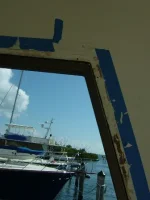
Ed and I have searched for the forum, and read all of the applicable threads, and we are stuck. We are trying to remove a window frame that has proven to be the one of two sources of leaking water down inside the aft deck wall and into the master stateroom below. We can’t fix the interior teak plywood wall until we fix the leak.

We have removed the exterior screws. We have removed the interior teak trim to expose the crevice and dug out all of the caulk. What we cannot do is get a scraper underneath the exterior trim/flange which is where I believe we are stuck. We have tried a heat gun, but the surface is too large. By the time we make a reasonable run with the heat gun, the area where we started is not hot anymore, and we cannot simply pick up a corner and start pulling. This thing will not budge. Is there some technique that we’re missing? Pascal offered us a jack hammer last night, but we declined. We are reserving judgment on that offer, now. :)
DSCF3115.webp
DSCF3116.webp
DSCF3117.webp
 
I can only tell you what I did, which was successful, but I would not call it satisfactory. A genius had used 5200 to install my sliders, so I used a 4" putty knife and a hammer and drove the blade between the exterior frame and the fiberglass until it bottomed out. I did this all the way around the frame. A lot of work and time consuming, but I was able (eventually) to remove them.
 
Some folks have used a Fein type multi tool to work around the frame flange.

Bobk
 
We got our 5200 sealed sliders out using several very large C clamps to push the frame from the inside using 2x4 lumber that was cut to size to make a bridge over the outer window frame and create pressure against the frame from the inside. We slowly and gradually applied increased pressure to the frame incrementally along its length, starting at one end and moving toward the other as the sealer broke loose. Applying increased pressure with sufficient patience to make sure the frame was not bent in the process was the biggest challenge. We supplemented the outward pressure with a heat gun and other methods as required. It took a lot of time, even a few days, but the pressure from the clamps eventually pulled it loose.
 
I'll be watching this operation with great interest, as I have to pull my windows as well and replace the surrounding wood. At the same time I will replace the glass and refinish the frames.
 
Your better off ordering new window frames in fiberglass .
 
Your better off ordering new window frames in fiberglass .

I thought about that, but my frames are in great shape from a "no pitting", "no corrosion" aspect, and I understand those composite frames are not cheap. I'm only having to repair one window. If I change that one window to a composite frame, then I have to do all of the windows to match - that would be 9 large windows that do not leak (not counting the five windshield panels), so it just does not make financial sense at this point. In fact, I cannot even see where the water is coming in - I run a dental pick in all the tracks, and do not feel a spot where there is corrosion, but when I perform a controlled flood test on the the bottom channel, I get water coming down through the aft deck wall and dripping into the master stateroom; this, after several days of testing this and testing that to make damn sure that the leak is coming from the source I am testing (I found two sources of leaks). It has to be some sort of a pinhole or leak through a corner crevice weld. These frames look otherwise perfect for their age and the fact they have lived in a salty environment. They are certainly not "spent" in the least bit. They look very much "fresh water" like. When I do get it out, I plan to seal the bottom of the frame where I find the leak, and then repair the aft deck wall with a fiberglass cap for the frame to sit upon - something Hatteras did not do, yet should have. It appears from others' photos that Hatteras merely cut the hole, and insert the frame without sealing off the coring below with a fiberglass cap. Caulk only lasts so long and only spreads out so far. It's not all-encompassing like a fiberglass cap would be.
 
I have the same leaking problem on my 43C slider windows. I've owned the boat for 13 seasons, and have never opened (nor wanted to open) those windows even once in that time. I have good AC for the salon, and if I want fresh air, the forward hatches provide that adequately. As much as it is considered to be heresy, I am seriously considering just filling the channel outside the glass with black boatlife caulk and just being done with it.
 
I have the same leaking problem on my 43C slider windows. I've owned the boat for 13 seasons, and have never opened (nor wanted to open) those windows even once in that time. I have good AC for the salon, and if I want fresh air, the forward hatches provide that adequately. As much as it is considered to be heresy, I am seriously considering just filling the channel outside the glass with black boatlife caulk and just being done with it.

Somebody before me did that with one of my sliders in the the crew stateroom. It did not cure the leak (or if it did, that fix had already failed by the time I got the boat) and digging all that out was a real chore. I was so happy that day to finally get that window to open, especially after my cat got locked in that room when a drawer came open behind the closed door and blocked it while we were underway.

I'm actually leaning towards the opposite approach - I'm thinking of not putting the glass back in, at least for a while to see how I like it. The aft deck gets so hot that during all but about 3 months during the winder that it's pretty much unusable unless you are in a wet bathing suit, even with the big sliders open which only gives half of that opening available to air flow. That area just was no designed to allow for air flow - we have no side decks or wing doors - just the openness above the stern hand rail. Having the glass out makes a huge difference - the greenhouse effect goes away. I may change that opinion once the rainy season gets here, though...but....I could very easily snap on a piece of canvas when it rains and we want to use the aft deck.
 
Finally....we are making progress. Thank you, Robert Miller, for showing us your technique. Ed will post some photos. We've got six large clamps on it with some lumbar, making a vice to push it out. Patience..... Folks going by on the dock and by water keep stopping to see what we are doing. I have to admit, it does look like we're nuts, but it's working.

Ed and I are in agreement to give it a try without the glass put back in. "If we like it, we get to keep it." :) If we go that route, we will finish off the window hole in teak rather than putting the frame back in. That means I have to get my sailmaker machine out and sew some canvas.
 
As promised, progress photos. No give at the top yet, which surprises me a bit considering where we're finding sealant, but the bottom has moved nearly along it's full length already.

2014-12-30 14.06.29_1024x576.webp2014-12-30 14.06.36_800x450.webp2014-12-30 14.06.29_800x450.webp
 
A couple of other angles....

2014-12-30 14.06.59_800x450.webp2014-12-30 15.00.12_800x450.webp
 
The purpose of the lines tied to the clamps is because they don't float all that well if they fall in. ;)
 
On projects like this, you're expected to throw a tool in as a sacrificial offering. I usually offer up my last square head power screwdriver insert.
 
More progress today. Tightened down the clamps a bit this AM and was rewarded with some creeking and an increase in the gap around the outside. Time to re-position the wood and put pressure insome different areas. I'm convinced this will work eventually....
 
If it's held with 5200 or the like, if you spray some AntiBond in between the frame and the fiberglass, it will release much faster. It will take several coats and turns the 5200 into paste.
 
Ed just went out for the Antibond and we will be applying that. We're headed out to meet up with Mario ("MarioG" on the forum), with clamps in place, for NYE pig roast. No need to sit in the slip while this process is working - we can keep pulling the frame either here or there.

Oh...just learned fuel is down to $2.57 delivered by tanker here in Miami. I haven't seen that price in many years, if ever. Time to fill 'er up!
 
Some folks have used a Fein type multi tool to work around the frame flange.

Bobk

Wasting lots of time if you don't have one did my front window with one ,and would never even start the job with out one.
 
At last, the frame is out, and the spot of the leak is EXACTLY where I predicted it would be due to the flooding tests I did before deciding to remove the frame. (And thank God it was - Ed would never have let me forget this had I been wrong, after all the effort it took to remove.) It appears to be an erroneous saw cut made during production. The frame is in fantastic shape - too bad we don't really want to reinstall it and put glass back in. I'll keep it for a while until we decide whether we like our aft deck open (and MUCH cooler) or not. At least we know how to get the other one out if we decide to keep the aft deck more open. RobertM, thank you so much for taking the time to come down and show us your technique. It was spot on.

DSCF3118.webp
DSCF3120.webp
DSCF3121.webp
 
Last edited:
So the technique Robert shared with us was indeed the key to success, with minimal collateral damage. I'm not convinced that de-bond is useful for this. We ended up using "anti-bond 2015" as that's what was available, but while it did indeed soften the caulk, it also made it more "sticky" which I believe made it more difficult to break the seal. it was definitely harder to pull out of the gap once sprayed with the magic juice. I think it has use in different situations, such as removing deck fittings that have been secured with the devils glue, but for this application, I think I'll skip it. on the next frame I remove.

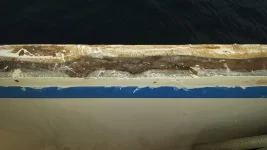
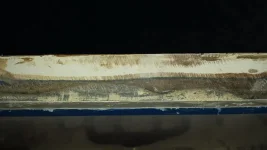
So, yea, it's been 34 years, but it's still disappointing that our leak was caused by poor craftsmanship. The frame overall was capped and finished with glass. There were a couple of areas where someone went nuts with a saw after the fact, and that's where the leak is. That the factory took the time to finish it right, and hack into it later is where the "face palm" comes in. I'll cut into it further and replace what's rotted, and all will be well again.

Meanwhile, the idea of leaving the frame out, building a teak decorative frame and building a canvas panel with a "smile" window is growing on me. Twice the airflow, no fuzz and glides to maintain.

Here are a couple of photos to add to the mix. You can see the bad cuts on the vertical edge, and the rounded blade penetrations through the "finished" edge that exposed the core to the leak in the frame.


2015-01-01 17.18.39_800x450.webp2015-01-01 17.18.54_800x450.webp2015-01-01 17.19.05_800x450.webp
 

Forum statistics

Threads
38,156
Messages
448,741
Members
12,482
Latest member
UnaVida

Latest Posts

Trending content

Back
Top Bottom