Sam's is your source for Hatteras and Cabo Yacht parts.

Enter a part description OR part number to search the Hatteras/Cabo parts catalog:

Email Sam's or call 1-800-678-9230 to order parts.

If at first you don't succeed

  • Thread starter Thread starter danshat
  • Start date Start date
  • Replies Replies 8
  • Views Views 3,739

danshat

Active member
Joined
Jun 16, 2007
Messages
143
Status
  1. OWNER - I own a Hatteras Yacht
Hatteras Model
34' DOUBLE CABIN (1963 - 1966)
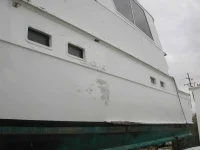
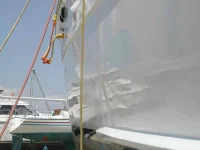
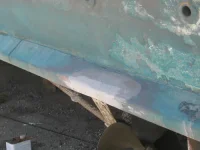
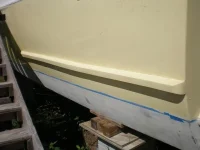
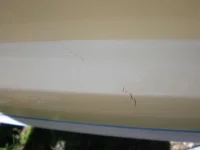
Ok so upon recommendation of the local boat expert (yeah right) I had splash rails made out of oak and installed (obviously without a level.) I followed all of his instructions about how long to wait before painting them etc. The bottom half of the boat was painted a while ago and now I'm not happy. I hate bothering you guys but does anyone have any suggestions as to how I can fix this now?
 

Attachments

  • 013a.webp
    013a.webp
    25.3 KB · Views: 169
  • 014a.webp
    014a.webp
    9 KB · Views: 169
Dan, just a quick question. Is it actually unlevel as out of water is different from in the water. Just to answer the question for you or to take a new look at it I will measure mine from the water line to let you know where yours is and if its a problem. I know its a serious question from your stand point but my sick sense of humor came up with changing the line under the splash rail,LOL. You gotta love working on these old boats and humor helps, LOL
 
Lol! I appreciate the humor. No it is not level but I actually miswrote what I was thinking. The rail has a distinct wave in the middle. They didn't even try to make it even. I unfortunately didn't notice until it was painted. Now my concern is the cracking in the paint. That is a big source of water intrusion and eventual rot. Should I just take the dang things off and start over?
 
You may not care for this answer but I suggest you take it off and start over. I know from MANY personal experiences that when I'm not happy with something and figure..."Oh, it'll be OK," it NEVER is and I later cause myself a lot more work and money by doing it over. It's easier to do over at the moment than it will be later...

But that's just me and there's no way I would suggest that everyone should be the same way. But if you already ARE that way, then just redo it now and save the constant "I should have redone it back then" refrain and the eventual redo that you will undertake anyway! ;)
 
Well with the corrected meaning of the problem, I'm like Mike. PITA but that is what I would do too before I went any further with any more painting. I've second guessed myself some too, just like on the covers I made. I had a few seams that I could have gotten by with,,,,not suiting me I took them out and redid them,,,,,you are the one who has to be happy with your work
 
Once you get a piece of stainless steel rub rail on that, and the boat is in the water, you probably won't notice that wave in the rail. It will take a long time for a piece of oak to rot from water intrusion.
 
Dan, looked back at the pics again and reread all post. Chances are the crack in the paint developed as the oak may not have been totally cured. Depending on the deflection, you may be able to sand down the top or outer side of the splash guard and fare it out with westsystem to your satisfaction. Would solve two problems, especially the water intrusion problem,,,,,Hey I do this on even my own solutions,,,,think and decide, think and decide. Another option!!!
 
This is gonna be fun!! First of all do you know what was used to glue the scarf together with? What ever it was allowed the two pieces to move and cracked the paint. Theres literally tons of force on that stuff when planing and youre still dry correct??
Get some stainless shim stock and masking tape it above and below the joint to protect yer paint job. Take your SHARP back-saw and slice the glue out of the joint down to the shim stock... CAREFULLY!
Make some beveled clamp backer-uppers and re-align the two mating surfaces. Now for the goody... Take your circular saw and horizontally plunge cut a slot well into both boards. Get your glue all set up and tap a piece of aluminum 1/8" flat stock (or whatever the blade thickness is) into the slot. Let it all set up before you pull the clamps. Cap the rail with some SS rubstrake (the solid stuff!!!) and bed it with 5200. You will never see a failure again!
Scarf joints are cool, but they really really need to be tennoned. Seeing is believing...The one pic is the sub at pre purchase inspection. Notice the busted rail? I scarfed in a new section and its still pretty good, barring cheap paint at the time. #2 is the rail roughly repaired and #3 is the lower chine spray rail with another repair... seemed to work for me!!! ws
 

Attachments

  • DSCN6695.webp
    DSCN6695.webp
    14.2 KB · Views: 120
  • DSCN0146.webp
    DSCN0146.webp
    23.2 KB · Views: 119
  • DSCN0145.webp
    DSCN0145.webp
    24.5 KB · Views: 119
Assuming it is secured and sealed properly and this is just a cosmetic problem I would work with it. Grind off all the paint shape the wood were you need to then saturate it with epoxy. Then use the epoxy fillers to build it up were you need to sand smooth and re seal it.

Brian
 

Forum statistics

Threads
38,154
Messages
448,702
Members
12,482
Latest member
UnaVida

Latest Posts

Trending content

Back
Top Bottom