Sam's is your source for Hatteras and Cabo Yacht parts.

Enter a part description OR part number to search the Hatteras/Cabo parts catalog:

Email Sam's or call 1-800-678-9230 to order parts.

Flybridge gauge and switch redo project

  • Thread starter Thread starter Genevatexan
  • Start date Start date
  • Replies Replies 11
  • Views Views 6,604

Genevatexan

Active member
Joined
Apr 12, 2010
Messages
111
Status
  1. OWNER - I own a Hatteras Yacht
Hatteras Model
Not Currently A Hatteras Owner
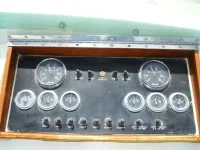
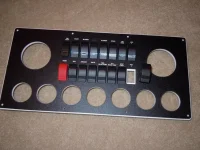
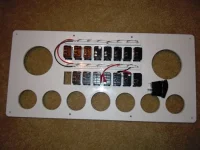
My flybridge guage panel was metal and the Stewart Warner gauges oxidized and failing. I had a new panel made by a guy that does Sea Ray panels with a CNC router out of the black material with routed white letters. That panel has rectangular 1.450 x .83 cutouts and he provided some Carling contour switches formerly used by Sea Ray. The panel maker included SPST switches on everything but the starter switches, which came as SPST Mo-On, Off.
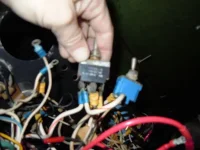
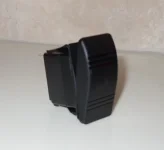
Three questions: 1) the starter switch needs to Mo-on/Off/M-on to activate the stop solenoid in the aft M-on position. But must it be Dual Pole, or Single Pole? (Is the presence of two terminals in the middle of the switch indication that it is dual pole?) 2) the Carling/Sea Ray switches he sent are all 20 amp but do any need to be any stronger (starter switches?) 3) His switches are all straight 1/4 spade lugs-no screws. My old set are all screw terminals. It makes me nervous to install non screw down connections, and I worry about them bounding loose. Can you buy contour switches with screw terminals today? I also do not relish cutting off about 1/2 inch of every wire under the helm to replace the ends and maybe degrade the strenth and reilability of the conttetion...
Kent
 
Picture of the start/stop switch attached inline to the on off switch for the circuit.
 

Attachments

  • starter switch.webp
    starter switch.webp
    23.7 KB · Views: 186
new and old panel

Pictures attached of old panel and new panel (made by Sea Ray guy in Fall River, MA). Also picture of the new switches. The original question was around whether the starter switches were DPDT, but its hard to see the terminals as camera did not focus well-- too close I assume. The second issue I raised was on using push-on terminal ends instead of the screw terminals. The Carling switches that the board builder provided are only push on, and I dont see where Carling offers a screw terminal solution. Next question is whether other rockers will fit the 1.450 X .83 cutout....
Finally, I could not find amp rating on original starter switch and wondered if new 20 amp switch was sufficient.
Input appreciated.
 

Attachments

  • old panel.webp
    old panel.webp
    42.3 KB · Views: 146
  • new panel.webp
    new panel.webp
    52.7 KB · Views: 148
  • switch.webp
    switch.webp
    10.7 KB · Views: 147
panel back with new lighting for switch wording

here is the LED lighting board builder can provide to shine through wording routed on front of panel along with view of switches from rear.
 

Attachments

  • panel back small.webp
    panel back small.webp
    28.2 KB · Views: 145
Last edited:
The pic of the starter switch appears to be a SPST momentary center off switch. One way to tell if a switch is single pole or double pole is to look at the connections to it. A SPST will usually only have 3 connectors on it, a DPDT will have 6 connections on it. If there are 2 conncections in the center possibly the unused terminals were cut off. Check with a continuity tester, the 2 center poles may be common internally, or a wire soldered across them.

As for bolt on connections vs push on, I feel the bolt on is more secure, but the push ons work well. You can either solder the push ons in place for a more secure connection, (making replacement a bit more work) or drill a hole in the push ons and put a nut and bolt on them.

Look on the old switch and see if there is a part number, and look up the specifications on the switch.
 
Last edited:
Nice work. How much did it cost to redo this panel?
 
The panel, along with all the Carling switches (Contura III -mostly SPST) was $250 all-in, by Vector Imaging in Falls River MA. He is mostly a Sea Ray guy, but he did this with no problem. The work is super. The switch holes have square corners, all the cuts are specd via CAD/CAM. The material is heavy and UV stable. The old board did not have miniature LEDs to light the wording, which is routed into the surface of the new board. The worst part about it is thinking you are going to put those old gauges back in and then seeing how bad they really look. Now I need a line on Stewart Warner Deluxe gauges and someone who can help me match the current gauges so I dont have to replace senders. Can SAMs help me with that?
 
If you can secure the terminals somehow (like drill and bolt) that would be better. Push on connections aren't very secure on boats.

For gauges, which will match the old senders, try Don Wendlich at Isspro on the West Coast. They can probably make whatever you need. SW is still in business, but it isn't the same company and I don't know if they make marine gauges anymore. And I am not certain they actually make anything- they may just be repackaging other people's stuff. Isspro actually makes gauges and their stuff is very reliable. They can match some gauge faces.

You have a lot of wires under there, but if you just drilled through the tab, and put a small self-tapping screw in each terminal, that might do it.
 
...You have a lot of wires under there, but if you just drilled through the tab, and put a small self-tapping screw in each terminal, that might do it.
An alternative method might be to secure the wire bundle to several of the mount brackets for the gauges. If you bundle the wires together and then tie the bundle to the gauge mount bracket so that the connector only has to support a couple of inches of wire, then it should be ok. It is important to do this so that the weight of the wire is not on the connector. You will end up with a wire tie on the bundle where each wire joins the bundle, this can be a wire tie every inch or less. I don't know how long your wires are, but it would be easier to work on if the wires are long enough to have the panel out of the dash while wiring it. Here is an example which I found via google. I believe that the first 3 pictures are of the same panel.
auctionbandits-boston-whaler-boat-carling-electrical-switch-panel.jpg


Mark
 
Yes Sam's does have the SW guages in stock.
 
Excellent feedback. Was trying to work with old short wires but its creating issues. I really like the harness that has the master connector on it but obviously I already have a board and switches. I think I will create supports for the harness from some bolts that are convenient and then wire all switches with a harness of my own and tie that back to the source in a neater design, probably using terminal blocks. I will also pull all the grounds to a ground block and ground that with an appropriate gauge master wire.
 

Forum statistics

Threads
38,156
Messages
448,741
Members
12,482
Latest member
UnaVida

Latest Posts

Trending content

Back
Top Bottom