Sam's is your source for Hatteras and Cabo Yacht parts.

Enter a part description OR part number to search the Hatteras/Cabo parts catalog:

Email Sam's or call 1-800-678-9230 to order parts.

DD 6/71 NA - Removing the heat exchanger core from expansion tank

  • Thread starter Thread starter brico
  • Start date Start date
  • Replies Replies 14
  • Views Views 9,534

brico

Well-known member
Joined
Dec 25, 2013
Messages
311
Status
  1. OWNER - I own a Hatteras Yacht
Hatteras Model
37' CONVERTIBLE (1977 - 1982)
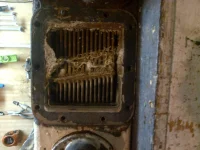
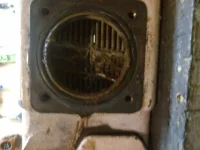
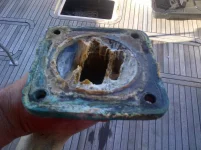
I've opened up my cooling system. the coolant side looks clean and blockage free. Te coolant color looks pinkish and I'll test it with testing strips tomorrow. The raw water side is a bit of a bummer. The inlet and outlet pipes and flanges have heavy buildup of calcium or whatever that is. I can see the light from both sides and I am sure there is reasonably good flow as my engines never overheated even at WOT load. The heat exchanger core is not bad but it has blockage. While removing the big square inlet flange one of the 10 bolts sheared The one on the bottom) so i decided to remove the whole expansion tank. Easy to remove but is it bloody heavy to take out. I managed alone, but will definitely look for a hand when boxing back.

So how do I remove the heat exchanger core to acid clean it? I see the exit round side/flange can perhaps be "hammered" out and it should exit at the inlet square side. How do I remove it without making damage or do i simply soak the entire expansion tank in DD suggested chemical mixture of Muriatic acid water and oxalic acid? I am afraid what will happen to rubber seals in the process.

In addition, the DD manual talks about 5.5 gallon coolant capacity while I've drained 9.5 gallons after draining it at the pump, bottom of oil cooler, exhaust manifold and block heater. The block heater cavity produced 1 quart or so, the oil cooler 1-1.5 quarts, and exhaust manifold about 2.5 quarts while the rest was from the water pump. total 9.5 gallons. Mine is J&T marinized engine and the expansion tank is certainly J&T one.
 
here are some photos of it. The expansion tank photos are on the work bench i my garage.heate exchanger raw water inlet side.webpheat exchanger raw water exit side.webpheate exchanger raw water inlet pipe and flange.webp
 
Take a block of wood big enough to cover the round end of the bundle and drive it out. you can shoot some wd40 around the round end to help it slide out. There's a large o-ring in the housing that's keeping you from pulling the bundle out. I think the spacer that hold's the o-ring can be remove carefully then the bundle will come out. It usually get's corroded up around all of the bolts and makes it hard to get off. Put never-seize on all of the bolts and it will come apart next time without breaking the bolts. I wouldn't boil it out as an assembly. My tanks were aluminum and muriatic acid will destroy it.
 
You have pics now. Those look different than the coolers on mine. They definately need cleaned though. I would try to go around the oring with some lubricant then pry around the other end with a stiff putty knife to break the seal then you should be able to drive it out. You can't beat on it though. If you pry too hard you'll bend the flange all up.
 
There's just a gasket on the square end and 2 O rings and a metal spacer between them on the round end. You might be able to remove 1 O ring and the metal spacer from the round end and slide a putty knife under the square end to get things started. Once started, it should pull out easily from the square end. J&T has gaskets, O rings, and metal spacer etc. Once apart, you can spray the broken bolt with PB Blaster and remove the rest of it with vice grips.
 
Last edited:
Attached is a diagram from J&T. I have the diagram for the Port one also but it is essentially the same as far as gaskets go. Mine isn't a TI but the gaskets etc. were the same.


View attachment Expansion Tanks.pdf
 
Last edited:
If it was me, I would attempt to boil it out before taking it apart. See if all of gaskets and seals are available and order them first.

I have used Karl's procedure a couple of times and it cleans things up very well. I pull the hose upstream from the raw water pump and the hose down stream from the exchanger and connect them to the pump and bucket. This way I get the fuel cooler, intercooler and heat exchanger all done at once. The rubber hoses have no apparent damage after two passes over two years.
 
As noted, the core just pushes out to the "square" end. The first time I did mine I just used a block of wood against the "round" side and used a big rubber hammer to tap from that side. Came out with no drama although it took several hammer blows to get it moving. I have since pulled it several times to boil the core and it just slides right out. Obviously, the longer it stays in there unmolested, the more difficult it will probably be to remove.

The gaskets/Orings are easily available from local suppliers or the internet. I have purchased them locally on Long Island and Kent Island. On once occasion, the shop didn't have them it stock when I walked in but had them for me that same afternoon.
 
Thanks to all of you guys. If you may have noticed I do have the drain fitting on my square flange and the zinc fitting is on the side. The drain hose is directed to the bilge. I never drain the sea water from the expansion tank though. Maybe if i do i would reduce rate of the scale accumulation as it would appear that the scale formation is mainly due to stagnant sea water (see the line across the element due to the engine trim.) Let's face it, our boat spend months at the dock not moving and engines not running.
Your thoughts?
 
Mine was similar to yours the first time I pulled the cores. However, since then - pulled every other season, they have stayed essentially clean. I keep saying I might try in "in place" cleaning but I prefer to see what I'm working on and verify that everything is OK. OTOH, lots of folks like the in place method and it obviously works fine.

I definitely would recommend that the FIRST time you deal with them that you disassemble/boil/check them out (as you are doing) and then from that point on do the in-place cleaning. I use the DD-recommended solution for "boiling" - Muriatic/oxalic acid/water mix. I don't remember the proportions but it's in the DD service manual. I'd look it up but I'm not on the boat so I don't have the manual available.

Assume that whatever clothes you are wearing will end up with holes (and therefore will be very stylish by current standards).
 
Last edited:
remove the oring and gentley use a putty knife to break the seal between the tank and the flange. once you get that flange off the basket should come right out. good luck
 
On ours we have the Sen-Dur exchanger that has 5 inch caps on each side. The coils stay put. Prior to boil out I pull the caps and remove any zinc or other large debris that happens to wind up in there. A shop vac stuck in the end of the coolers cleans them up good prior to the boil out. I keep a set of the zinc heads without the zincs around and install them prior to the boil out.
 
Thanks everyone for chipping in with suggestions and tips. I managed to get the core out of the expansion tank with some WD40 and couple of blows with rubber mallet. Instead of going straight with Muriatic and Oxalic acid mix i'll give it a try with "ZEP- Commercial Shower, Tub & Tile Cleaner" containing Sulfamic and Glycolic acids. It is readily available in Canada, but I am sure similar product is available in the USA. I've tried it this summer when i found my fuel coolers clogged with lime and other stuff. It works like a charm and is much safer. In fact I leave it soaking overnight and most of the stuff just falls off and the metal shines back again.

Thinking a bit more about the lime and other stuff growing in the heat exchanger core, i thought it is because of the heat and salt water, but having opened up my raw water pump suction side I found another monstrosity of piled up zincs and heavy lime deposits. Opening and cleaning raw water pump and fuel coolers is an easy job, but doing this with main heat exchanger and going for expansion tank removal, i believe it is worth having those drains that I have and more importantly using them, e.g. once back in the marina, open the drain and drain the expansion tank into bilges. This will certainly reduce if not eliminate the buildup of lime and other hard deposits on the heat exchanger.

Our boats sit in the marina most of the time and stagnant sea water in a bare metal enclosure is bound to start depositing minerals etc.

Having seen so many zincs stuck in the entrance of the heat exchanger, the fuel cooler and now in the suction side of the raw water pump I am having second thoughts of using these. Some people I've spoken to do not use them at all. They said, maintain good bonding on your boat and you will be OK without zincs.
 
I agree - see the ongoing post re zincs.
 
On my Vancouver gimmies, I drain them after docking, never have had to clean them yet, that's since 1991 and the temps have stayed steady, also, no zincs in sea water pump or at the hex's.
 

Forum statistics

Threads
38,155
Messages
448,721
Members
12,482
Latest member
UnaVida

Latest Posts

Trending content

Back
Top Bottom