Sam's is your source for Hatteras and Cabo Yacht parts.

Enter a part description OR part number to search the Hatteras/Cabo parts catalog:

Email Sam's or call 1-800-678-9230 to order parts.

Corroded Copper Water Pipes

  • Thread starter Thread starter JD5652
  • Start date Start date
  • Replies Replies 10
  • Views Views 3,232

JD5652

Well-known member
Joined
Mar 23, 2019
Messages
763
Status
  1. OWNER - I own a Hatteras Yacht
Hatteras Model
58' LRC (1975 - 1981)
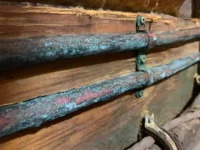
When I removed my 1976 vintage washer/dryer out of the closet, it exposed a run of wiring and copper water pipes that feeds the forward state room. The copper water pipes had some corrosion built up on them and I gently removed most of it. The pipes on either side of washer/dryer compartment do not seem to have the same level of corrosion.

I'm trying not to open up a can of worms here, and am thinking about a few different solutions:
  1. Coat copper pipes with product such as Ospho or POR 15 to alleviate any additional corrosion
  2. Replace that 4- 5 foot section of copper pipe with new copper pipe
  3. Replace that 4 - 5 foot section of copper pipe with PEX or similar
  4. Replace entire run of copper pipe from engine room to forward state room with PEX or copper or similar
Option 4 would definitely open up a big can of worms since I would have to open up walls to secure the piping.

Hope those that have dealt with this can provide some insight.... thanks in advance!
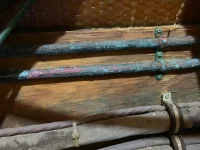

IMG_3508.webp

IMG_3512.webp
 
Last edited:
I think the location of where the bad copper stops will dictate the minimum needed to be replaced. Everything in the pictures looks rough. If you can find a good copper on each side of that area I would replace that section with copper or pex. Flared copper would be the old way of doing it that still works but soldered would be better in my opinion. They also make shark bite fittings that work well for PEX to copper or copper to copper if you want to go that route.

On opening a can of worms you can read my post about one thing leading to another. It started with replacing steering lines that look just like those and now I am about to paint the capacity on my fuel tank.
 
Based on my past experience with old boat copper, I'd say that options 2 & 3 will make option 4 non-optional. I'd apply a protective product and go. Maybe you'd want to apply some vinegar and a soft brush beforehand. But, my experience says that you will have problems working the old copper when cutting and flaring. But if you do decide to replace a section, install a valve to isolate the line just in case.

I also recommend you take care of that decaying wood in the picture before it becomes terminate bait. Personally, I paint all raw wood I find with polyester resin.
 
Brian-

I have read through your thread and will re-read it again. I regularly got into cases of worms on my old boat and don't have a problem doing so if the situation dictates.... however trying to work smarter these days.

Of course the other underlying thought is also the "should never be in this area again" syndrome that drives the urge to take care of issues while an area is opened up for other repairs.

I did not know that you could go from PEX to copper and back with the Sharkbyte fittings. I will look into that option as one of the lines does make a turn as it enters the engine room and the PEX would seem to handle the bend easier than copper.

Will still have to remove the saddle clamps for the wire bundles that run along with the water lines ... of course the water lines are underneath the electrical wire bundles.

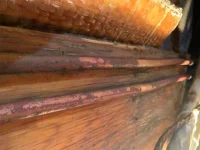
Here is a pic of the same copper pipe 10 feet or so forward... while not "perfect"... certainly not in bad shape considering its age.

Thanks for the input!...

IMG_3537.webp
 
Based on my past experience with old boat copper, I'd say that options 2 & 3 will make option 4 non-optional. I'd apply a protective product and go. Maybe you'd want to apply some vinegar and a soft brush beforehand. But, my experience says that you will have problems working the old copper when cutting and flaring. But if you do decide to replace a section, install a valve to isolate the line just in case.

I also recommend you take care of that decaying wood in the picture before it becomes terminate bait. Personally, I paint all raw wood I find with polyester resin.

Robert-

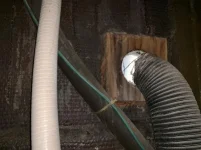
Very good point about the wood... and I will certainly do that. This area is right below the dryer vent outlet and it seems the dryer vent hose had been disconnected for who knows how long... which allowed an ingress for water... fresh and salt... Thanks!


IMG_3499.webp
 
I have copper on my 1966 TC that looks way worse than yours. I had a leak earlier this Summer that turned out to be a relatively new plastic filter assembly that was cracked. I ran through the "what if" scenario on the old copper and luckily it was something way simpler. Conclusion I came to on this particular annoyance was to fix it when it fails. It's not like it's a safety concern.
 
Only a safety concern if you are connected to city water. Can't sink if you are using your tank water.
 
I did a total replacement of my copper with pex due to my poor winterizing last season. If you plan on going that route take pics of every connection with labels to what and where they feed.
 
Corrosion on copper is always superficial and cosmetic. I have 50 years old copper on my that looked corroded but never leaked
 
Many Thanks to everyone for their input!...

To satisfy myself on the condition of the most corroded section of piping.... I gently cleaned off the corrosion along a 3 foot section.

I also removed the mounting saddles and inspected condition of the piping underneath.... specifically trying to find any indication of wall thinning comparing that underneath the saddle with that exposed to air and most corroded. I did not find any difference between the piping underneath the saddle versus that right next to the saddle that was heavily corroded.

With the saddles removed, I also performed what I will call a "snap test". Very unscientific and very subjective.... I got a screwdriver underneath the piping midway of he 3 foot spand and gently pulled it out less than 1/4" and let it "snap back" to the board where it was mounted.... did this several times .... The pipe did not "feel" soft or did not crease at all. When it hit the mounting board... it "sounded" solid....

All the above with the input here... don't think I have a problem. Likely will leave it alone or at the very most coat the area with POR-15 ....


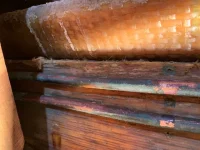
Here 's the AFTER cleaning photo of the same section as above...


IMG_3541.webp

IMG_3542.webp
 
I recently ran into this. I had areas that had bursted from freezing and the PO just disconnected the areas. The copper on my 61 is not standard plumbing size 3/8. It is refrigeration copper and is a hair bigger and much thicker than standard household copper. I had to get refrigeration fittings to fix it. Pex fittings will not work since it is a hair too big. I had to consult some pros to figure this one out! If the line is not leaking then I would suggest light brush and coating it. The walls are thick on this stuff and surface damage is just that...If you want to cut it out take the section with you to the plumbing store to confirm size. Will save you some trips...
 

Forum statistics

Threads
38,156
Messages
448,748
Members
12,482
Latest member
UnaVida

Latest Posts

Trending content

Back
Top Bottom