Sam's is your source for Hatteras and Cabo Yacht parts.

Enter a part description OR part number to search the Hatteras/Cabo parts catalog:

Email Sam's or call 1-800-678-9230 to order parts.

Best caulking

  • Thread starter Thread starter Scarlett
  • Start date Start date
  • Replies Replies 15
  • Views Views 2,086

Scarlett

Legendary Member
Joined
Dec 10, 2015
Messages
1,938
Status
  1. OWNER - I own a Hatteras Yacht
Hatteras Model
53' MOTOR YACHT (1969 - 1988)
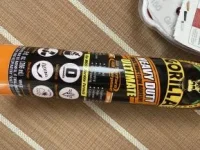
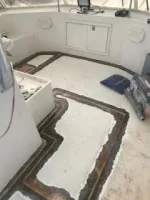
I have been using this for about 8 months and it has been incredible. Works as a glue holds in about 30 seconds. Works as a caulk both inside and outside. Paints easily. I caulked my shower seams and so far no mold or mildew. So far it has been almost to good to believe.
 

Attachments

  • 032667B1-E401-468A-B518-7EDD316C1BED.webp
    032667B1-E401-468A-B518-7EDD316C1BED.webp
    24.3 KB · Views: 240
Thanks John. Is it flexible? If so I’ll grab some next week.
 
Yes it is Rusty
 
Bought some today. Thanks John.
 
Does it by any chance clean up with water? Usually the good stuff doesn't but it would be awesome if it does!
 
I believe its just a silicone caulking. Not the right caulk for everything.

I'd be looking at specific types for different needs.
 
No clean up with water, I used mineral spirits I think.
 
This stuff is as bad as 5200 if you ever need to remove what you glue. Prior owner of my 46C used it to glue sections of 2" steel plate together that was placed in the bilge as ballast to counteract loads he had added. When I removed the loads the ballast had to go.Even a hammer drill with a spade bit would not break the bond of this stuff between two pieces of painted steel. Wound up dragging it out with ropes on a 2x12 and throwing overboard.I also glued a piece of chipped concrete back on my seawall after I saw how it held. It hasn't moved and seems bonded better than an epoxy glue.
 
What product would be recommended for resealing where the fish box meets the cockpit floor? I used the loctite brand to seal the splash rails and it SUCKS!!!! Despite being clear, once dried, it looked like I wiped a coat of grease over the product, it looks AWFUL. This was done on the hill after removing the old caulk and prepping with acetone, then denatured alcohol
 
What product would be recommended for resealing where the fish box meets the cockpit floor? I used the loctite brand to seal the splash rails and it SUCKS!!!! Despite being clear, once dried, it looked like I wiped a coat of grease over the product, it looks AWFUL. This was done on the hill after removing the old caulk and prepping with acetone, then denatured alcohol

I'm watching for good answers as well. I used 4200 for the 1st time and it turned black. Up on the flybridge around the deck after I had just repainted, I ran a bead around and it was turning mildewy black within a few months. What a hassle to cut it out....
 
I'm watching for good answers as well. I used 4200 for the 1st time and it turned black. Up on the flybridge around the deck after I had just repainted, I ran a bead around and it was turning mildewy black within a few months. What a hassle to cut it out....

Can you glass it in and paint to match? I did that with my flybridge benches that had 5000 screws and bedding tape holding them down. It turned out really good and no more leaks
 
Can you glass it in and paint to match? I did that with my flybridge benches that had 5000 screws and bedding tape holding them down. It turned out really good and no more leaks

That's genius...never thought of that. This would keep water from sitting under there as well. This boat is getting painted in July. I might ask about them doing this or try to find a little time to prep it myself.
Did you inject a little resin into each old screw hole in the deck before glassing over the old holes in the helm? Trying to think how that will work....

I replaced the entire deck on an old flybridge once. I bought that 42' Post for $13k because the PO had filled a soft deck area with spray can foam and ruined it all. The rest of the boat was great.
Being able to remove that helm easily was good in that project, but this Hatt will never get in that bad condition.
 
I put resin in the screw holes after grinding the gelcoat off both sides of the seam. Put a slight bevel on the deck and ran a strip of cloth to tie the two together. Used awl fair before priming. Used the harbor freight belt sander with the narrow wheel in the front to shape the curve between horizontal and vertical. Here are some pics of the process. The final one looks better in real life. I think that is water or something wet on the deck when I took the picture


IMG_1368.webp
IMG_1441.webp
 

Attachments

  • IMG_1330.webp
    IMG_1330.webp
    10.2 KB · Views: 89
There are as many responses to this as there are boats out there, I think. We have a local father-son vendor here in Fort Myers, and the father has been working on Hats since 1971, and the son is an old Coastie engineer now working with his father. We met them 2 days after moving Pau Hana to Fort Myers, when we had to have them replace a defunct toilet and address a clogged pumpout system. We'd only had the boat 3 weeks at that point and didn't really know some of the ins and outs. They swore by, and only use, this brand caulk. It stays flexible, and apparently a repair they did 3 years earlier on their 53' Hat was still as good as the day it was done. I had bought a couple of tubes the week before Hurricane Ian, and this tube was recovered from the wreckage.
20230422_121512.webp
 
I put resin in the screw holes after grinding the gelcoat off both sides of the seam. Put a slight bevel on the deck and ran a strip of cloth to tie the two together. Used awl fair before priming. Used the harbor freight belt sander with the narrow wheel in the front to shape the curve between horizontal and vertical. Here are some pics of the process. The final one looks better in real life. I think that is water or something wet on the deck when I took the picture


View attachment 66782
View attachment 66783

Wow, that looks great. Removing that entire lip where the screws were looks really clean.

I still don't even have a kitchen in my house, from Ian. It'll be nice when all the storm damage is fixed and I can refocus on the 52. That's a project I'd enjoy.

A guy named Bob Wise is painting my boat this Summer in Port Charlotte. His biz will be overworked for a couple years, but a helm update like this will be a nice job to keep his crew busy when slower times return.
 
Wow, that looks great. Removing that entire lip where the screws were looks really clean.

I still don't even have a kitchen in my house, from Ian. It'll be nice when all the storm damage is fixed and I can refocus on the 52. That's a project I'd enjoy.
.

It is hard to tell from the pictures, without zooming in, but I actually left the lip. I ran a piece of cloth tape over the deck and up onto the lip to seal the cracks and make it look seamless. There is still the raised area where the screws were.

Good luck on your house. I used to demo, dry out and restore behind hurricanes. Always a mess and all kinds of stories of issues with insurance companies, contractors, etc. I am on the Gulf in Hernando Beach. People always think we are crazy for living on the water and putting up with the hurricanes but when the weather is good there is nothing better. If I can ever help in any way let me know.
 

Forum statistics

Threads
38,154
Messages
448,696
Members
12,482
Latest member
UnaVida

Latest Posts

Trending content

Back
Top Bottom