Sam's is your source for Hatteras and Cabo Yacht parts.

Enter a part description OR part number to search the Hatteras/Cabo parts catalog:

Email Sam's or call 1-800-678-9230 to order parts.

Baffled by tank baffles

  • Thread starter Thread starter SeaSwick
  • Start date Start date
  • Replies Replies 22
  • Views Views 6,446

SeaSwick

Active member
Joined
May 28, 2005
Messages
70
Status
  1. OWNER - I own a Hatteras Yacht
Hatteras Model
41' CONVERTBLE YACHT FISH (1960 - 1963)
Let the fun begin...

Anyone have experience in opening old Hatteras fuel tanks?

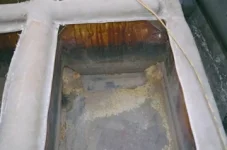
I'm replacing the cockpit on the SeaSwick, a 1960 41' w/454 Crusaders, & will be opening the fuel tanks to clean & coat the inside with an ethanol proof barrier (INTERPLASTIC's CoREZYNA(r) VE8770 VINYL ESTER, rated UL1316 for "All Fuels" applications. Ethanol solvent resistant & approved for use in underground gas-station storage tanks). She's been out of the water for years & never exposed to ethanol.

Specifically, if I grind, itch, and then cut on the original top seam, will the baffles lift out with the top, or are they integral to the carcass & remain in the tank(s)? It seems BERTRAM (pardon my french) used aluminum baffles in their old 'glass tanks that are attached to the top.

If the Hatt baffles are built-into the tanks (which I'm betting on), I think I'll cut a "smaller" opening inside the edges & epoxy on a new top when the job is done.

It's been strongly recommended when coating old tanks to DOCUMENT THE WORK WITH PHOTOS, have the work inspected & reported as completed by a marine surveyer before closing up the tank. This will help in dealing with Insurance Companies (like... getting some), potential purchasers, as well as if the Hatt goes into the charter business down the road.

Thanx in advance for any $0.02
 
Last edited:
I would try the good people at Hatteras or Slane for the info. They seem to have the most knowledge about the way the boats were built.
 
i'll take a look when i go home this evening. i have the tank in my garage.

jim
 
They are glassed in place but you could cut them out and then replace them. You also will have to do the top of the tank also. I am thinking if you go this way make a new top with baffles connected to the top and keep them 1" of the bottom of tank. This can reduce crud from building up in the coners but you have to make it strong enough so that they don't break lose!
In the picture you can see where it is tabbed in place. This is a tank that was eating away with the Ethanol.
 

Attachments

  • Port Tank.webp
    Port Tank.webp
    11.5 KB · Views: 198
I am about to repower (1965 34SC) and will likely recoat my fuel tanks. Sure would like to learn from your experience. Gougeon recommended the same Interplastic group to me as well as Damon Industries' Red-Kote. Gougeon said just a matter of time before diesel also has ethanol in it. California is already talking about it.
 
Hey Don --

I'd heard of Red-Kote & another old dragracing stand-by called Kreem. I didn't 'look' any farther when I learned that, with Kreem anyway, the racers recoated their tanks each season. I just kind'a lumped Red-Kote in the same 'not-permanent' group...

Have to respect the Gougeon opinion, they actively tested to find out how epoxy would do & they did not hesitate to say that epoxy wasn't the cure-all it was hoped to be.

Chuck Cameron from Hatt e-mailed and said that the baffles are attached to all four sides of the tanks... should we have expected anything less from Hatteras? The baffles are bonded to the sides & bottom, then screwed to (thru') the top after it (the top) is put on. There are a series of ridges across the top of the tank for each baffle, bedding/covering the screws.

The pic from 34Hatt's (thanx Dan!) reply shows these ridges, with the tank top cut out between them. FYI the yellow stuff that looks like sand in the tank is BARE CLOTH that the ethanol has dissolved the resin out of (gulp).

Now ethanol is going into diesel!? Maybe time to plan on converting to Hydrogen, using a desalinator & solar panels to produce the stuff...

Anyone got any "Buck Rogers meets Rube Goldberg" sketches on cocktail napkins???
 
Last edited:
i can vouch for at least 3 sides being glassed to the tank. i can't verify the top as i didn't cut my tanks open and dont have the BIG ridges like those tanks. how will you seal the the seam you create when you cut the top off?

jim
 
Thanks Ford,
So interplastics is best barrier from ethanol. Do we first saturate with epoxy to repair damage then apply interplastics or will the barrier saturate and have strength? I guess a shop test is in order.
Don
 
SeaSwick said:
Let the fun begin...


Specifically, if I grind, itch, and then cut on the original top seam, will the baffles lift out with the top, or are they integral to the carcass & remain in the tank(s)? It seems BERTRAM (pardon my french) used aluminum baffles in their old 'glass tanks that are attached to the top.


I assume that you have the tanks filled with water when you do this?

We used to drop an pieced CO2 cartridge into empty (metal) gas tanks adn weld them, but it was nonetheless always pucker time for me when we did this.

Eric
 
Hey Don --

Interplastics VE8770 is a resin & can be applied directly to the glass tanks, after thorough prep, just as if applying additional coats of polyester resin. It is recommended to add a layer of fiberglass cloth saturated with the VE8770.

It appears no transitional coat is needed (like epoxy) to the tank surfaces.

I don't have the specific directions, but the process seems straight forward; after cleaning & sanding, wet-out the surface with the VE8770, apply a layer of 3 oz glass cloth & wet out. Then build up additional coats of VE8770 resin. The number of coats recommended & the re-coat times/techniques (sanding between coats or re-coat after some "kick-off" time, etc) I don't know... yet, but "the-more-the-merrier," IMHO.

But pre-cut ALL the cloth pieces needed (and more!) there's gonna be a lot of corners and cut-outs in the baffles that cannot be overlooked!!!!!

Fortunately the job doesn't need to be pretty, just very, very thorough.

As far as tinting the stuff to help observe coverage, or thickening for gussets in corners (if needed)? Dunno that either... yet.

And by the way... I've not done this.

I'm pointing out what I've found and the direction I'm heading on the SeaSwick. We all have to "dot our own I's & cross our own T's," on these decisions and techniques.
 
Seaswick

That's a really nifty looking trunk cabin 41 you have. What is the hull number on that?

Eric
 
Hey Eric --

Hull # 60214

Hull numbers are sketchy at Hatteras for the Trunkcabins (1960-63/64). I haven't checked with Tom Slane to see what his thoughts are...

Hatteras says she could be hull #3 OR hull #15, but that Hatteras stopped making centerline exhaust at hull #10 & she has centerline exhaust, as opposed to outboard exhaust (at the corners of the transom).

The previous 2 owners always said she's #3. She was ordered at the 1960 NY Boat show (Knit Wits/Hatteras debut) for delivery in Tx (I have a lot of the original paperwork as well as the leather binder from Hatteras with her numbers embossed on it). Some say the #s indicate her keel was laid on Feb 14th, 1960, indicating #3.
 
but that Hatteras stopped making centerline exhaust at hull #10 & she has centerline exhaust, as opposed to outboard exhaust (at the corners of the transom).

That is a old one # 3 that is COOL :cool: can't wait to see her next summer ;)
Sounds like you have a good handle on the tanks but It sounds like a lot less work to get new ones! :D
 
this is a great thread, I believe most of us will have to do this in the future.

please keep detailed photos etc.

Are you taking the tanks out or doing them in place. If taking them out then i would recommend cleaning them with a good solvent then wash with strong detergent then sand blast instead of sanding. sand blast will open up inclusions and give you a much better surface not to mention way faster. since you are adding glass, why not remove some material, these tanks are thick. Someone told me the bottom is .5" thick. sides a quarter or more.
 
Yeah...keep us posted on your progress....with pointers, pictures, and where you get that coating you'll be putting in the tank. That's news to me. Didn't know anything had been developed that would work for us and E-10.
 
Hey 67Hatt34c --

After re-reading some of my reply's, and sounding like the second coming of Willis Slane, Jack Hargrave et al, let me fall back down.

You asked if I'd be removing my tanks for cleaning... it's my belief that the bottom of the tanks are the bottom of the hull, and not complete tanks set into the hull. But I don't know.

From the brief look at them, they also appear to be glassed to the engine room bulkhead forward, as well as the mid cockpit bulkhead. I think it would be easier to build a new boat than get them out!

But my cockpit has gotta go (most of it has on its own already) so I'll get a good look soon... and take pictures for posting.

With the cockpit sole out and the tanks opened up, sand blasting would be... well... a BLAST! And a goodsend. The thought of grinding/sanding the tank bottom, sides, top, ends & faces of the baffles (as well as the baffle hole edges) TWICE(!) is un-fun (that's a technical term).

Is there a specific medium to use? Sand? Baking soda? Walnut shells? I'd hate having a 'What the hell is that bird doin' over there?' moment & when I look back down, see the ground.
 
use the fine sand and dont re-use it. keep the tip moving. you dont want to over heat the surface, high heat will damage the resin. I have never sand blasted FRP, but do have limited experience with Aluminum. I think using bead blaster and sand blaster is a lot of fun, as long as you dont do it for a living.

as far as the tanks being part of the boat, i doubt it.
 
Here is a new twist.
Got a letter from my insurance co. today. They are placing my vessel on "Port Risk Ashore" adding that she must be laid up ashore until fuel tanks are replaced or diesels installed. This subject is getting wide attention.
I wonder if Interplactics has any documents to help us keep these bullit proof tanks in our boats.
 
Hatteras does not (to the best of my knowledge) use hull-integral fuel tanks. They're separate structures and then tabbed to the support structures. On the sportfishers they're typically on shelves between the stringers.
 
Ford,

A noble job that must be done if ever there was one. Just heed the advice of filling with water before cutting or grinding - something we used to do with truck tanks.

Need to tell these folks in NJ that Hatteras only make fibergalss boats (or maybe I'm wrong??? ):

http://www.woodenboatsnj.com/handyman.html

Good luck with this project. She is a beautiful old dame well deserving of new life.

Capt'n Bill

1965 14' Starcraft with 1956 Wesco trailer - 2nd owner.
 

Forum statistics

Threads
38,154
Messages
448,708
Members
12,482
Latest member
UnaVida

Latest Posts

Trending content

Back
Top Bottom