HATTERAS YACHT PARTS
CABO YACHT PARTS
Sam's is your source for Hatteras and Cabo Yacht parts.
You are using an out of date browser. It may not display this or other websites correctly.
You should upgrade or use an alternative browser.
You should upgrade or use an alternative browser.
1976 Hatteras 58 LRC Stabilizer System Install
- Thread starter JD5652
- Start date
- Replies 85
- Views 9,868


OP
OP
JD5652
Well-known member
- Joined
- Mar 23, 2019
- Messages
- 763
- Status
- OWNER - I own a Hatteras Yacht
- Hatteras Model
- 58' LRC (1975 - 1981)
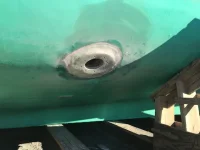
It is not brass , it’s steel, probably zinc plated. It should not be covered as the measurement from the bottom of the boat to the top of this plate is fairly critical. It’s purpose is to provide a platform to jack the actuator out of the block if needed. I wish that I didn’t throw my old ones away , so I could show you the amount of deformation due too the soft blocks that I had .
That would make a LOT more sense that's it's zinc plated steel.
The "reveal" of the actuator shaft assembly housing beyond the outer edge of the hole is 1/8". I'm sure that sets up the overall "height" you're talking about.
SKYCHENEY
Legendary Member
- Joined
- Apr 12, 2005
- Messages
- 15,546
- Status
- OWNER - I own a Hatteras Yacht
- Hatteras Model
- 53' EXTENDED DECKHOUSE (1983 - 1988)
My mahogany blocks have no fiberglass. They are just set into some sort of sealant. Its not 5200 but something similar. They were installed the year after the boat was built and after 5000hrs of service and 36 years they still look like new so I guess mahogany was a pretty good choice.
jmooney
Well-known member
- Joined
- Jun 26, 2012
- Messages
- 589
- Status
- OWNER - I own a Hatteras Yacht
- Hatteras Model
- 61' MOTOR YACHT (1980 - 1985)
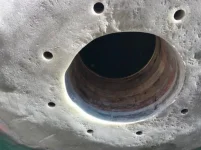
I think my blocks are are constructed of mahogany plywood. And this is one of the problems . Solid boards would be more water resistant. Also , the Naiad installation manual calls for two layers of fiberglass covering the blocks and extending at least 6 inches away from the blocks.
Last edited:
OP
OP
JD5652
Well-known member
- Joined
- Mar 23, 2019
- Messages
- 763
- Status
- OWNER - I own a Hatteras Yacht
- Hatteras Model
- 58' LRC (1975 - 1981)
Sorry for the long pause in updates. I had some real life issues to take care of.
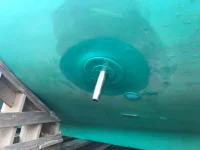
The install has progressed nicely. The actuators were installed and fiberglassed to the inside of the hull. You can't really see the fiberglass work in the pics since they tabbed them onto the hull and up on the sides of the support block.
I was not on the boat when they installed the fins and the yard did not get any pics of the fins installed.
The boat was re-splashed about two weeks ago. Then the oil cooler/reservoir was installed along with all the associated hydraulic hoses. The wiring was also installed and run up to the pilot house and upper helm. When I left there last week, they had installed both the upper helm and pilot house controls. All that was left to do was for the electronics guys to do the actual hook ups.
Attachments


Scarlett
Legendary Member
- Joined
- Dec 10, 2015
- Messages
- 1,939
- Status
- OWNER - I own a Hatteras Yacht
- Hatteras Model
- 53' MOTOR YACHT (1969 - 1988)
It’s Amazing how different installers do them differently. Mine have glass on top and sides of the mahogany blocks and no glassing on the outside, bottom of the hull. Also that little unit that sticks up on the actuators has been added at some point and made it hard to make covers in my engine rooms because they had to be so high to cover that little part. John
Scarlett
Legendary Member
- Joined
- Dec 10, 2015
- Messages
- 1,939
- Status
- OWNER - I own a Hatteras Yacht
- Hatteras Model
- 53' MOTOR YACHT (1969 - 1988)
Not sure on that Sky, but it is definitely a mil spec hydraulic fluid that is very light in color more like Sea Star fluid. Won’t be on my boat for 4 months. John
OP
OP
JD5652
Well-known member
- Joined
- Mar 23, 2019
- Messages
- 763
- Status
- OWNER - I own a Hatteras Yacht
- Hatteras Model
- 58' LRC (1975 - 1981)
What oil are they using now? That stuff looks really light. My book say to use 10w30
Sky-
Here is what they are using on my system...
1 (warrenoil.com)


Last edited:
OP
OP
JD5652
Well-known member
- Joined
- Mar 23, 2019
- Messages
- 763
- Status
- OWNER - I own a Hatteras Yacht
- Hatteras Model
- 58' LRC (1975 - 1981)
It’s Amazing how different installers do them differently. Mine have glass on top and sides of the mahogany blocks and no glassing on the outside, bottom of the hull. Also that little unit that sticks up on the actuators has been added at some point and made it hard to make covers in my engine rooms because they had to be so high to cover that little part. John
John-
I agree....
For my install, one of the reasons I selected AYB is that they have been installing Niaid stabilizer systems for over 30 years. I asked the same question about why no resin/fiberglass on the top of the support block and was told it was not necessary. I have to defer to their long-standing experience with stabilizer system installation and relationship with Niaid on this one.
OP
OP
JD5652
Well-known member
- Joined
- Mar 23, 2019
- Messages
- 763
- Status
- OWNER - I own a Hatteras Yacht
- Hatteras Model
- 58' LRC (1975 - 1981)
2-25-22 Update -
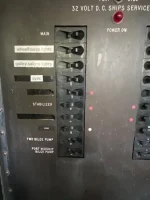
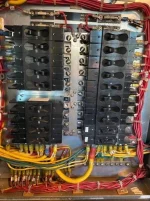
All the wiring was completed yesterday. Both controllers (Pilot House and Flybridge) were wired and interfaced. The NIAID control box was also interfaced with my Garmin Pilot House MFD so the GPS speed could be used for automatic centering of the fins below 3 kts. They also installed a small 32-24 VDC DC-DC converter for the system.
I had to do some wiring and breaker modification in the 32 VDC Ships Servce #1 breaker panel. The original stabilizer system was powered from a 5A breaker which was in the #6 position on the panel. This system required at least a 7.5A breaker. The original breaker wiring (Wire #312) went up to a flybridge terminal block. For this installation, it was decided to place the NIAID control box in the Pilot House "cable spread room". Rather than running new wires, I traced out some existing wires and did a slight wiring ad breaker modification.
At some point, a previous owner had removed the Pilot House Instrument Lighting system. This was powered by a 10A breaker in the same panel. The Instrument Lighting wiring (#314) went from the 32 VDC Ships Service Panel #1 to the Pilot House TB#4. So I swapped the breakers in the panel and swapped the wiring so I could use the existing "Stablizer" breaker slot on the 32 VDC Ships Service Panel #1. This is a relatively minor detail, but wanted to share this with the group.
Looks like Monday is "hot functional" test at the dock and if all goes well, we will also do a sea trial on Monday.


Forum statistics
Latest Posts
-
-
Any recent advice on how to retrofit Cruisair Split units
- Started by Cap'n Kirk
- Replies: 7
-
-
-

Trending content
