Sam's is your source for Hatteras and Cabo Yacht parts.

Enter a part description OR part number to search the Hatteras/Cabo parts catalog:

Email Sam's or call 1-800-678-9230 to order parts.

12v71 intercooler regasketing

  • Thread starter Thread starter Paul45c
  • Start date Start date
  • Replies Replies 8
  • Views Views 6,239

Paul45c

Well-known member
Joined
Mar 2, 2006
Messages
947
Status
  1. OWNER - I own a Hatteras Yacht
Hatteras Model
Not Currently A Hatteras Owner
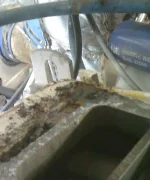
I shot a few pics of one of my intercoolers. It had been off the motor 2 years ago and cleaned up and pressure tested by a mechanic, and has been used for very light hours since then. I just noticed about a month ago that there was a rust stain on the port outboard top corner starting. It went from that to suddenly noticing some paint flaking off the aluminum side plates to "holy crap this has got to come off NOW!" in about another two weeks with virtually no use. Today was the lucky day. It's amazing how quickly it all broke down to this sorry shape.

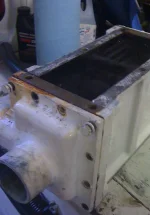
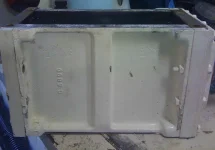
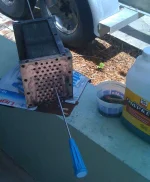
You'll see the aft outboard corner of the mounting surface of the blower where all the corrosion was (it's actually cleaning up pretty well -- I don't think I was too late to save it), the top quarter view of the intercooler, and a profile view of the cooler. Here's my question -- it looks to me like those aluminum side plates will have to come off...any advice on what I'll run into? I've heard you need to chill them with dry ice to shrink them up enough to get them out. It looks to me like they'll need to be regasketed. Are the side plates the only things that come out, or are they attached to anything in the middle of the cooler? It only appears to have bolts going into the end plates.
 

Attachments

  • BlowerAftCorner.webp
    BlowerAftCorner.webp
    67.7 KB · Views: 134
  • CoolerTopView.webp
    CoolerTopView.webp
    79.2 KB · Views: 132
  • CoolerSideView.webp
    CoolerSideView.webp
    90.6 KB · Views: 132
Thanks for the link, that was very helpful. Like you, I was wondering how to clean the water side without getting any acid on the fins.

I feel I'll need to somehow get those side plates, off, though. I know there must be (or should be) gaskets in between the flanges on the side plates and the big bronze or brass plates the water tubes are welded or brazed to, because I can see them on my other set on the other motor (different mechanic played with those and appeared to be more thorough). I can't even see any on this cooler.
 
"It went from that to suddenly noticing some paint flaking off the aluminum side plates.."

Is there actually aluminum used??
Is that in contact with salt water??? Or is it just the air box component?

edit: Now I recall the heat exchanger is likely stainless, and it's the airbox enclosure is a soft metal..aluminum I guess....
 
Last edited:
Yes, the side plates are definitely made of aluminum, and no, they don't come in contact with the salt water. They simply frame the airway around all the cooling fins and water rods of the intercooler.

Looks to me like the construction of the cooler is very modular. Two end caps bolted up to thick bronze plates; those two plates connect via the braised on water tubes. Of course it's open top and bottom, and then there's just those aluminum side plates that I'm trying to figure how to get out of there. I'm really not sure why they'd even need those aluminum side plates; why not just have a box of bronze open top and bottom without the removable sides? Seems like it would be simpler and more durable, and it's still open top and bottom for their fabrication purposes. I can't believe they were worried about saving weight.
 
The side plates come off for cleaning. The gaskets are available from DD. To reinstall the plates I shrink them with some dry ice then they fall right in place. Be sure to pressure test them. Put a light film of silicone sealant on the gaskets and you won't get the seepage or ooze.
 
That's what I was looking for...thanks, Dave!
 
After already pretty much disassembling the whole intercooler, I started thinking about how best to safely clean out the water tubes without putting any of the fins on the air side at risk from any splashover. My mechanic has warned me more than once not to get strong acids near those fins.

Well, my redneck ways really came through for me. I call it the Redneck Cooler Cleaner. Yep, that's a standard smallbore rifle cleaning rod with the .22 cal bronze bristle brush running through one of the tubes. Dipped in slightly diluted Phosphoric Prep & Etch from the Depot and voila -- polished tubes! Worked really well. Took about two beers to finish one cooler that way. And whoever recommended brake cleaner for the air side was right on; I set up the cooler over a 5 gal bucket and had at it with 3 cans of Brakleen.
 

Attachments

  • RedneckCoolerCleaner.webp
    RedneckCoolerCleaner.webp
    118 KB · Views: 74
Here's the last pic showing the cooler complete, all high & tight. Fresh gaskets tacked with a really light film of silicone (including the side plates gaskets I made up), and all the stainless bolt & nut hardware was given a light smear of TefGel anywhere it could come in contact with aluminum.

Given especially the shape of the aluminum and the 10,000 coats of different kinds of paint, I decided to chemically strip all the paint back to bare metal, acid etch and then repaint it all. It was a lot more work, but it was definitely necessary.
 

Attachments

  • CoolerComplete.webp
    CoolerComplete.webp
    70.2 KB · Views: 52

Forum statistics

Threads
38,156
Messages
448,736
Members
12,482
Latest member
UnaVida

Latest Posts

Trending content

Back
Top Bottom