Sam's is your source for Hatteras and Cabo Yacht parts.

Enter a part description OR part number to search the Hatteras/Cabo parts catalog:

Email Sam's or call 1-800-678-9230 to order parts.

8v92 TI Florida Panhandle Chrome Trim Package

  • Thread starter Thread starter rustybucket
  • Start date Start date
  • Replies Replies 26
  • Views Views 8,225

rustybucket

Legendary Member
Joined
Jul 12, 2013
Messages
1,200
Status
  1. OWNER - I own a Hatteras Yacht
Hatteras Model
52' CONVERTIBLE (1983 - 1990)
One of the big projects for this weekend was clean, prep and paint the engines. I tried to document the process as good as I could but we were quite rushed, so here is what I have.

REALLY wish I had taken more before pics, the transformation was stunning lol.

Prep. Air seps were removed, turbo inlets were taped over/sealed off. Exhaust jackets were removed.

Step 1 (8am sat): Engines were blown off with a high flow air nozzle hooked to air compressor. This removed any loose dust/debris

Step 2 (10am sat): High School Aged helper degreased/washed the engines. Hit any rusted areas with wire brush

Step 3 (3pm sat): Engines blown off again to remove as much water as possible.

Step 4 (4pm sat): I donned a Respirator and fans added. Used brake cleaner to hit all the spots degreasing/washing missed. Used about 20 cans of brake cleaner over the course of the project. I'm amazed at how well the brake cleaner just rinsed the oil/grime away.

Step 5 (8pm sat): All rust spots were hit with ospho in a squirt bottle.

Step 6 (9am sun): All ospho spots were rinsed off with freshwater.

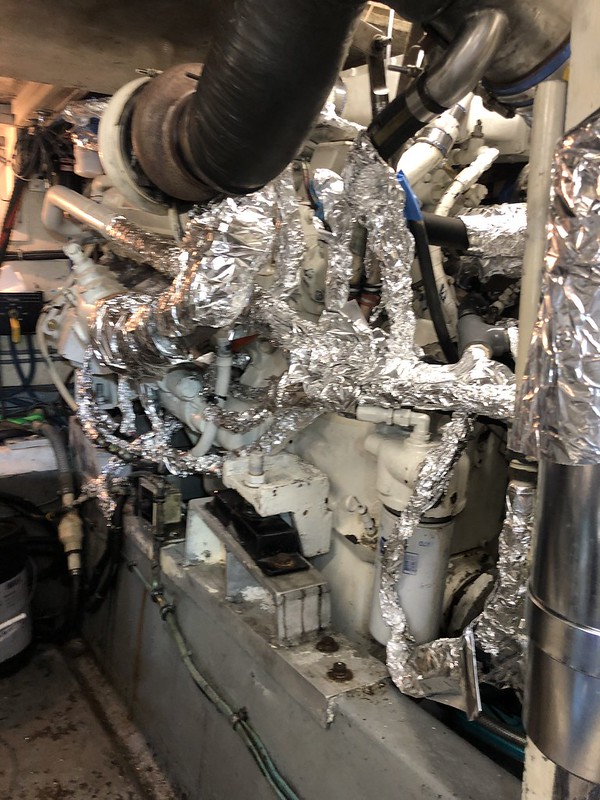
Step 7 (9:30am sun): All hoses and wires masked with aluminum foil

Step 7 (10:30am sun): One last pass with brake cleaner, mainly catching runs/drips.

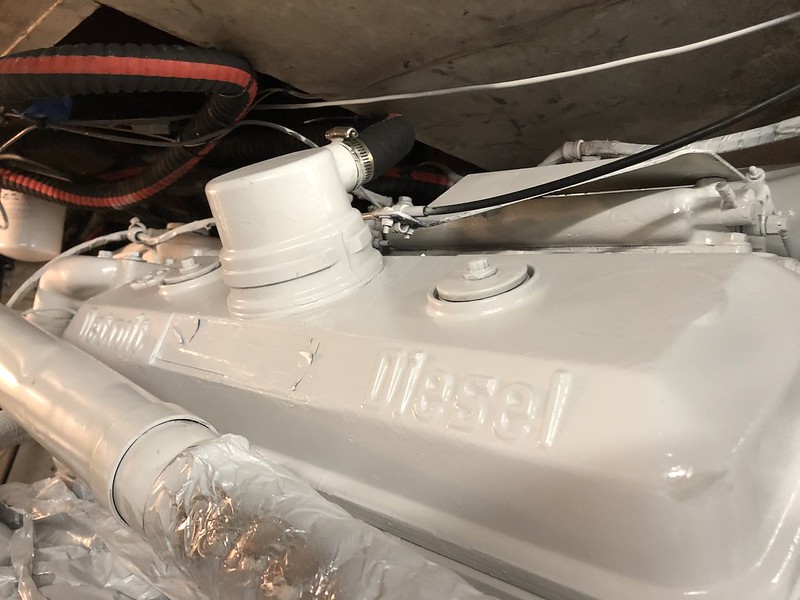
Step 8 (11am sun): Painting begins. Everything got at least two coats, many places got 3.


North Florida Chrome Package added!
49613838222_e80d179894_c.jpg


49613062603_abd26e3a4d_c.jpg


49613582596_c74f1d08ef_c.jpg


Painting begins!
49613582531_b9d6c029d1_c.jpg
 
The finished product! Still amazed at how much it brightened up the engine room.

49613838642_dc0d6047d5_c.jpg


The genset only needed a couple small spots hit.
49613837947_09c16c0ef9_c.jpg


Gotta love the instant gratification projects! Will be painting some of the bilge compartments and finish off the motor mounts and hot parts of the exhaust manifolds next weekend.
 
WOW ! Great work.!
 
Yes sir, that pops!! Plus, I learned something new. I never thought of using aluminum foil for masking. What a time saver.

I used to buy brake cleaner by the case because, as you said, the grime just rinses away. Unless you used a two part engine paint, be aware that it could melt your new paint.

Thanks for posting and congratulations--beautiful!

Thanks for your help/guidance on getting me heading in the right direction on this project Robert! The aluminum foil sure did make for easy (and very cheap) paint prep/masking.

The brake cleaner was AMAZING. I had never used it in this capacity before and I'm blown away. It's like a little pressure washer for grease/grime, stuff just melts away.
 
Last edited:
Looks Great! I remember doing the exact same project 10 years ago. Rob Brueckner (Rbrueckner) told me about using aluminum foil, best idea ever. Same with brake cleaner. Was one of more satisfying projects.

IMG00354-20100508-1604.webp
 
What paint did you use? was the overspray excessive ? Edward
 
What paint did you use? was the overspray excessive ? Edward

I used Two different paints. My engines were covington white to start with, which is a slightly off-white color. I decided to go with a bright white, due to the visual advantages of it, the cost and relative availability of the bright white.

Most all of the engine got Rustoleum High Performance Industrial Enamel in gloss white. We used about 14 cans of this.

The exhaust manifolds are getting G2 Brake Caliper Paint. I'm hoping 2 kits (1 kit should do 4 calipers on a car) will be enough for the exhaust manifolds. If not I'll order another kit.

The rustoleum is rated to 200 degrees. Hopefully it will handle temps near that very well and if hot spots develop it will turn amber in color, visually alerting me to hot spots.

The short pieces of the exhaust manifold that connect to the heads and are NOT water jacketed exceed 200degrees by a LOT and I was getting really tired of all the white paint flakes. So they were wire brushed down and I'll be applying this 2 part brake caliper paint to them this next weekend. Hopefully the 2 part high temp paint will hold up better to the higher temps.

The overspray wasn't really that bad. We filled the bilges and under the engines with water to 'catch' the overspray or drips there. Also, I plan on re-painting the bilge compartments and floor with a white paint, so some oversrpay is not going to hurt anything.

We laid blankets or foil over anything we were really concerned about, but it really wasn't much of an issue.

If you were concerned with overspray just lay paint cloths over everything and the overspray would be zero.
 
Last edited:
Sounds like you had it well planned , I thought it would much longer,looks great! Regards, Edward
 
Sounds like you had it well planned , I thought it would much longer,looks great! Regards, Edward

It really went pretty quick and smooth. 3 of us were working it on/off through both days. Only had 1 respirator so once we got to brake cleaner and paint it was a 1 man job.

Proper ventilation was really key. We opened the forward stateroom hatch and salon windows. Closed the salon/cockpit door and had the engine room hatch open with a shop fan blowing air from the engine room floor up through the ER hatch.

Had a nice breeze the entire time so it was somewhat of a wind tunnel in the engine room. Air entering the hatches and windows had only one way out, through the open floor panels, down in the er and out the hatch.
 
Third or fourth the "AHA" moment with the Alufoil. Especially the heavy duty stuff in a BIG roll I get from the restaurant supply.....

Brake cleaner is a staple in my shop, right up there with the PB-Blaster!

Cool project. I see this in my future.....
 
Looks great! This would be a 4 weekend project for me. One of these days.
 
Gad,, I luv those V Cummins. That looks hot.
 
Wanted to close the loop on this thread. Got the 2 part hi-temp G2 Brake Caliper paint on the non-water jacketed portions of the exhaust manifolds this weekend. 1 can per engine. I did 1 can for inboard port/starboard, and 1 can for outboard. With my ER config it just made it easier.

Paint went on pretty dang good. Everything got 2 coats and the top/visible portions got 3 coats. Hopefully this stuff will hold up to the temps. I'll report back after a few runs with pics of how it is doing.

49643878826_59ce2d7795_c.jpg
 
Third or fourth the "AHA" moment with the Alufoil. Especially the heavy duty stuff in a BIG roll I get from the restaurant supply.....

Brake cleaner is a staple in my shop, right up there with the PB-Blaster!

Cool project. I see this in my future.....

Believe it or not, I bought several sizes/brands of the aluminum foil for this project. By far the preferred one was the el-cheapo walmart thin stuff. The heavy duty was ok for shielding bigger objects, but for hoses, hands down the best stuff was the cheap/thin foil. It wrapped much easier and stayed in place better than the thicker stuff.

Bottom line, I'd suggest getting one roll for each side of the engine(s), so 4 rolls for twins of the thin/cheap and a couple rolls of the reynolds heavy for shielding and overspray.
 
Wanted to close the loop on this thread. Got the 2 part hi-temp G2 Brake Caliper paint on the non-water jacketed portions of the exhaust manifolds this weekend. 1 can per engine. I did 1 can for inboard port/starboard, and 1 can for outboard. With my ER config it just made it easier. Paint went on pretty dang good. Everything got 2 coats and the top/visible portions got 3 coats. Hopefully this stuff will hold up to the temps. I'll report back after a few runs with pics of how it is doing.
49643878826_59ce2d7795_c.jpg
Looks great. You’ll be able to tell your hot or hotter cylinders when you run up to temp. Beware the smoke of fresh paint burning in.
 
BTW, anyone got recommendations for painting over corroded chrome valve covers. No good resources around here to re-chrome. I have one chrome and one painted per motor. Thx
 
Chrome inboard, painted outboard. But you already knew that!
 
BTW, anyone got recommendations for painting over corroded chrome valve covers. No good resources around here to re-chrome. I have one chrome and one painted per motor. Thx

Powder coat them all?
 

Forum statistics

Threads
38,154
Messages
448,697
Members
12,482
Latest member
UnaVida

Latest Posts

Trending content

Back
Top Bottom