Sam's is your source for Hatteras and Cabo Yacht parts.

Enter a part description OR part number to search the Hatteras/Cabo parts catalog:

Email Sam's or call 1-800-678-9230 to order parts.

Removing stanchion bases on 73 53mt

  • Thread starter Thread starter ron6785
  • Start date Start date
  • Replies Replies 24
  • Views Views 8,342

ron6785

Well-known member
Joined
Jan 30, 2009
Messages
580
Status
  1. OWNER - I own a Hatteras Yacht
Hatteras Model
53' MOTOR YACHT (1969 - 1988)
Having developed a soft spot on the port side deck which I will repair. The culprit appears to be the base of the rail stanchion. In what has to be one of the worst designs these fittings are made to leak. They appear to be attached by bolt thru a threaded backer plate?? Is that the case , and if so how do you remove the bolt after all these years??

Help,
 
Ours came out fairly easily. The method that worked best was to apply liberal amounts of penetrating oil at each screw and allowing it to to set overnight. We then used large screwdrivers that fit the screwheads with the handles driven up inside 3/4 drive sockets that fit around the handle and turned them with a 3/4" rachet (turned manually, very slowly with no power assist) Use a lot of downward pressure while turning to avoid slipping, (and did I say turn very slowly).
 
Ron, when you fix the problem and reinstall the stantion base, you might consider using some butyl tape to seal the screw rather than other sealants like 4200, 5200, etc. You can get butyl in white. Ed found an interesting read here http://www.sailnet.com/forums/gear-maintenance/63554-bedding-deck-hardware-butyl-tape.html on butyl vs. caulk for sealing things that are screwed down to the deck. I think that's how I'll reseal the 200 screws holding down the flybridge helm when I get up there to start resealing that.
 
Also - Turn the screws first in the direction to TIGHTEN them (clockwise). It is much easier to break a seized fitting loose in the tightening direction first. It only needs the slightest fraction of a turn to do so. Much less chance of breaking the fitting as well by doing this. Then, as noted, unscrew slowly and, if necessary back them out a tiny bit, then screw in, then back out slightly more, screw in, etc, etc, etc.

I have never found penetrating fluid to be of any help breaking a fitting loose initially though it is a big help in the unscrewing afterward.
 
If you break off one of the screw or have to drill it out I found its not that drastic to chisle around the screw enough to get a good vice grip on it and get them out. Then of course you need to patch the mess but its not that bad. Gives a change to fix any damage to the lament from the leak or stain from the stainless.
I used a large brace and bit with the exact screw head match to slowly work the screws out of four stantions. I broke or ruined three screws, not too bad.

Skooch
 
I notice several of you have mentioned screws. I have two stanchion bases that have Philip head bolts. Since they are the only Philips heads I assume they have been replaced and came out fairly easy. I am making the assumption that all the others are also bolts??

For those who have done this find bolts or screws???
 
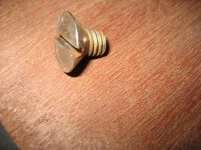
ron from hatteras the stantions have machine bolts screwed into aluminum plates that are put in place during lamination. most of mine use a flat head screwdriver, a couple have phillips which i think have been replaced at an earlier time.
 
Hi All,

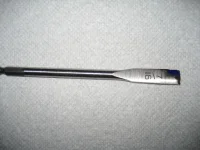
We're similar to Bill,,,,flat head stainless bolts with an occasional Phillips (which I'd actually prefer). We are maybe 30% complete on our stanchion rebeding. There were some tough ones that took a lot of coaxing, but knock on wood none have snapped so far. We were very frustrated that we could not find a bit or screw driver that fully and snugly fit the grove in the bolt so we made a custom flat head bit from a drill, worked extremely well.

IMG_1681.webp

The dissimilar metals (stainless into aluminum) over time creates a wicked bond, almost a weld. Case in point I recently had the guys attempt to remove the cockpit door which is held on by a HUGE stainless hinge with 4 flat head bolts on each side. The first one was a struggle, second and third were a @$@$ and the fourth snapped. We used every removal approach and penetrating oil and both, wouldn't move a millimeter.

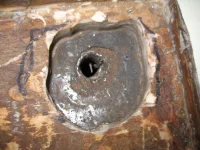
Removing the snapped stainless bolt from the aluminum plate was like removing the sword from the stone. Took 2 people over 5 hours to get it out....I'll bet I've got $500+ into this door removal to date. Now it needs to be cleaned out, realigned, filled etc etc.....

IMG_1680.webpIMG_1675.webp
 
Last edited:
"For those who have done this find bolts or screws???"

They are - at least on our 53 - machine (thread) screws into metal backing plates. I don't know how a bolt could be used since there would be no way to manipulate a nut from the underside but who knows what may have been done at initial construction? :)
 
ron from hatteras the stantions have machine bolts screwed into aluminum plates that are put in place during lamination. most of mine use a flat head screwdriver, a couple have phillips which i think have been replaced at an earlier time.
Thanks Bill, wasn't sure what the plate was made out of which explains the metals and why they are so tough to get out.
 
"For those who have done this find bolts or screws???"

They are - at least on our 53 - machine (thread) screws into metal backing plates. I don't know how a bolt could be used since there would be no way to manipulate a nut from the underside but who knows what may have been done at initial construction? :)
The Phillips heads were clearly machine bolts
 
ron, when you go back together find a product called tefgel, it works great. it was recommended by my powder coating guy for the monel screw to aluminum window frame contact.
 
Hi Ron,
Long time no hear....Funny thing, I was just trying to get one of my stanchions off today. Two screws came loose, but two wouldnt budge. I gave up. I am chasing a rain water leak. Hope you get yours off. Keeps us posted.
 
Hi All,

Sorry guys I must have used the wrong terminology by saying "bolt". As you can see from the images of the door, they are threaded stainless, i guess machine screws, that are screwed into aluminum plates.
 
Hi Ron,
Long time no hear....Funny thing, I was just trying to get one of my stanchions off today. Two screws came loose, but two wouldnt budge. I gave up. I am chasing a rain water leak. Hope you get yours off. Keeps us posted.
Hey, we spend about 4-5 months a year RVing and this year we were in Canada so wasn't on the forum. Yea, these early Hat's had a three part stanchion with a fitting at the rail and gunnel and a stainless pipe. The fittings are bronze and there is no way they wont leak as water runs down th pipe it goes right into the fitting, the only saving grace is the backer plate however with dissimilar metal it forms a natural weld when mixed with water.

Have you got your bride on board yet??

Ron
 
If you break off one of the screw or have to drill it out I found its not that drastic to chisle around the screw enough to get a good vice grip on it and get them out. Then of course you need to patch the mess but its not that bad. Gives a change to fix any damage to the lament from the leak or stain from the stainless.
I used a large brace and bit with the exact screw head match to slowly work the screws out of four stantions. I broke or ruined three screws, not too bad.

Skooch
How did you drill around screw without destroying the base fitting??
 
The base has to be off before you try that trick.
 
Hi All,

We're similar to Bill,,,,flat head stainless bolts with an occasional Phillips (which I'd actually prefer). We are maybe 30% complete on our stanchion rebeding. There were some tough ones that took a lot of coaxing, but knock on wood none have snapped so far. We were very frustrated that we could not find a bit or screw driver that fully and snugly fit the grove in the bolt so we made a custom flat head bit from a drill, worked extremely well.

View attachment 12511

The dissimilar metals (stainless into aluminum) over time creates a wicked bond, almost a weld. Case in point I recently had the guys attempt to remove the cockpit door which is held on by a HUGE stainless hinge with 4 flat head bolts on each side. The first one was a struggle, second and third were a @$@$ and the fourth snapped. We used every removal approach and penetrating oil and both, wouldn't move a millimeter.

Removing the snapped stainless bolt from the aluminum plate was like removing the sword from the stone. Took 2 people over 5 hours to get it out....I'll bet I've got $500+ into this door removal to date. Now it needs to be cleaned out, realigned, filled etc etc.....

View attachment 12512View attachment 12513
Yes, to remove all the fittings would be a monumental job. I don't think heat would help since the bolts are in a backr plate in the fiberglass. By the time the heat warmed the backer plate to expansion you would have bubbled paint and fiberglass. I tried a hand held impact screw driver to no avail and tried a bit like you used and it bent the bit , guess it wasn't a high enough grade steel.
 
Ron, when you fix the problem and reinstall the stantion base, you might consider using some butyl tape to seal the screw rather than other sealants like 4200, 5200, etc. You can get butyl in white. Ed found an interesting read here http://www.sailnet.com/forums/gear-maintenance/63554-bedding-deck-hardware-butyl-tape.html on butyl vs. caulk for sealing things that are screwed down to the deck. I think that's how I'll reseal the 200 screws holding down the flybridge helm when I get up there to start resealing that.
Thanks Ang,
 
How did you drill around screw without destroying the base fitting??

Very carefully drill out the head of the stailess bolt so you can remove the stantion. Then dig it out. I found on my LRC the fiberglass was about 3/8-1/2 inch to the aluminium base. I used the TFal treatment for dissimilar metals on re-construction but have never had to remove them again.

Skooch
 

Forum statistics

Threads
38,156
Messages
448,745
Members
12,482
Latest member
UnaVida

Latest Posts

Trending content

Back
Top Bottom