Sam's is your source for Hatteras and Cabo Yacht parts.

Enter a part description OR part number to search the Hatteras/Cabo parts catalog:

Email Sam's or call 1-800-678-9230 to order parts.

Watertank baffle repair

  • Thread starter Thread starter Cricket
  • Start date Start date
  • Replies Replies 26
  • Views Views 74,786

Cricket

Legendary Member
Joined
Aug 22, 2006
Messages
1,422
Status
  1. OWNER - I own a Hatteras Yacht
Hatteras Model
50' CONV -Series I (1966 - 1969)
Went to install Maretron focus tube for NMEA2k tank sensor and found all 3 water tank baffles laying on the bottom of the tank. my guess is they've been there for a long time, fortunately no leaks.
So we cut the floor out in the V berth, cut the top of the tank off, and into a unexpected project. From what we can tell they only were attached to the top of the tank with some bonding putty and screws from the top. Hatteras puttied and glassed over the screws on the tank top which is why it isn't leaking.
Probably going to end up making a new tank top out of some G10 fiberglass board and add some holes to the baffles to lower the pressure when the water is passing thru, besides tabbing the sides as far down as we can reach.
The good news is the tank was super clean, no algae at all.
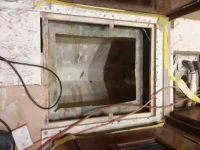
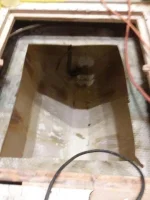

Water_tank_cutout.webpWater_tank_close.webpWater_tank_baffles.webp
 
Project got bigger.....
Hard to believe the tank wasn't leaking.
We must have found at least 25 screws screwed into the tank, all had to be original as they were from the outside in on the sides and top.
Cut them all off and glassed them over with 1700 and epoxy.
The entire inside of the tank will be coated with West epoxy before we seal it up.

The last photo is the forward fuel tank with the Maretron sender we installed fall 2018.

And to think I was going to just have fun adding a N2k gauge to the tank last weekend.......
 

Attachments

  • WaterTank1.webp
    WaterTank1.webp
    102.5 KB · Views: 263
  • WaterTank2.webp
    WaterTank2.webp
    100.3 KB · Views: 261
  • WaterTank3.webp
    WaterTank3.webp
    75.3 KB · Views: 264
Last edited:
More pix
 

Attachments

  • WaterTank7.webp
    WaterTank7.webp
    82 KB · Views: 261
  • WaterTank8.webp
    WaterTank8.webp
    83.7 KB · Views: 256
Thanks for posting up the in process.... always find these type projects interesting... hard to remember why you drained the swamp when you suddenly find yourself up to your a**hole in alligators....
 
Thanks for posting this and especially with the great pictures. It'll be a great help for others. I discovered my water tank (380 gal.) ruptured at the top aft corner after purchasing Aslan. I felt like Hatteras should have supported it more completely. Fortunately, the area was accessible w/o pulling anything more than inspection deck plates. As a result of your post, I ran my DEPSTECH inside the tank and confirmed everything is in place.

Getting a look down in hard to reach bilges, as you have done, is invaluable. Is there any unsealed wood down there that could be a moisture or termite magnet?
 
How dirty was the tank when you first cut it open? It looks like it was pretty clean!
 
We always epoxy coat any uncoated wood we run into.

I was surprised how clean the tank was, actually spotless. One of the guys that fishes with us has taken the water tank on as his chore for the last 10 years, he's also the one who crawled into it to do the grinding and glassing for the repair..
 
In all of the years I've been involved with this site, I have never seen pics of a Hatteras tank opened up. This has to be the most interesting thing on this site in a long time. Much better than which varnish is best or what toilet do you like. :)
 
Are the tanks built somewhere else and then dropped (and glassed) into the hull?

Or, are they part of the hull of the boat and built in?

Jon
 
The tanks are separate parts that are foamed into place, all of ours are centerline between the stringers, only the aft fuel tank, under the cockpit, is taller than the stringers. tank bottom must have been made in male molds since the insides are smooth, the lid is added and then glassed together. Have a pix that I will post a Hatt with all of the tanks ripped out sitting under the hall.

Think the baffles broke off for a couple or reasons, the attachment to the top was using a very small flange with bonding putty and screws from the top and also a very small tab on the sides also with only bonding putty, and mainly because there was only a very small area for the water to move because of the very small cut out on each side and the bottom. Just not enough surface are was used for the tabbing.

Interesting thing about the photo that has the fuel sender (yellow wire) is the 2 plates on the top of the tanks. For at least 15 years we've been chasing an intermittent small fuel leak that we just assumed must have been from a crack we couldn't find. last year while fixing a plumbing leak we noticed a damp spot on the tank top. so we cut a hole and found those 2 plates, the gaskets had rotted out just like on all the other tanks. My guess is they used the same tank on other boats, our front tank pulls and returns only from the aft side of the front tank.
 
It's funny how things snowball sometimes lol! Nice work on posting the pics though, very informative! Best of luck getting it all back buttoned up!
 
Cricket,

Thanks for the description of how these tanks were installed.

Please send more photos especially how you close off the tanks. I am thinking of doing this on one of my fuel tanks that has been abandoned for over 15 years.

Jon
 
Are the tanks built somewhere else and then dropped (and glassed) into the hull?

Or, are they part of the hull of the boat and built in?

Jon

There used to be a video in the videos section of this site there's one that was a tour of the High Point plant. The tank molds were visible in some of the sequences and it appeared that the tanks were laid up over the molds of the inside shape. I @$$ume in two pieces, then glassed together.

Too bad the video isn't still up. It was pretty interesting.
 
I cut up and removed my aft tank from lazarette due to leak. Can confirm it construction was a top and bottom molded over a plug. Baffles tabbed into bottom, with top puttied and bronze screwed to baffles and bottom, then glassed with tape over join and screw heads. Fittings installed from outside with backing plates and gaskets.
 
More pics
 

Attachments

  • Watertank_Hall_clamps.webp
    Watertank_Hall_clamps.webp
    74.3 KB · Views: 138
  • Water_tank_Pickup.webp
    Water_tank_Pickup.webp
    103.8 KB · Views: 136
  • Hall_Floor.jpj.webp
    Hall_Floor.jpj.webp
    104.2 KB · Views: 134
Cricket,

I take it from your pics today that the spring clamps are holding the new fiberglass "cleats" being epoxied in.

Then, your original fiberglass pieces glued (epoxy with some fiberglass) right on top of the cleats?

Details....

Thanks

Jon
 
Yes, epoxy the cutouts (or new pieces) onto the cleats and then glass over the seam.
Probably going to end up using G10 pieces instead of the cut outs since they're perfect on both sides.
We were going to just glue everything on the outside/top of the tank but think this way is stronger, and we don't have to glass a weird seam/edge.
Using the G10 saved us a ton of hours/work, even though is looks to be expensive, $370 for a 1/4" 4x8 sheet ended up being cheap overall.
 
All sealed up, just have to install the pick ups, vent, Maretron sender, and inspection plate.
And to think this was going to be an easy install of the Maretron parts.........
 

Attachments

  • watertankglassedvberth.webp
    watertankglassedvberth.webp
    93.4 KB · Views: 85
  • watertankcleats.webp
    watertankcleats.webp
    87.7 KB · Views: 83
  • watetankopencloseup.webp
    watetankopencloseup.webp
    84.7 KB · Views: 85
Very good pics and potentially very useful thread. I appreciate your making such a detailed record.
 
Very good pics and potentially very useful thread. I appreciate your making such a detailed record.

I second Roberts sentiments....

Would also like to hear more about the Maretron pickups as I will be moving to a Maretron system sooner or later.... likely sooner...

Thanks!
 

Forum statistics

Threads
38,156
Messages
448,748
Members
12,482
Latest member
UnaVida

Latest Posts

Trending content

Back
Top Bottom