Sam's is your source for Hatteras and Cabo Yacht parts.

Enter a part description OR part number to search the Hatteras/Cabo parts catalog:

Email Sam's or call 1-800-678-9230 to order parts.

Replacing Forward Portlights - 1976 58 LRC

  • Thread starter Thread starter JD5652
  • Start date Start date
  • Replies Replies 16
  • Views Views 2,508

JD5652

Well-known member
Joined
Mar 23, 2019
Messages
763
Status
  1. OWNER - I own a Hatteras Yacht
Hatteras Model
58' LRC (1975 - 1981)
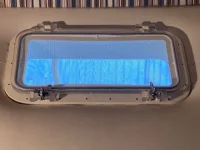
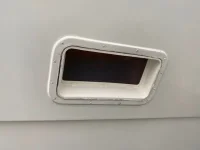
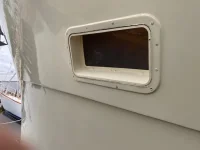
I have to replace both my forward portlights since they were blown out in Delaware Bay. When I looked at the ones I have in my "stock", I found out that they are basically one piece with the trim ring being on the outside. Looking at the currently installed portlights (whatever is left of them), I had previously thought that the hatch was attached to the internal trim ring that was screwed into the boat hull and the outer "trim ring" was attached to the outer "overhang".

I had thought I could just do the portlight replacement from the inside only, but it appears now I will also need to have access to the outside.... meaning now planning to do this when the boat is hauled to do the stabilizers or try to bring the bow close enough to the dock to reach the portlight from the outside.

Does anyone have any photos of doing this or any words of wisdom from previous experience doing this?

Thanks in advance!
 
I originally posted this up in December 2021....got no responses. Now I'm diving into it.

I've removed all the mounting screws from inside flange. My first thought and attempt as to see if I could simply pry the old portlight and frame out of the opening. I should have thought better. I'm thinking there's likely 5200 all around the frame where it passes through the hull.

I'm thinking my next step is to use a multi-tool and cut the frame in numerous section and remove each section. I can estimate the depth I need to go using the new portlight.

Anyone have any thoughts or suggestions??

Port Portlight Removal 04.webpPort Portlight Removal 02.webpPort Portlight Removal 05.webpPort Portlight Removal 04.webpPort Portlight Removal 02.webpPort Portlight Removal 05.webp
 
Well.... sometimes you just have to trust your gut and go for it....

Port Portlight Removal 06.webpPort Portlight Removal 08.webpPort Portlight Removal 09.webp
 
Dry fit of the new portlight....
 

Attachments

  • Port Portlight Removal 20.webp
    Port Portlight Removal 20.webp
    40 KB · Views: 103
  • Port Portlight Removal 18.webp
    Port Portlight Removal 18.webp
    11.3 KB · Views: 102
  • Port Portlight Removal 19.webp
    Port Portlight Removal 19.webp
    18.6 KB · Views: 105
Now to clean up the opening and prep it for sealing.... think I'm going to go with Dow Corning 795.. I have excellent results with this product over the years...albeit primarily for window sealing.

Any other thoughts on the sealant?

I have to say that whatever was used originally at the factory was still pliable and doing its job after 46 years...
 
JD,

Sorry I missed your post for information on doing this project, because I would have been able to tell you EXACTLY what you found out. Multi-tool and a bunch of wide pry-bars and the entire assembly will come out from the inside, leaving the outside trim ring intact.

I did my starboard side about 6 months ago. Just noticed I may need to do the port side as well, but I may be able to save that one with a touch of epoxy.

Has me wondering about all the other port lights. Clearly the bow is the most critical as it's the most likely to allow a wave to dump large amounts of water into the boat.

Got to love all the surprises these older girls bring us.

Zig-

What sealant did you use?

Also, did you put sealant along the entire surface of portlight opening. On the original install there was only sealant on the outer edge for about 1 inch.

Thanks!
 
I am 99% sure that I used 3M 4200 for sealant. I masked off the outside of the hull with tape and plastic so that I could pump as much sealant as I could into the hole and onto the entire surface of the port light.

If I remember correctly, it took some real pushing and finally using the screws on the port light to pull it back to the hull and squeeze out the excess caulking. I believe the new port light should be good for at least 25 years or so which means I probably won't be ever replacing it again myself.

Because I did this repair at the dock (not fun), I had to wait for a very calm day. Swung the stern of the boat out into the canal and pulled the bow up as close as I could to the pilings so I could reach the port from the outside.
 
I have used Dow 795 , I heard that it adheres to the plastic better . I cut the sealant away with a knife ,but that was difficult. I would now use a multi tool , but I would try the plastic spatula attachment made for removing sealant. This might alleviate any collateral damage .
 
I hadn't really thought about it, but it is interesting to note that the vinyl seems to be stapled on and then the portlight covers it?
 
I hadn't really thought about it, but it is interesting to note that the vinyl seems to be stapled on and then the portlight covers it?

Yes...that is at least how mine is done.

I inadvertently tore mine in a few places and punched a couple holes when the screwdriver slipped off the portlight flange and into the vinyl. Will have to repair that after I repair the inside mounting holes. Almost all the screws on the bottom of the flange inside had been overtightened at some point and were just spinning in their holes. Assuming a previous owner probably had a gasket leak and thought it was coming from the flange and overtightened the screws to the point of stripping out the holes.
 
I thought Hats were all fiberglass from the rub rail down. I see plywood, is that an LRC thing?
 
Mine are all the old bronze ones but the same principle. I did not like how the vinyl and foam was sandwiched between the flange and the plywood. In fact the whole deal is just wrong. Basically it’s all held in with the caulk. In reality there should be through bolts from the flange to the outside bezel but it is what it is. I pulled all mine out years ago and put them back with 5200. As the OP said the screws don’t really hold and if you tighten them down thy strip. The plywood on mine wasn’t even attached to the hull glass so I pryed it out and pumped 5200 into the gap. 30 years later no leaks still but I never open them and have them 5200 shut.
 

Forum statistics

Threads
38,156
Messages
448,737
Members
12,482
Latest member
UnaVida

Latest Posts

Trending content

Back
Top Bottom