Sam's is your source for Hatteras and Cabo Yacht parts.

Enter a part description OR part number to search the Hatteras/Cabo parts catalog:

Email Sam's or call 1-800-678-9230 to order parts.

Original spotlight mechanical question

  • Thread starter Thread starter Timm
  • Start date Start date
  • Replies Replies 23
  • Views Views 8,068

Timm

Active member
Joined
May 8, 2007
Messages
163
Status
  1. OWNER - I own a Hatteras Yacht
Hatteras Model
53' MOTOR YACHT (1969 - 1988)
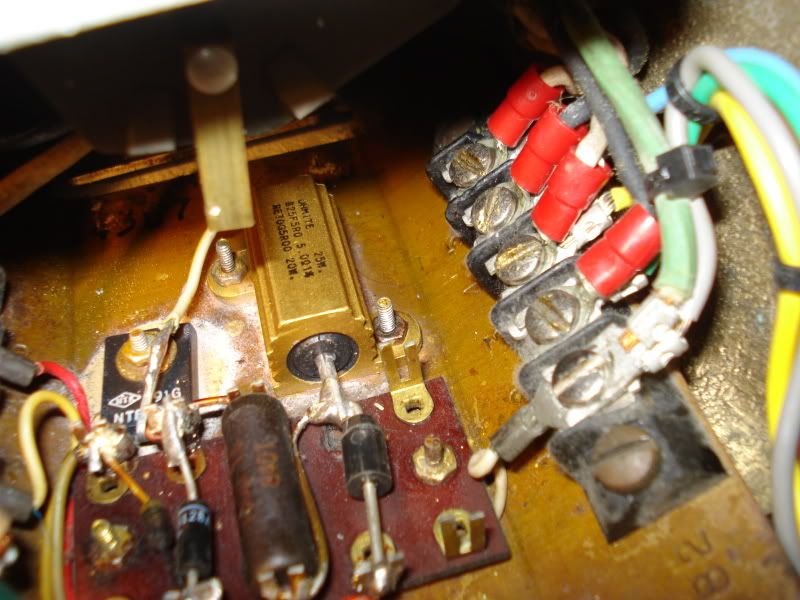
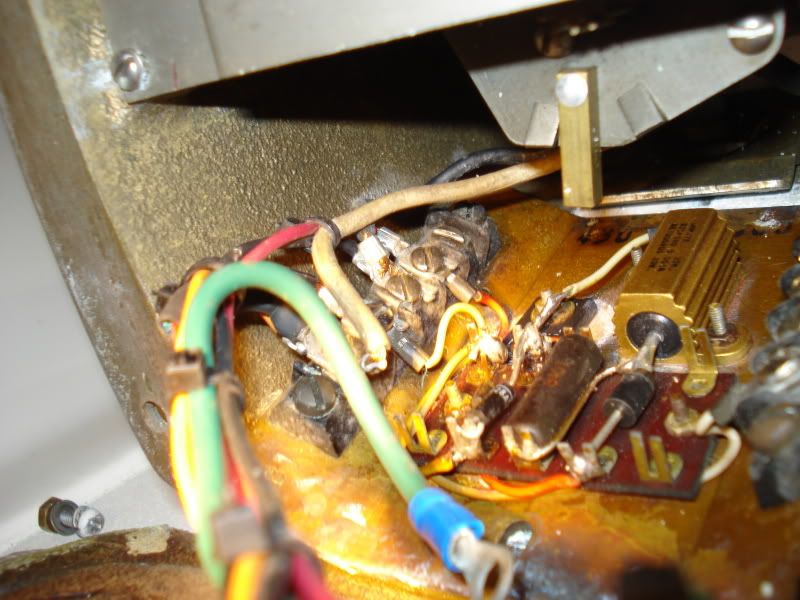
I recently had the original spotlight on a 78' vintage 53' YF rechromed. Prior to disassembly, it worked fine mechanically except the bulb was burned out.

Like a fool, I did not take pictures of the mechanics prior to disassembly.

Now, it looks beautiful, lights up fine with a new bulb, but I can't get it to move up/down or right/left. I hear and can see the motors running inside but no actual mechanical movement of the body.

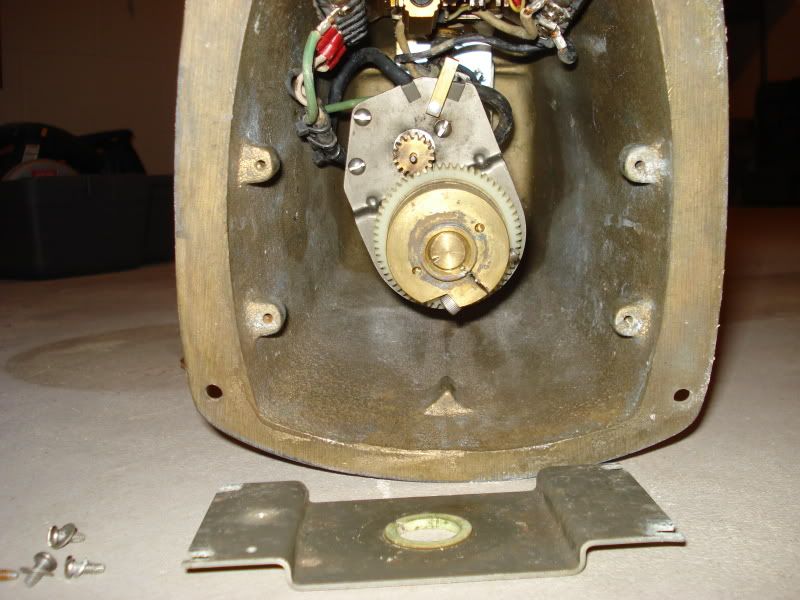
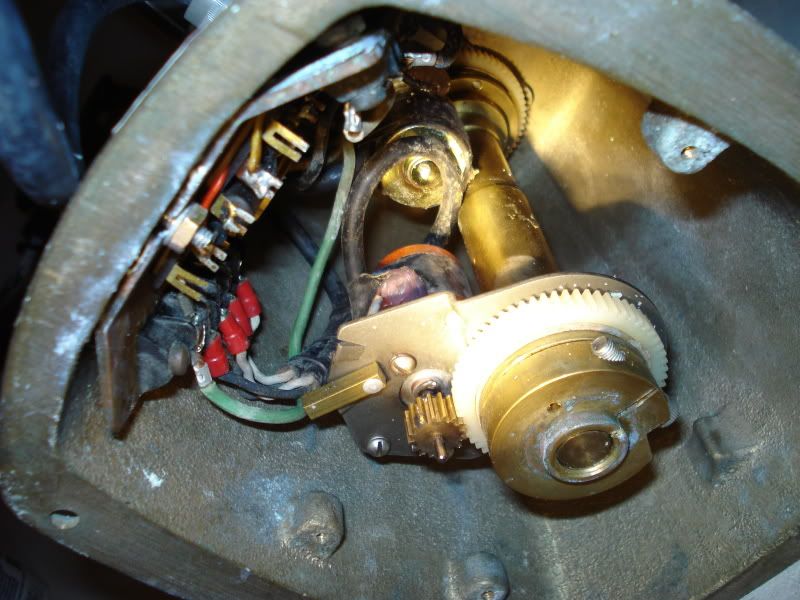
I am wondering if I could ask someone a huge favor if they would be willing to pull their spotlight off of the mounting block attached to the boat, turn it upside down and take a picture of the internal mechanics inside the base and email it to me?

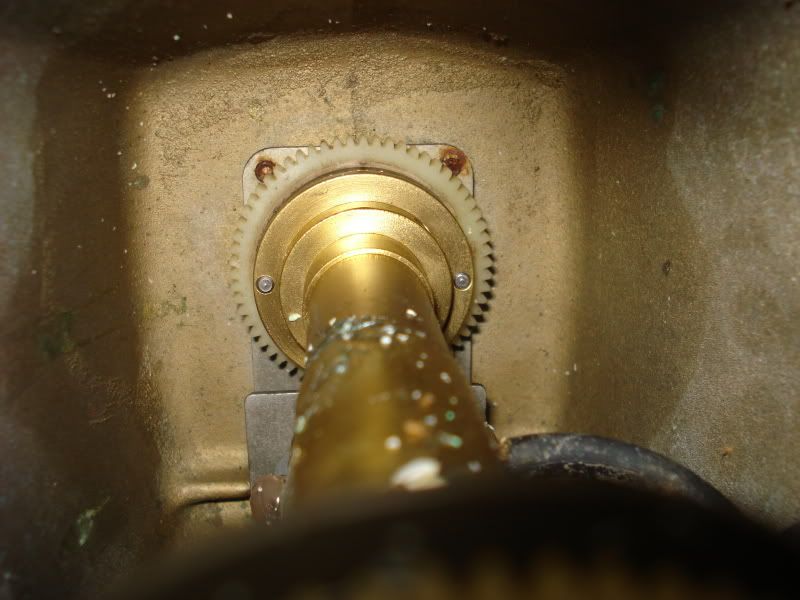
At the very bottom of the base, there is a rectangular plate that has a hole in the center which goes over one of the shafts, mounted with 4 screws on each corner. It would also be very helpful if that person could remove that plate and take an additional picture too.

I'm hoping with pictures of a working light, I can spot something that I may have reassembed incorrectly.

I know this is asking a lot but thought it was worth a shot.

I can be emailed at: timm@walkerairsep.com

Thanks.
 
Timm,
I'm sorry I can't help, but I do need to have mine rechomed as well. Where did you take it and what did it cost?
 
I had it done at a local shop here in San Jose California. It was about $300. I repainted the base.
 
Unfortunately, I can't supply any pics. I used to have some but I can't locate them from when I overhauled mine.

There are two clutches inside, one set for each motor. If they are slipping, the light won't turn. There is also a small gear unit that reduces the RPM from the motor to something suitable for moving the light. If any of these gears are stripped, the light won't turn. ALSO, the main gears that control traverse and elevation are held onto their shafts with set-screws. There is no woodruff key. If the set screws are loose, the shaft will turn but the gear (and the light) won't.

These units should be completely disassembled, cleaned, and lubed every few years. They get a lot of exposure and the grease will eventually dry up and turn into glue. As I said in another post, it is a lot more complex inside than one might think. It's certainly not difficult but at IS a bit fiddly.

I remember when I disassembled my first (car) automatic transmission many years ago. I expected hundreds of complex components and I still recall my first words when I had it apart. I said, "You mean that's all that's in here?" I had the opposite reaction when I took the searchlight apart!


Glad to hear it was just a burnt out bulb!
 
$300 is quite a bargain. I paid about $1k to have my One-Mile Ray rechromed, but then it was the fully mechanical version so all of the knobs, gears, nuts, bolts, and straps had to be done as well.
 
Timm,
I just pulled my Rayline spotlight off to get it re-chromed. It's sitting in my basement right now. I haven't disassembled it yet as I'm going to the plating shop first to get a quote. What do you need to know? I can take some pictures for you, but it would help to know exactly what you need to see.

Also, did you plate just the light itself, or did you also remove the yolk that attaches the light to the base and have that plated? I can't decide whether to do that part or just the light. I think I'll just repaint the base.
 
Here is a couple of shots of the wiring. I took these so I could remember how to put it back. If you need something else, just let me know.

stabilizerandspotlight016.jpg


stabilizerandspotlight014.jpg


stabilizerandspotlight015.jpg
 
I am doing the same project for our 1976 48 LRC. Will be removing the spot light tomorrow morning if all goes as planned. I plan to leave the wires attached to the light as they go to a terminal buss under the forward side of the flybridge. No numbering on the wires, not very helpful. Now the lower control works fine, but the bridge control that looks original is dead. Would also be interested in a recommendation on replating outfits in the North Carolina area or that does it via UPS. The replater in my immediate area is just so sloooooooooooooow on turn around. Waited two months to get two door locks back. Never again.

Pete
 
Have an update and question for today. Did successfully remove the spotlight today with all the wires still attached. Just disconnected the wires at the terminal block and pulled them through. Now it is dismantle time. Was a pleasure to be doing this in the heated paint prep shed, as it was snowing outside in eastern NC this afternoon.

Have a question on the operation of a dual station spotlight. Looking at the wire routing today, it is clear that the electrical path is DC power to the lower pilothouse control, then up to the flybridge control and next to the actual light. In my previous post, I mentioned that the bridge control is dead. Now I am wondering if the lower control has to be on for the upper control to work. Too late for me to try it! So simply stated, to use the flybridge spotlight control, on a dual control installation, does the lower control need to be on, or can it all be done from either control independently? Thanks

Pete
 
Either control should run the spotlight independently.
 
Thanks all for the replies and pictures.

I completely disassembled the light and had all of the metal pieces rechromed. I just painted the base.

Sky: if you could take the plate off , tilt the base up and take a picture of the orientation of the motors, that would be helpful too. In other words, a picture looking straight down into the base with the plate off.

Thanks.
 
Timm,
I can try to get better pictures of the motors, ect, but I don't see any plate. My base is solid on all four sides with a hole in the top for the shaft to come out. It is completely open on the bottom for everything to slide out. I have not disassembled it yet, but it looks like I'll have to take out a couple of set screws at the top to remove the yolk and gear from the shaft and then it should all slide out the bottom of the base housing. Does this sound correct? Yours is a Rayline, right?

The only plate I see is one mounted inside of the housing that has the terminal strips on either side of it.
 
Sky,

That plate with the hole in the middle supporting the main shaft has 4 screws holding it in the base. When they are removed that little plate will come out; or at least mine does.

I'd like to ask if when you remove the plate whether it is apparent or not if it (the plate) or something attached to the plate, actually prevents the motor shaft from spinning. I think this may be my problem in that when I operate the motors, the entire shaft is spinning and not moving the gears.

I disconnected the circuit board so I could pull the light from the boat but I did not remove the shaft and associated gearing. The yoke and little gear on top of the shaft can all be removed from the shaft.

The shaft is actually a shaft within a shaft. One moves the light vertically and the other horizontally. The gap between the yoke and the base is too small for a wheel puller so I used a self made pry bar (2 of them) to wedge the yoke off. It's pressed on the shaft much like a steering wheel.

Thanks,

Tim
 
I'll look at it tonight and post a few more pics.
 
Timm,
I removed the bottom plate. I don't see anything that holds the bottom motor. The top motor is screwed to the top plate that is fixed, but the bottom motor mount is just attached to the shaft. Here are a couple of pics.

stabilizerandspotlight031.jpg


stabilizerandspotlight034.jpg


stabilizerandspotlight025.jpg


One question for you: I removed the two set screws from the yoke, but I don't see any in the top black plastic gear. What holds that gear on? Is it just a press fit?
 
Last edited:
Thanks so much for these pictures and your help. This is exactly what I needed. And, I think I see what my problem is. It appears as if there is a nylon bushing in the hole of the plate. It also looks as if it had some type of adhesive to hold the bottom of the shaft (that round brass piece) to the plate. My plate doesn't have the bushing. I must have misplaced it during disassembly and forgot all about it during the rechroming since it took almost 2 months for them to complete the job.

When you dropped the plate, did it seem as if it was actually adhered to or stuck to the shaft or did it just "fall off" into your hands?
 
The plate just fell off.
 
Quick update on the non functioning bridge control. Got it apart, and the problem is obvious. Some water got into the case and the rheostat speed control sits right at the lowest point in the round case, so the rheostat is nothing but rust. Will fix this and the rest looks OK. Word to the wise is to keep this control sealed, as any water intrusion will do it in quickly.

What I need at this point is a new cosmetic front plate. I use that term loosely as the present one is a vinyl stick on. It is a black ground with white lettering stick on, that looks like it has been exposed to the weather for 30+ years. Any ideas where I might get a replacement? Anyone do something creative about the face plate instead of finding a new sticker?

Pete
 
LB Harvey will have the plate, but you will not like the price. I bought just the stick handle a couple of years ago and it was over $20.
 
Have completed the repair of the bridge search light control and all is working again, at least on my work bench. Two items to pass along based on this experience. First, the replacement speed control, with on/off switch, can be had from Mouser Electronics for $1.99 plus shipping. I ordered a spare at these prices. Their part number is 31VM301-F on www.mouser.com. The part is a common 1K ohm linear potentiometer with off/on switch. May even be able to pick one up at Radio Shack, if you are so inclined.

Second is the problem would have been avoided if the round control case had a small drain hole at the lowest point. Mine now does. From the waterline inside the case, it appears I had at least a half inch of water in there at one time.

Now I am on to getting the search light rechromed.

Pete
 

Forum statistics

Threads
38,156
Messages
448,746
Members
12,482
Latest member
UnaVida

Latest Posts

Trending content

Back
Top Bottom