Sam's is your source for Hatteras and Cabo Yacht parts.

Enter a part description OR part number to search the Hatteras/Cabo parts catalog:

Email Sam's or call 1-800-678-9230 to order parts.

Measuring Exhaust Back Pressure

  • Thread starter Thread starter Bob Bradley
  • Start date Start date
  • Replies Replies 21
  • Views Views 1,884

Bob Bradley

Legendary Member
Joined
Apr 12, 2005
Messages
3,661
Hatteras Model
43' CONVERTIBLE-Series I (1978 - 1983)
I bought a boat with a Northern Lights NL753k genny a couple years back. Genny starts easily and runs well. No real complaints other than the fact that she smokes quite a bit. Dark gray exhaust smoke. Per the trouble shooting section of the manual, possible causes are:

Clogged or dirty air cleaner

Defective muffler (back pressure too high)

Improper fuel

Injector nozzles dirty

Engine out of time.

Valve adjustment needed.

Air cleaner is fine, fuel is fine, and I´ve replaced the injectors with new ones. I have the valve cover off and will be doing the valve adjustment while I'm in there.

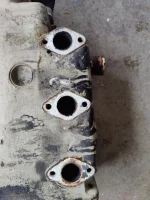
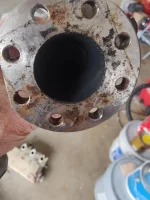
From my research on Boatdiesel, I determined that corrosion in the exhaust elbow is a common cause of excessive back pressure on these engines. Original elbows were cast iron. I removed the elbow and found it had already been replaced with ss. I also pulled the exhaust manifold. Both are clear of any obstructions. I plan on replacing the exhaust hoses, hoping that perhaps they have failed internally and have a flap causing back pressure. I hate to just blindly replace the lift muffler not knowing if its good or bad. I'm not sure how a fiberglas muffler could fail to the point of creating back pressure. I should mention that the exhaust water does seem to "spurt" as it exits the system overboard. Can anyone tell me how to measure exhaust back pressure. I haven't removed the hoses yet, so I have the engine end of a 2" hose accessible to me to perform a test.

I'm not sure how to time the engine - manual does not address that. Suggestions on this would be appreciated too.
IMG20231211111027.webp
IMG20231211111032.webp
IMG20231211111037.webp
 
With the exhaust manifold removed, look way into the engine head. I remember an issue where behind the exhaust valve was full of caked up carbon and restricting the engine poorly.
Poor engine loading usually causes this.

If your using a normal lift muffler and 2 inch hose, there is no problem down there.

I would look into an injector over fueling a lung or two. Have them all checked when you do a compression test,
When the injectors come back, check the pop timing, late timing may cause this also.
 
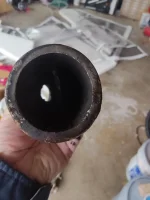
I had an inner ply come loose on the generator exhaust hose that caused this problem. Took allot 'troubleshooting' to figure this out. I purchased an inexpensive endoscope on amazon and sent it down the hose to find the problem in a tight bend. I don't think it would have shown up if hose was out and straight. Good luck!
 
The hoses do sometimes de-laminate and have also scene frp lift mufflers also deteriorate over time as well.
Hopefully it's something relatively easy like a tune up or some new hoses, new hoses and clamps are always a good idea anyway.
.
 
if she has ever had an impeller failure and ran dry i would look at the hoses and muffler, neither of these are designed to run without water going through them
 
if she has ever had an impeller failure and ran dry i would look at the hoses and muffler, neither of these are designed to run without water going through them

Not in the 3 seasons I have owned her, however, the raw water pump had been replaced, as it is unpainted bronze. That's a good suggestion.
 
When did this problem start?

Also, you should get that elbow bead blasted. You will not be able to see the flaws with all that soot and scale in it.
 
Well, I took a shop vac and used the blower side and blew thru the hose and muffler. My buddy observed and videoed it from the outside. I didn’t perceive any significant back pressure, and the video showed that the vacuum easily blew out the contents of the muffler. The hose was clearly old, so I removed both sections for replacement – before and after the lift muffler. I then blew thru the muffler by itself and detected no back pressure whatsoever.

So, at this point, I now have now removed the valve cover / aircleaner housing, the exhaust manifold / heat exchanger, the mixer elbow, and the exhaust hoses. There are no obvious blockages anywhere. The Operators manual recommends a valve adjustment, which I will do as I reassemble.

The thing is, I’m this far along, and I have to remove the coolant circulator pump and replace it, as its weeping coolant. I’m wondering if I should just bite the bullet and pull the head for a valve job given that I’m this far into it anyway. Or, just put it back together and run the piss out of it to see if the smoke clears itself up by running for an hour or two under a heavy load.

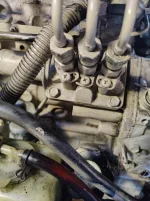
Adding to my decision factors, the Operators Manual mentions black smoke as a possible indication of an engine out of time or an Injection Pump malfunction. The Workshop Manual isn’t particularly helpful. It makes no mention of engine timing (injector timing, I presume), despite the fact that there are what appear to be adjustment mechanisms at the base of the fuel deliver tubes where they attach to the injection pump (see pics below). They are secured by philips head screws and its clear that the setting of the one to the left has been changed prior to my owning it. If not adjustment mechanisms, what are these?

BTW, As a side note, I’ve spent 25 years adjusting injector timing on Detroit Diesels – it’s not exactly foreign to me.

The Workshop manual also references something called the “Smoke Set Start Spring”. All it says is that it is pre set at the factory. No mention of its function or the potential of adjusting it.

Thoughts?


IMG20231218114115.webp

IMG20231218114118.webp
 
That's not an adjustment. It's a lock to keep the delivery valve holder from turning when you loosen/tighten the injector line. It's VERY unlikely that the pump has gone out of calibration. Timing is accomplished with a shim under the mounting flange of the pump. Again, VeERY unlikely to change unless somebody has fooled with it. Also, do a compression test before you start pulling the engine apart.

Again, when did this problem start? Has it always done this, or is it recent?
 
Last edited:
It's smoked since I've owned it. That's 3 seasons now.
 
That's not an adjustment. It's a lock to keep the delivery valve holder from turning when you loosen/tighten the injector line.
Looks like that #1 has been twisted already. Somebody already pulled that injector tube (& injector)??
 
It's entirely possible that someone had their mitts in it. Does it carry load okay? Have you tried isolating cylinders while it's running to see if the smoke changes?
 
I replaced the injectors last year hoping that would correct the smoking problem. I had the tubes off but didn't intentionally move those brackets. You can see the Phillips heads have unbroken paint in them. Perhaps it moved when I replaced them.
 
I replaced the injectors last year hoping that would correct the smoking problem. I had the tubes off but didn't intentionally move those brackets. You can see the Phillips heads have unbroken paint in them. Perhaps it moved when I replaced them.
I assume no compression test then or recently?
Have you tried isolating the cylinders while running with a load to find a weak lung then or recently?
 
Last edited:
I replaced the injectors last year hoping that would correct the smoking problem. I had the tubes off but didn't intentionally move those brackets. You can see the Phillips heads have unbroken paint in them. Perhaps it moved when I replaced them.

That's a fair prospect. I agree it doesn't look like the screw was removed. But the lock does look like the original spot was around the middle of the groove. Torque on those holders should be in the vicinity of 20-25 lb/ft if you want to loosen the loosen the screw and try to snug it up. If it wants to turn more than a few degrees something is up.
 
Well, I seem to have found a smoking gun. I finally remembered to bring my full socket set with me today and did a redneck compression check (cranked engine with a socket wrench and felt for compression resistance - per discussion on NL forum, I should feel 3 "bumps" per every 2 rotations of the engine, i.e. one bump every 240 degrees of rotation). Lo and behold, I got two bumps and a squish on a pair of rotations. I repeated the test a few times and confirmed. And, I could definitely hear the leaking valve. I´m going to check the valve lash to see if one of the valves is too tight on that cylinder, but I kinda doubt it.

So I presume I´ll be pulling the head. Anybody know if there is anything unique or special about pulling the head on the Lugger engine? It looks fairly straightforward. I presume I simply loosen the rocker arms and remove the push rods to remove the head, like on my old GM V8? Or does the complete rocker arm assembly need to be fully removed first?
 
All of the rocker arms make one whole assembly.
Those 3 studs hold the assembly down.
 
I have the IPB (illustrated part breakdown) and shop manual for the 673 and just the IPB for the 773 & 843 engines if needed.
 
Thanks, Ralph. I have the shop manual too. It's marginally helpful, but I guess I'm spoiled by the DD books.

I pulled the head off the engine this afternoon. The faces of the valves looked clean, other than the copious soot. #2 and #3 piston heads were fairly clean, with visible spray pattern markings from the injectors. #1 (genny end - I´m calling it #1) was sooted up pretty badly, however, there was evidence of the spray pattern somewhat visible. I believe this was the offending cylinder. With the valves fully closed on the removed head there was no obvious indication of corrosion around the valve seats.

I did note that a couple valves were out of adjustment, but both were intake valves, not exhaust. Still, just to be sure my smoke problem wasn´t the result of a badly adjusted valve, I loosened all the adjusting screws and did another redneck compression test. Result was the same - two good bumps and a soft "squish".

It was a bit of a pita getting the head off. Lots of stuff on it, including what appears to be a temp sensor on the back side that was difficult to remove the wire from. And, the heads are located on the block by a pair of what the book describes as "pins", but really are expansion coils, not simple pins like on a chevy v8. Removing the head after removing the head bolts required a bit of wedging with a thin screwdriver. In any event, its off. I´ll let Rhode Island Marine Engine (NL dealer) handle the valve job from here. That´s over my pay grade. Once its back together I´ll update on the results.

Thanks again for all the valuable advice everyone.
 

Forum statistics

Threads
38,154
Messages
448,707
Members
12,482
Latest member
UnaVida

Latest Posts

Trending content

Back
Top Bottom