Sam's is your source for Hatteras and Cabo Yacht parts.

Enter a part description OR part number to search the Hatteras/Cabo parts catalog:

Email Sam's or call 1-800-678-9230 to order parts.

Leaking under rudder stuffing box

  • Thread starter Thread starter first230sl
  • Start date Start date
  • Replies Replies 24
  • Views Views 17,801

first230sl

Active member
Joined
Apr 12, 2005
Messages
145
Hatteras Model
58' YACHT FISHERMAN (1970 - 1981)
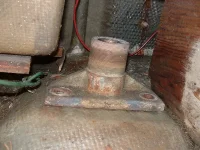
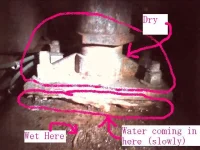
My port rudder post area was leaking, so I tightened up the stuffing box and now the top part is dry. Unfortunately, it appears that the stuffing box was not the only leak. I still seem to have a bit of a leak coming from the area between the hull and the bottom flange of the stuffing box/rudder post holder (sorry - don't know the correct name).

A picture is wqorth 1000 words so here it is (sorry for the poor image quality - I only had my phone with me and it, aTreo 600, has a crappy camera).

My question is whether it is simply OK to build up the area where the hull meets the flange with epoxy or 5200 to stop the leak - or does something more need to be done? I am not concerned - there are four bolts holding the flange in place. Should I be more worried than I am?

Thanks!

Murray
 

Attachments

  • Stuffing Box.webp
    Stuffing Box.webp
    50.6 KB · Views: 337
Last edited:
This is NOT a good thing.

You need to get that boat out of the water and the assembly taken apart and fixed. Its entirely possible you have major corrosion under there (galvanic) or other serious problems.

The rudder post hardware is under considerable load when the boat is underway.

If the that hardware fails - and if its leaking it might - you're in deep doo-doo. I would not screw around with this - I'd come out immediately and take care of it. Depending on what is found under there this could be a relatively minor - or a fairly significant - repair.

Don't try to bandaid this one....

PS: You may THINK you have 4 bolts, but there is no guarantee you ACTUALLY have ANY bolts that are structurally sound in those holes! And no, playing with them to try to find out if they're ok while in the water is not a good idea :eek:
 
Last edited:
IMO , it needs to be re-bedded. Which means it (Flange) needs to be taken up,cleaned and re-caulked : Boat hauled. Personally I'd be worried about the integrity of the fasteners. Also has the boat been aground lately?
 
Doc and Karl - thanks for your responses (and Doc - no, the boat has not been aground in my history with it. But I think it has been leaking a long time, hidden by a packing glad leak I had and only recently was able to fix because I had to have the wrenches made).

The assembly itself, where it is observable, looks solid and intact. There is no way to know if the bolts are intact, or if the flange has a corrosion problem underneith without removing it - so your advice is well taken. I need to remove it, inspect it, and (if all is well) re-bed it. Sounds like fun (not really).

OK - I'd like to do this myself unless people tell me I am crazy. So a few questions:

1) how accurrate does the vertical alignment of the assembly have to be? Is there some trick to this? I suppose the best way might be to mark the location of the rudder over the ground (maybe by fastening a stick to it) and then make sure it has the same vertical alignment when I put it back together.

2) There seems to be about 1/2" - 5/8" of bedding material between the flange and the hull now (both sides the same - I assume it came from Hatteras that way - why is that - so they can level it?). I suppose I will build it up again the same way - maybe build a small perimiter of wood to pool the bedding material, and then sink the flange to the appropriate depth. Let it harden, and then snug up the bolts. Sound reasonable?

3) I assume I should use epoxy for the bedding material. Does that sound reasonable? Or should I build up the surface instead using fibergalss cloth/resin?

4) Getting the assembly off there now might be a real challenge to say the least. Once the bolts are out, the linkage taken off & rudder let down, how do I "break" the bond of the bedding that is there now? Should I saw through it then grind down the surface to fibergalss? Any other ideas?

I have not thought this trough yet - so any other things I need to be careful about or any other advice anyone can give me would be very much appreciated.

Thanks and best regards - Murray
 
Last edited:
Murray,
I would assume that Hat would not use caulk in lieu of a proper fairing block ,if it were needed under the flange. I am not sure but you may be able to break the bolts loose,keeping the rudder ass'y intact, and jack the rudder from the outside enough to clean the mating surfaces and just rebed it. You would need to use something like a wheel - puller to connect the rudder shaft to the stuffing box ass'y. Or you may be able to pry the flange loose from inside , again hard to speculate not knowing what sort of clearances you have to work with . Inspect to be sure the metal is good .Definately do not use epoxy to bed it. Put new bolts in, but be sure they are the same metal (silicon bronze , I believe). Probably should check with the factory, (252 672 7368 is Bruce Morrison's direct line), first . Probably best to remove the stuffing box entirely so it can be inspected properly e.g. drop the rudder.
 
Last edited:
Please allow a few questions/comments from a non-owner (but in the hunt)-
1) Yeah, these things are bedded with fairing blocks of some type to allow the use of 90 degree off-the-shelf rudder ports. I'm going to guess Buck Algonquin made that bad boy. Obviously, Hatteras would be able to tell you this and what they use for the build-up. If you replace, you let the solid pad dry and then use a bedding compound. I'm thinking you could get the pad nice and flat by using the gland base itself with saran wrap or something as a parting agent. Use a dummy pipe/tube perhaps to insure proper alignment-asumming you have removed the rudder.
2) From your pic, your pad up looks a little ragged. Obviously, anything not real solid needs to go.
3) Your bonding connections- do they look ok?
4) So guys, these things don't use cutless bearings-right? So if there is wear, how much does one tolerate?
5) Just curious, what is the rudder shaft dia?
6) How far up will you have to go to drop the rudder? Sure complicates things
if the yard can't block her that high. Maybe you can get by with dropping the rudder just enough to to slide the casting off the top of the shaft? I guess this is worst case thinking, huh? As you suggest, maybe you can get it done by just sliding the casting up to the shelf.
7) What about the other rudder-do it now so you sleep better?
big project, but I'm thinking you can handle it! seems like you have a good feel for the issues, IMHO.

good luck Murray,
Gary
 
They do not use cutlass bearings. All of the rudder ports I have seen on Hatteras yachts were made by Buck-Algonquin and most of them are still in the BA catalog. BA is now relocated to Delaware from PA. It's possible that the bolts have electrolyzed and are weak and that the whole rudder assembly has floated up off the floor of the hull.
This is definitely a haul-to-fix item and I suspect cannot be done in the slings- meaning a real haulout. And I agree with Karl- the side loading on steering system pieces in turns is fierce and you want everything to be in good shape.
I replaced the long bronze bolts that hold the rudder ports in, on my boat, a few years back. This turned out to require knocking off the heads, I think, with a small die grinder and then tapping the remains of the bolt up through with a drift. They were in surprisingly good shape, actually, but you couldn't tell that for all the corrosion on them. Of course the new ones turned green almost immediately as well.
Subsequent to that I found that if you treat new bronze parts with Corrosion Block when they are put in, they remain bronze colored and don't turn green. Once a year seems to do it.
Let us know what you find. You DO want to mark your system for rudder alignment when you reassemble it. There is supposed to be a small amount of toe-in- Sam's should have the spec. Rudders are not set parallel.
 
I had a rudder post bolt come apart on me when replacing a bonding wire attachment! It was only one, and there was no indication of electrolysis on either piece (once I was hauled to get the other half our!); it appeared to be a material failure, possibly bad on original install 20 years ago. The replacement bolt cost something like $8.50....

The point though is that I had NO CLUE it was compromised until I put a small amount of torque to it. Needless to say, the others got checked pronto! They were all ok.

There are a few places you don't fool around. This is one of them. Strut attachments are another. Problems in either of those areas need immediate attention lest you get a truly ugly surprise offshore some day.

If this boat is like mine the rudder stocks are indexed and keyed, with toe-in set with the crossbar. As such there should be no drama putting it back together, but there may be getting the arm and crossbar off if the rudder needs to be dropped.
 
OK - thanks for the advice and comments.

Jim - where did you get your bolts & nuts? Was it Sam's? What, exactly, should I ask for in terms of nut and bolt metal (bronze? Silicon Bronze?)

I am still unclear as to what the fairing material needs to be between the hull and the flange. Can I build it up with fiberglass as level as possible, and then do the final bedding and leveling with epoxy? Is there a better and or easier way? What exactly would you recommend?

When the bolts go in, is 4200 the correct stuff with which to bed them against leakage?

The stbd side is dry (it is the port side that is leaking). My thought is that I will also replace the bolts on the stbd (dry) side for peace of mind. However, I won't remove the rudder shaft housing on the stbd (dry) side unless I find corrosion on the wet (port) one that I need to remove. No sense re-bedding the dry rudder shaft housing unless I suspect a problem. Does that make sense to everyone?

My sense is that this is going to be a job that will be full of various tough parts. Getting the bolts out will probably require some work. Separating the flange from the hull will almost certainly be a huge challenge I suspect. Trying to make a level fairing block of some sort will challenge the limit of my abilities. But afterward, I should be an expert (and will hopefully do it right). Honestly, my fear in giving it to someone else is that it may not be done right and I won't know it. At least this way I'll know exactly what has been done.

Gary - the bonding connections look good and I recently tested the resistance. It was good. I don't recall the rudder shaft diameter - but I'll be getting intimate with it soon (so to speak), so can tell you. And to drop the rudder - I don't think it is all that far - maybe I'll need 18 inches or so - I'll have to measure that as well before it goes up on blocks. Thanks for mentioning that - it could have easily slipped my mind. Would hate to have to call the hoist over again. I really think I'll need to take the rudder out - there is only about an inch of clearance above the housing - so I can't really slide it up.

Karl, Jim, Gary, Doc - thanks so much. I am sure I'll have lots of other questions and I sincerely appreciate all the advice here. I know for certain that you are all helping me avoid a large number of mistakes I would otherwise make in this repair. Please keep the advice coming.
 
Last edited:
There is nothing wrong with using glass and epoxy to build up the mounting point. Its very permanent, its very tough, and it works. Its also a royal PITA to work with!

See what you've got once its apart. I bet its a big mess and will take some work, most of it in cleaning up what's there now.

4200 is fine for bedding, although for this application I'd probably use 5200. I know people don't like it as its 'permanent', but that's exactly why you should use it for something like this. BTW you CAN get 5200'd things apart either with "debond" or with a chisel and hammer to lever apart the two components - in the case of a rudder stock and fiberglass/epoxy fairing block, its not a problem if it ever needs to come off.
 
OK - great. Thanks Karl.

Laying in bed last night I had a few more thoughts.

First - I actually don't think it will be too bad getting the rudder port alignment correct. There is a bushing above the port that the top of the rudder post fits into. Thus I can use either the rudder post itself, or a shaft of the same diameter to ride the housing on when doing the last alignment of the flange. This should give me the alignment needed.

Second, further to your advice Karl, perhaps one way to build the fairing block is as follows:

1) remove and clean up all surfaces well, acetone them in case there is wax, after first measuring how high the flange is off the hull.
2) build a small, rectangular dam just a bit larger than the perimeter of the flange. Put it in place on the hull. The dam will be there to help form the sides of epoxy/glass fairing block I'll be making.
3) Coat the rudder port flange and cylinder with a releasing agent, and place it part way down in place so that it is suspended above where it would normally rest, but that the rudder cylinder is part way into the hull hole. Put the rudder in place (or a substitute shaft) to properly align the rudder port.
4) Put the four old bolts, from the top, into the flange and through the hull holes (after coating them with releasing agent).
5) Fill the dam/pool area under the flange with epoxy and small pieces of glass so that the area is built up flat to approximately the desired height.
6) Press the rudder port flange down into the epoxy and let it set.
7) Once set, pull it all apart. Coat the bottom of the flange and outside of rudder port cylinder with 5200 or 4200, press down, coat bolts with 4200 (I don't want them to be a pain to remove later), press into place, and tighten.
8) Reassemble rudder shaft and linkage. Remove the dam.

OK - a few questions.

- is this how you might do it? Any better ideas?
- when building up the epoxy/glass fairing block - do I need to do it in layers and let each layer set (one at a time) due to the thickness of the job? Or can I lay the whole thick mess at once and let it set?
- the epoxy (at least the last layer) will be setting in a sandwich between the metal flange and the FG hull. Do I need to worry about heat buildup? Any other tips on the glass/epoxy? I have not done it before other than to butcher old cars as a kid.
- the rudder port, done this way, should be removable later because the only mechanical bond, other than the bolts, is 4200 (or 5200). Is that the smart thing to do? Or should I forget the releasing agent, and simply bed the rudder port directly into the epoxy and not take it out and rebed with 4200?

Once again - thanks so much. This should be an interesting fix.

Best regards - Murray
 
Last edited:
Hi Murray- I've been doing a little more thinking on your project. A few more comments.
1) Hole quality. Chances are your leak indicates your rudder port has started moving (we are not talking a lot). So elongated or worn holes are probable. In addition to the (4) bolt holes, you have the hole for the casting barrel. BA would cast these things with a significant length extension below the flange; the builder then saws it off to be flush with the bottom of the external backing plate. Clean/abrade the hole bores and build them back up with an epoxy thixo. You should be able to pack the barrel hole, even upside down, with the appropriate consistancy thixo. I would really strive to get that barrel well packed- because of its dia it can transfer a lot of the load, probably more than the (4) bolts. The barrel will also transfer the load directly to your thick hull laminate vs to the pad-up, which is what the bolts will transfer to. We're talking big-time shear loading for rudder ports.
2) Silicon bronze bolts-one trade name was Everdure-don't know if it's still around. I see that BA's backing plates have square holes-this tells me carriage bolts. Makes sense, no drag and no huge countersinks to do.
3) I would use epoxy for any fairing, hole repair or laminating. Simply stronger, tougher, more moisture resistant and better secondary bonds.
4) Oh, you can buy epoxy thixo or make your own. I made some with west system and their high-density filler. Lots of competing products out there too.

later, Gary
 
Tahnks Gary. Yes - I went to the BA site after you and Jim mentioned them. I saw the backing plates. Interestingly, I don't see any backing plates on mine, but I believe the bolts are carriage bolts. I've attached an image.

And good point about the possible movement. It seems rock solid, but I'll know more when I try to remove it.

Thanks so much.

By the way - one thing I did that I recommend to everyone is that I spent a 1/2 day on the boat taking pictures of pretty much every nook and cranny on the boat. Did the same thing for the hull on the next haulout. I find these pics highly valuable. It let's me plan work and repairs to a significant depth without having to keep running out to the boat. Really nice to have.

Best regards - Murray
 

Attachments

  • rudder.webp
    rudder.webp
    38.8 KB · Views: 178
Yep.

Do not use straight epoxy. Its very brittle (although very strong.) That's why you use FIBERglass - the glass provides the flexure strength and the combination is WAY stronger than straight epoxy.

I'd probably laminate it up out of cloth/epoxy until I was close to proper thickness, then use a thickened epoxy for the final layer. Be extremely careful using the rudder itself for alignment - I'd use a piece of round stock of appropriate size instead, and make sure you coat it WELL with release agent (wax, silicone, etc) because getting it epoxied in there would be VERY bad! Also take care not to get any epoxy INSIDE the bore.

Also, I would not make the port non-removable, which not coating the bushing would do. Some day you might dearly regret that decision, and grinding off the fixture would be both difficult and very time consuming. Its not hard to avoid that, so do.

As noted this assembly takes a LOT of load. There's a reason your rudder post is as thick as it is and the lever arm from the top of the rudder to the post is almost of zero length......

I'd laminate it up to close to proper height, clean up the drop extension and the plate (that goes into the hole), then mix up my thickened mixture and with the port/drop coated WELL with release agent set it in place. Once the epoxy sets remove it, check the fit, and if all is ok go ahead and bolt it up with 5200 or 4200 for your bedding.

"Best practice" is to do this all more-or-less as one shot; if the laminate is less than 1/2" thick or so you can do it using slow-cure epoxy (e.g. West's "Slow" hardener) without problems with it "cooking". If its significantly thicker than that do it in stages, let one layer "go off" before adding the next, but DO add the next before you have a full cure on the previous so you get a chemical rather than a glue bond between layers. If for working reasons you must allow a layer to cure fully before proceding you need to sand the layer that has fully cured to insure that any amine blush is removed and wipe with acetone or you risk that joint being quite weak and prone to shear under stress.

Be aware that large pots of epoxy go off VERY fast and get VERY hot.....
 
Excellent - thanks. OK - I am close.

Hopefully last question for now.

It seems most of the strength I am looking for in the fairing block is compressive crush strength.

Does anyone know what type of glass is best for that?
- Woven Mat (thick roving? finer stuff?)
- chopped strand glass fibers (individual strands of 1/4 inch or so mixed into the epoxy)?
- other form of glass?

Also - is there any filler I should be considering that increases compressive strength? I was thinking a flock to thicken it a bit and add compressive strength.

Thanks so much. As I say - I hope not to keep bothering all of you with the endless questions. I believe I have most of it reasonably well worked out now.

Thanks Guys!
 
I did this a couple of years ago and it was a breeze. If you don't touch the sreering arm,(which you shouldn't) then everything should go back the same. The keyway on the rudder post and the collar bearings will ensure this (make sure you mark port & starbord on the rudders). The rudders on my 46' SF have a cutlass bearing in them and I believe most Hatts do (I've never seen one without them) SAMS can tell you what size you'll need. My rudder post fit flush to the hull, no fairing blocks or compound was used. The pads fit flush into recessed areas of the hull. I bedded mine with 5200 and put in all new fasteners, packing, cutlass bearings, and collar bearings. A lot less play and no more drips. In fact I have replaced every fastener and thru hull fitting in the boat. I had no problems but since the boat was 25 years old when I bought it, I didn't want to take any chances. You rarely can tell when a fastener is about to fail. As far as fasteners, all are silicone bronze. There is a supplier in New England that carries the bolts, nuts, washers carriage bolts etc and will sell you as many or few as you need. http://www.jamestowndistributors.com great source of some hard to find stuff and the only ones who did require buying a box of each size.

As far as getting the rudders out, have the yard block the stern as high as they can. I believe mine were about 4ft tall. If you can't get high enough than hopefully the yard is not paved and you can dig a hole under the rudder.

Jack Sardina
 
I got my bronze bolts from Chesapeake Marine Fasteners, which is in Annapolis, MD. I am interested to see what you find when you take all this apart- my guess is that the assembly has floated upwards. Let us all know.
 
I'd like to order the bolts now in case they take a long time to come. Does anyone know roughly how thick the hull would be at that point? I need to know in order to determine the length of the bolts. I am guessing 1 inch. Sound reasonable? I can always try to measure from the outside, but there will be some slop in the measurement.

I will indeed let you know how this goes. I am negotiating for time on the hard, and might be able to get it up as early as this Friday. Could be a week later though- we will see.

You could be right about it riding up, but if I had to make a guess - I'd say no. My guess (and it is only a guess) is that whatever was used for a fairing block is disintegrating and water is getting past - making it go faster. I can see one of the bolts as it goes between the hull and the flange, and it looks like it is in excellent shape. May be bad elsewhere - but looks good there. If that is the case, and all are them are good (again - guessing), then it probably has not moved appreciably.

But - I suspect all will be told once I get it apart.

Thanks guys - Murray


jim rosenthal said:
I got my bronze bolts from Chesapeake Marine Fasteners, which is in Annapolis, MD. I am interested to see what you find when you take all this apart- my guess is that the assembly has floated upwards. Let us all know.
 
my hull was 1 5/8" under the rudders. I was able to get everything I needed within a couple of days. If you can, I would pull it apart first and then order what you need. It's best to get exactly what you need instead of guessing and fed ex can get the stuff to you next day.

Jack
 
OK - got the rudder port out. All the hardware is in outstanding shape - no problems at all.

If you recall, I had about 5/8" of bedding under the flange of the rudder port. I assumed it was needed to level the inside of the hull to mate with the flange.

Well- now that it is out, I see that the fiberglass is perfectly flat underneith the bedding!!! And for the life of me, I can not see any reason at all not to simply 4200 the flange directly to the fiberglass on the inside of the hull. I'd have to cut 5/8" off the bottom cylinder of the rudder port to make sure the rudder sits at the same height, but I can't see a problem with that.

In addition, with the bedding in place (and the port therefore 5/8" higher) it was impossible to do the rudder packing without removing the rudder. There was not enough overhead clearance abouve the rudder port to get at the packing. However, with the rudder port directly on the hull (no bedding) now there IS enough clearance!!!

All this tells me that it did not come from the factory with the bedding, and that I should put the port directly onto the hull with no bedding. The only thing stopping me is that there *must* have been a reason for someone, in the past, to raise the rudder ports up the 5/8". And they *probably* bought new rudder ports when they did it, because the bottom cylinder of the rudder port is flush with the outside of the hull only when it is raised the 5/8". If I place them right on the hull with only 4200, I'll have to cut 5/8" off the port bottom cylinder.

So - before I go and cut the port - can anyone do a sanity check for me? Is there any reason you can fathom why I should not simply bed the port in 4200 directly to the fiberglass? Why in the world would anyone have raised the rudder ports - making it impossible to change the packing, and making it prone to leaking between the port and hull. Both sides are the same way???

Let me know if I am missing something.

Thanks so much - Murray

- I have attached two photos - one showing the rudder port sitting directly on the inside of the hull (no bedding - to see the bedding, look at the first picture in this thread), and a second image showing how much I'll have to cut off if I don't raise the port.

- P.S. things went relatively well thus far. Everything was a bit of a pain, but nothing was a disaster. Access is a bit limited, nuts are very hard to turn, only broke one set screw, and getting the rudder port disloged from the hull/bedding was pretty tough.
 

Attachments

  • DSCF0102.webp
    DSCF0102.webp
    114.7 KB · Views: 90
  • DSCF0104.webp
    DSCF0104.webp
    48.7 KB · Views: 88
Last edited:

Forum statistics

Threads
38,154
Messages
448,708
Members
12,482
Latest member
UnaVida

Latest Posts

Trending content

Back
Top Bottom