Sam's is your source for Hatteras and Cabo Yacht parts.

Enter a part description OR part number to search the Hatteras/Cabo parts catalog:

Email Sam's or call 1-800-678-9230 to order parts.

Inverter questions

chris piazza

Well-known member
Joined
Mar 24, 2006
Messages
589
Hatteras Model
53' CONVERTIBLE (1969 - 1980)
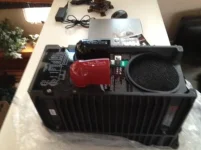
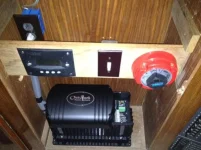
I have decided to add a Outback inverter to the boat. Not being the sharpest tool in the shed I have read all the threads on inverters and I still don't quite get it. I realized that it probably should not be mounted in the engine room because of the heat and possible moisture. I think I have found the perfect location in the pictured cabinet which is located next to the pictured electric panel in the Salon. Both cabinets are right above the main battery switches in the engine room. I would like to have the inverter run small appliances, a few outlets, master stateroom and master head, two refrigerators, and davit. I also have an outlet on the bridge that powers my wave rouge and router as well as a small 12v charger for aback up battery for electronics. In the threads I have read there has been a lot of discussion on weather to run one bank or two to power the inverter, I was just going to use one bank because 95% of the time the inverter would be used when the boat is running. Also I don't understand what the "mate" option is and do I need it? Final question is can someone explain the best way to wire the inverter to the main panel, I don't have a 2nd generator switch as some do so I have no clue as how to do this. I don't think I want to use the "pass through" option, just keep it as simple as I can. Ok for some reason my two pics wont upload, I'll keep working on that.

Chris
Superior Nights 53c
 
If you've read all the threads you probably have a good idea of the opinions re pass through, single/both battery banks, etc. So re the mate...

I ran the outback without the Mate for about a year. IMO, save yourself the trouble and order it at the same time. THe Mate allows you to adjust the settings for anything you can imagine related to the inverter charger. For example, you can set specific voltages for every level of charging to within .1 volt. This allows you to optimize the charge for the specific batteries you are charging, using the battery manufacturers recommendations. NOTE that different manufacturer batteries will not have the same charging recommendations even though they may all be flooded batteries.

It also provides a readout of what's going on and a menu system, admittedly rather complicated, that allows you to access all the settings. Here's an example - we stayed at a marina last year (which we hardly ever do - usually anchor out). The alleged 240 50A shore power was actually around 204. Several items on the boat would not function properly and the outback would not charge the batteries because it was not seeing the proper voltage to operate in that mode. But using the mate you can change the default for that function so I dialed it to 202 volts and the charger than worked fine. My other (12V charger) wouldn't work at all. There are a huge number of settings that can be accessed - though I have to admit that you will probably never use many of them.

Without the mate, the Outback will be in it's default settings which may be less than optimum for your application and you will not have a remote display that you can mount in some convenient location.

So again, I recommend you purchase both together.

If you are not going to use the pass through you will need some sort of relay system to switch the circuits to/from the inverter. IMO - and others will not agree - this is more complicated than using the pass through. OTOH, the pass through has a 30A limitation that also affects battery charging. If you are drawing more than 11A through the pass through to run whatever, the amperage supplied to the charger will drop by whatever amount exceeds that 11 A. It has never been an issue for us but it could be depending on your use.
 
Last edited:
photo.webpphoto1.webp
ok here is the pics, Mike if I use the pass through how is that wired? and I am going to order the mate.

Chris
 
I hear these inverters build up lots of heat. The cabinet looks like a great place, but does it have adequate ventilation? You might could cut some holes in the door and add a vent register. Also inverters make a little noise. Thats the downside of installing them out of the engine room. I just ordered the Magnum 2800 pure sine wave with remote. I hate to open this can-o-worms, but are you going to purchase a modified or pure sine wave inverter? I'm going to install mine in the engine room. I figure my engine room might be hot for a little while, but then cool down and be OK for staying on the hook for a few days. Another thing, I travel at hull speed and the 3208's are at about 1200-1300 rpm's. Its really not that hot in the engine room (mostly warm). However, it does get much hotter when I run up to 1800 rpm's.
 
That space would work as long as there is some ventilation (louvers on the door). For safety ind install a small fireboy bottle in the space, Cheap insurance

Using the build in transfer switch is nice but as Mike said when you inverter only has a single 30amp input you are reducing charging capacity since both your pass thru loads and the charger will share that 30amp. This is the drawback of outback inverters

Basically what you do is split the breakers on your panel in 2 groups. Group one will be whatever will NOT be inverter power like charger, water heater, and any large load like stove and air con although on most boats these are different legs. Group 2 will have the loads which will be inverter powered

You don't need to physically group the breakers, you can just use the jumpers on breaker feed side. Group 1 remains powered as it is now, from the rotary switch

Next step is to add a 30amp breaker to group 1 and run a wire with the output to the inverter input

Next, run a wire from the inverter output back to the panel to power the group 2 breakers

Last, you need to connect inverter N and G

If you prefer not to use the built in transfer switches, it's a little easier. All you have to do is add a pair of dual pole breakers to your panel, or near the panel, with a safety slide to prevent both from being flipped on at the same time (obviously critical!)

Disconnect the genset H and N from the rotary and connect them to one of the breakers. Connect the H and N from the inverter output to the second breaker. Then wire both outputs to the rotary

In that set up you manually select inverter or genset with the breaker, and when you turn the rotary to genset whatever source you selected with the breaker will be used.

This method is a little easier to set up, more reliable as you are not relying on the automatic relay but you loose the automatic transfer capability. Usually an inverter built in transfer switch will transfer without power loss, eliminating clock resets as well as the long start up and reboot of modern sat tv receivers
 
The Mate also lets you set the max draw of the inverter as a charger. I once stored my boat in a hurricane proof warehouse over the hurricane season and the warehouse only had 15A electrical outlets for keeping the batteries charged. I was able to set the Outback to keep the house bank charged using only 9 amps while a 6 amp dehumidifier also ran on and off. As Mike said, it's great to be able to see what the system is doing and state of charge, etc.

Re: where to put it, don't forget to calculate the size of the DC cables necessary based on how far it is to the battery bank. Those can get huge. I got the ventless Outback and put it next to the batteries.
 
Last edited:
Pascal covered the hookup very well. Also, as he explained if the inverter is operated as a pass through, it switches automatically when shore/genny power is disconnected. Digital components can't even detect the switchover - it's as if nothing happened. You can, of course, use the mate to turn the inverter "off" so it will not invert at all if you don't want it to for some reason. It will still charge the batts in that mode.

I installed our Outback 3232 in our 53MY's genny compartment, next to the starboard batt bank. That way, the DC cables didn't have to be very large. With the Mate, there is no reason to worry about the location of the inverter as far as operating it. So I recommend you mount it as close to the battery bank(s) as possible.
 
I have two Xantrex 4kw inverters mounted in the port ER of my boat and have no issues with heat. The inverters (Xantrex) have blowers in them. I know some do not. I would try and get a spec on max operating temps. Some of the invereters only have a heat sink and no fans/blowers and they may drop off if the ambient temp gets too high........Pat
 
As far as the install; make sure you get meters (Link makes some and I think Xantrex too) or have the capability with your control to track how many amp/hrs you have used. You need to cycle the batteries to no more than 50% discharge on a regular basis or you will be buying batteries ......alot...................Pat
 
Although some sort of specific reading may be useful, the battery voltage will tell you the batts state of charge. On a 32V system:


State of Charge Volts per Cell 32V System Total Volts
100% 2.12 33.92
90% 2.08 33.28
80% 2.07 33.12
70% 2.05 32.80
60% 2.03 32.48
50% 2.01 32.16
40% 1.98 31.68
30% 1.96 31.36
20% 1.93 30.88
10% 1.89 30.24
0 1.75 28.00

FWIW, A few years ago we had the boat on the hard and the Outback inverter/4 year old Dekka batteries ran the fridge for 36 hours and the the batt voltage never dropped below 33V. Engines spun/started instantly when dropped back in the water.

Hmm..tried to re-align the columns. In "preview" it looks fine but when posted it goes back to un-aligned. :(
 
Chris,
Call me if you want to discuss. I have the same Outback and Mate and love it. We also installed one on another 53ED in the same way. 517 nine 3 zero 2011
 
and you're right to get the Mate 2 flush mount controller. I tried the Mate non-flush mount model thinking it would still flush mount, only it would just stick out from the wall a little bit. And it would have...but....the cable cannot be run behind the wall with it. The cable has to remain visible. So, for this reason, I exchanged it for the Mate 2.
 
Last edited:
Thanks for all the information guys, good as always! I am going to order everything later today. Sky thanks I will gave you a call later today or tomorrow when I get back home.

Chris
Superior Nights 53C
 
Although some sort of specific reading may be useful, the battery voltage will tell you the batts state of charge. On a 32V system:


State of Charge Volts per Cell 32V System Total Volts
100% 2.12 33.92
90% 2.08 33.28
80% 2.07 33.12
70% 2.05 32.80
60% 2.03 32.48
50% 2.01 32.16
40% 1.98 31.68
30% 1.96 31.36
20% 1.93 30.88
10% 1.89 30.24
0 1.75 28.00

FWIW, A few years ago we had the boat on the hard and the Outback inverter/4 year old Dekka batteries ran the fridge for 36 hours and the the batt voltage never dropped below 33V. Engines spun/started instantly when dropped back in the water.

Hmm..tried to re-align the columns. In "preview" it looks fine but when posted it goes back to un-aligned. :(

Mike, that is a fair guideline when the system is "at rest" with no loads. Hydrometer reading will tell you the relative health of the individual cells.
 
ok got my outback and I am beginning the install, pics are out of the box, sitting in the cabinet and panel that I made installed. DC hooked up and cabinet ground. Enough for today (got a late start) Tomorrow is the AC side and programing.
 

Attachments

  • photo1 (2).webp
    photo1 (2).webp
    25.2 KB · Views: 47
  • photo (2).webp
    photo (2).webp
    40.8 KB · Views: 48
Also you can see the AC panel next to the right side of the inverter. Going to use 3/4 conduit stright into the side of the panel. I also set back the inverter panel back and down from the shelf I'm going to put back in to leave a 2" gap for ventilation.

Chris
Superior Nights 53C
 

Forum statistics

Threads
38,155
Messages
448,721
Members
12,482
Latest member
UnaVida

Latest Posts

Trending content

Back
Top Bottom