Sam's is your source for Hatteras and Cabo Yacht parts.

Enter a part description OR part number to search the Hatteras/Cabo parts catalog:

Email Sam's or call 1-800-678-9230 to order parts.

headliner...

  • Thread starter Thread starter Capt. Tobb
  • Start date Start date
  • Replies Replies 32
  • Views Views 11,808

Capt. Tobb

Active member
Joined
Nov 18, 2006
Messages
168
Hatteras Model
Not Currently A Hatteras Owner
I wanted to ask the experts about headliners. What is the best material to use, can I use the pleather you get at the fabric store? Also, I would lke to do it myself, do yall know where I can get some DIY info?? thanks!
 
I just finished pulling down my pleather. Well, actually it was Naugahyde and it looked and felt like suede. It was dirty and you could not clean it. We hated it, but it was installed by a PO. I am going back to the original perforated headliner. You can buy it from Sams or from Sailrite. Sailrite has all of the stuff you will need to do the job.

www.sailrite.com


The other issue that I have is that whoever put up the suede stuff ran it fore and aft instead of athwartships. They added new strips of 3/4" plywood that actually lowered the headroom and they took out all of the overhead lighting. What a joke! I'll post some pictures of the progress at the end of the month.

BTW, don't forget to use stainless staples when you put up the new headliner.
 
Last edited:
I have done one headliner. Hopefully it was my last. Not as easy at it may look. One thing is a MUST: An air powered staple gun.

Do not try a headliner install with a regular manual gun.
 
Ahhh what memories!
Yer right sky... regular staples rust quick. I bought MONEL T-50s X 5/16" at the homo. $12 vs $3 but thats the fun part. Monel is REAL strong too. If one doesnt go all the way in you can tap it in with a finishing hammer. The rule of thumb is one staples space between the next staple... each "point should be 1/2" apart.
I generally start in the center of the space. You can have 2 pieces sewn toether with a seam bead, but start on the center joist. I dont like the bead, so I overlap (on the joist) and cover the seam with a piece of 1/4' X 2" teak strip ATHWARTS of course... looks nautical, and when a guest puts a boat hook or whatever through the material, you only need to change one section. I also dont use Hidem strips. I make 1/4 X 3/4 teak trim
(mounted vertically)for a finished edge. It hides a multitude of sins.
Keep a hair drier handy for stretching wrinkles out, kinda like shrink wrap. Top and trim guys use a steam gun.
I bought a $12 electric stapler 20 years ago and its still going strong. Make sure it takes T-50s. Make sure when you run the wiring, its anchored above the mat'l... if it hangs down and touchs it youll see it a mile away; and we all know what the judges think! One last thought; use the "off white" color. Bright white looks great when new, but once you clean it, it always looks streaked and lousy. ws
 
We just finished ours about a month ago. We just did the salon, so it was not that big of a job. In fact it was easier than we thought. There were three of us, but 2 can do it just fine. I bought the material from sam's. Good stuff, and a good price I thought.

Ours was a 1965 41' c.

Take down the 2 side valances and the rear valance. Pull all the old headliner down and pull all the staples. A regular screwdriver modified with a little roll in the end works well.

Buy some new strips. We just bought pine strips from Lowes. You need to cut a small "curfs" with a jigsaw to make the ends roll down.

Cut each section to just a little bit larger than you need. You can always trim later.

Staple the material up next to the windshield first. Start in the middle and use monel or stainless staples. I used a manual gun and an electric. The electric gun did not drive the staples all the way in so you had to finish with a hammer. Wrap around the first stinger and staple.

Place the first strip and secure with lots of stainless finish nails if available.

Staple the second piece up and repeat. If you strech as you go, you won't have any wrinkles and the material finishes perfect.

This would be a good time to make sure everything is sealed and replace your lighting and wiring above the headliner.

Don't be afraid, just jump in and figure it out. It is not that bad and goes pretty quick. We did ours in about 6 or 7 hours.

A air staple gun would work very well, but we could not find one at the time that used available t50 monel or stainless staples. I would think a different wood for the strips would make it last a while longer as well. A nice box of razor blades makes things a bit easier when trimming.
 
Last edited:
thanks for the help.....I will keep yall posted..
 
After a headliner is installed, it should sound like a drum .

Tight is Right !

I use a different method than what everyone here has described and believe me, it is a very physical job.

I use pneumatic guns ( I have 3 )and half inch premium grade stainless staples that run about 55.00 per 5000
 
Paul,
How is your method different other than the staples and staple gun? Give us your little secrets from start to finish.
 
yea, I would like to hear that too...
 
Tomorrow, Saturday, I will cut a couple of the strips I use to install headliners and post the pics.

You will get a clear understanding this way.
 
I was on a 1990(?) Bertram 50c that had large panels held in place with velcro. It looked like it was luan (or at least the same thickness) with headliner material glued to it. The entire salon ceiling was four or five panels running fore to aft. I liked the look of these panels and thought that it would be great for access. The owner did not want anyone to touch the panels except for the contractor who recovered/made them. Therefore I have no idea how easy they are to remove or install.

Later, I was also on a 2004 Hatteras 54c that had three or four panels in the salon that looked similar. However, the panels on the Hatt were not removed.

Is anyone familar with these panels? Are they easy to make and install?
 
Hatteras is using a product called Whisperwall. It is a pretty neat product that is held in place with small plastic tracks. The tracks are usually stapled in place with a pneumatic gun. The fabric edge is then pushed into the track with a putty knife, stretched across the area to be covered and puched into the next track. It is easy to care for and easy to replace if it damaged.
 
Not that easy.

A couple years back I did some repair work on a Marine Trader down in SC. The company that hired me to do the repairs also asked me to repair the headliner.

They had to remove the headliner from one of the tracks, but could not get it back in all the way. There was an apparent line of over an inch wide that needed to be stretched back into the track.

I got it in, but the it is not a job for the physically challenged person to do.


Been so busy at the marina I have not had a chance to cut the sample slats I mill to install headliners. Maybe later this week.
 
Here's what Hatt used to secure the headliner at the seams. It looks like just a little piece of cardboard. Hmmm.....

boatinterior012.jpg
 
The cardboard is from an upholstery shop. It goes on to give a clean line to the fold in the fabric that covers the staples. Without the cardboard the folded seam will not have a straight edge.
 
We have been so busy as of late down at the marina and boatyard I have not had time to mill a couple of slats I use for photos, but will try and explain the process I use.

Picture a strip of 1/2 plywood ( marine grade of course ) about 1 1/2 inches wide, usually in 8 foot lengths.

One corner is mitered off. Not the end, but the entire strip.......length wise.

So if you lay two strip together, side by side, there will be a "V" showing.

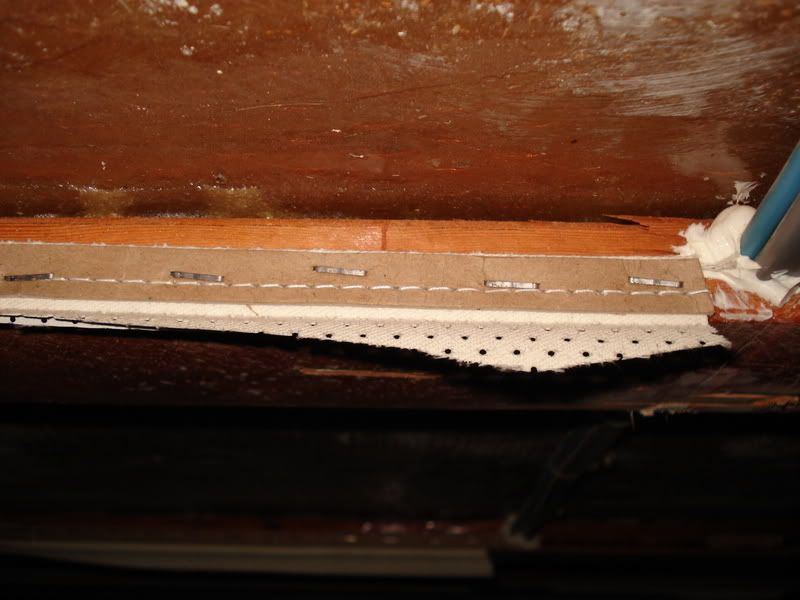
This "V" is facing upward. This is where the headliner is stapled so that there will be a tight fit of the headliner. You can not stick a business card into the seam.

I do not use the cardboard strips, because I do not like the "bump" in the headliner. I do not use solid wood such as pine because it will deteriorate and will not hold the staple very well , especially over time.

I fasten a strip to the existing frame from port to stb. Then cut a length of headliner giving about 10 inches extra per side.

The headliner is usually 54 inches wide. I then grab it in the middle, put a couple staples into the "V", then start stretching and stapling . The stretching is very physical. I work outward to one side, then outward on the other side.

The next panel strip is already in place and I then start with the middle of the headliner that is hanging down and stretch it over the next strip. This takes a lot of pressure. As I staple it, there will be a 45 degree angle of bubble or roll visible in the headliner.

Once stapled, then the ends are stretched and fastened. The excess is cut off and the next panel is started.

I space the panels so they are about 22" wide. This insures a drum tight fit.

Headliner work, to do it right, is not for the novice.

I purchase marine grade vinyl at a local fabric store. It is good stuff, about 20.00 yard, retail, but it does not collect mildew, and it lasts longer than the vast majority of your exterior cushions, including those made and placed on the Hats.

Cheap headliner material is just that. It will mildew faster, loose it stretch retention, and sag within a year or so.

Hats also use the cleat method for headliners, especially the older ones. The problem here when reusing those cleats, is that when the old staples are removed, the cleat ( wood strip ) is usually damaged and when the headliner is stretched during installation, those imperfections in the wood edge will show.

The other reason I do not like the old cleat version is that when the next cleat is fastened, those staples and the material it self causes a wider seam to show.

I will still try and get some photos.
 
Thanks Paul, but I'm not quite visualizing this. I think I need a photo. I've put up some headliner before, but only with the cleat method. I was surpised to find just cardboard when I removed this stuff. No hurry on the pics, though, since I'm still probably a couple of months away from the reinstall.
 
Thanks Paul, but I'm not quite visualizing this. I think I need a photo. I've put up some headliner before, but only with the cleat method. I was surpised to find just cardboard when I removed this stuff. No hurry on the pics, though, since I'm still probably a couple of months away from the reinstall.
If I am following this thread correctly Sky, you seem to be replacing the headliner because you needed access to repair rotted core overhead. If that is the case, I am sure you are using the simplest and best approach. Tearing up and rebuilding exterior fiberglass is an awful job. Doing the job from the bottom would be alot easier if you could turn the boat over. I would use a waxed piece of 3/4" plywood and a bottle jack to install the core and get a good strong bond. For the cloth overlay, I cover about a 3" area around the outside edge of the area to be repaired with blue masking tape. You can see the blue tape through the wetted cloth. Next I use masking or duct tape to hold the dry cloth edge up . I attach it outside of my masked area. Now wet and squegee the cloth and add layers. Leave a dry end to tape to the outside. When it is all wetted out and just as it starts to cure, I take a Stanley knife and cut through all layers on the inside edge of my masking tape. Now remove all the duct tape and dry cloth as well as all the masking tape with its overlayed cloth and rough edges. What you have left is a clean edged repair that will only need a light grinding to make the edge clean and even. Good luck.
 
Maynard,
Thanks for the pointers, but fortunately, I have no core problems to deal with. What I have is a PO who decided to have the headliner replaced with a Naugahyde material that was very similar to suede. It did not clean up well and it was run with seams fore to aft instead of the OEM athwartships. In doing so, the PO had the ceiling shimmed down 3/4" to accomodate the new headliner. At the same time, they pulled all of the OEM ceiling lighting and rebuilt the cabinet in the bar area to house a television. Unfortunately, this cabinetry rebuild was also 3/4" lower than the OEM headliner.

What I did was to remove all of the Nuagahyde material and all of the furring strips that it was attached to. Then I pulled out the added cabinetry to get everything back to original. Now I plan to re-veneer the original bar cabinet and re-install the OEM ceiling lights that had been removed. As you know, one thing leads to another so we will see how this ends up. Right now the job just seems to keep getting bigger.
 
Last edited:
Paul

Please post your pics, a picture is worth a thousand words and any assistance with headliner projects is appreciated.

tx
 

Forum statistics

Threads
38,156
Messages
448,741
Members
12,482
Latest member
UnaVida

Latest Posts

Trending content

Back
Top Bottom