Sam's is your source for Hatteras and Cabo Yacht parts.

Enter a part description OR part number to search the Hatteras/Cabo parts catalog:

Email Sam's or call 1-800-678-9230 to order parts.

Flybridge deck question.

  • Thread starter Thread starter oscarvan
  • Start date Start date
  • Replies Replies 19
  • Views Views 4,018

oscarvan

Legendary Member
Joined
Oct 31, 2015
Messages
2,926
Status
  1. OTHER
Hatteras Model
Not Currently A Hatteras Owner
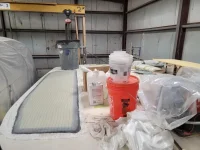
My flybridge needs medical attention. There are cracks in it. I suspect the bridge itself with it's 1168 screws may not be 100% tight either. Good news is that the boat has been under roof for the last 20 years and rarely ever is there water on there, so there is no major water intrusion. Surveyor said there were two spots with "elevated moisture readings" but they were not "wet" and certainly not spongy. There are a few very faint stains on the head liner below, but they look very old.

Still I have to do something here. So plans are forming.

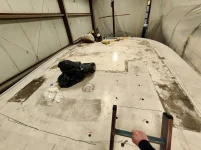
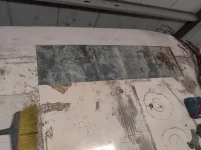
I was told there is plywood in the core where the flybridge attaches. This is good.

First question I have is whether there is anything else in the core than balsa under the stanchion bases for the weather boards behind the fly bridge? Did they put plywood or solid epoxy in the core for the screws there....... I hope? Re-bedding is one thing, opening up the deck and installing something solid there is another.

Thanks.
 
Last edited:
i recored my 71 53 several years ago. the plywood under the flybridge was only around the perimeter of the base. and only 6 inches or less wide. nothing but balsa under the bases
 
My whole flybridge deck is soft. I bought it like that. I am going to re-core the deck this summer and
will probably use high quality 3/4" epoxied ply over the entire surface, with big 1/2" aluminium plates where the hardware attaches.
 
My 1983 61MY had a couple of cracks near the stanchion mounts on the fly bridge. This was the result of water getting to the aluminum backing plates for the stanchion mounts and causing enough corrosion to expand the plates and crack the fiberglass. Not a hard repair, but time consuming.
 
We just finished recoring the bridge. Quite a project. Roughly half was wet.
 

Attachments

  • 20210306_102117.webp
    20210306_102117.webp
    86.5 KB · Views: 151
  • IMG_20210224_140251_1.webp
    IMG_20210224_140251_1.webp
    94.2 KB · Views: 150
  • IMG_20210226_085330_1.webp
    IMG_20210226_085330_1.webp
    92.3 KB · Views: 153
OK, so the stanchion bases are just screwed and glued to a layer of fiberglass.

That changes things. I am not putting it back together like that. I think a 6" or so hole saw, remove balsa, pour solid glass and replace the cutout disc.

There is a layer of glass going on the entire deck, and I am glassing the bridge itself to the deck. I have no intention of ever taking it off.
 
When are you going to start this project. Please send photos.
 
When are you going to start this project. Please send photos.

Washer/Dryer installation and tool/parts storage in forward cabin is next. (Appliance is on order) Then this. There will be extensive pictures, and a writeup on my blog. Good news is, again, I'm under roof so I can do it in phases.
 
Later boats had aluminum backing plates where the stations are up there. Yours may have them too. I'm not sure when they started doing that.
 
Last year I recored the entire deck. What started as just a few spots turned into a much bigger project. I ended up fiberglassing the flybridge down and got rid of all the screws. I can tell you it’s no easy task. Good luck.
 
Later boats had aluminum backing plates where the stations are up there. Yours may have them too. I'm not sure when they started doing that.

I wonder if a stud finder would tell me......
 
Last year I recored the entire deck. What started as just a few spots turned into a much bigger project. I ended up fiberglassing the flybridge down and got rid of all the screws. I can tell you it’s no easy task. Good luck.

I was thinking I'd leave the screws in, and cover the flange with mat, which would even the bumps out, or where I punch a hole where the screw heads are. Still have to experiment with that.
 
I think the screws and especially the washers would be slowly corroding under the mat , better to remove them , fill the holes with thickened expoxy , and lay the mat . Also ,if you ground the gelcoat off both on the fly bridge structure and the cabin top , this would give you about 1/8 inch to have 3 or 4 layers of light weight mat . This would be easier to fair the surface.
 
If you're going to leave the screws in you need to remove them, countersink the hole and replace with a flat
head screw. If they're loose either go bigger or fill the hole and re-drill.

Instead of using aluminum as a backing plate think about using g10 fiberglass instead. No corrosion, and glues great to everything else.
 
Tab the bridge down on the inside. Remove the screws and fill the holes and repaint that lip.

The aluminum backers in the deck will show up with a moisture meter. They pick up metal very well.
 
Tab the bridge down on the inside. Remove the screws and fill the holes and repaint that lip.

The aluminum backers in the deck will show up with a moisture meter. They pick up metal very well.

Interesting thought. How many tabs? Some areas are not easy to get to....
 
I would probably tab it every few feet. I guess it depends on how big you make them. You probably don't need any since the OEM 5200 would probably hold it without the screws anyway.
 
Will you have to remove the fly bridge ?
 
I would probably tab it every few feet. I guess it depends on how big you make them. You probably don't need any since the OEM 5200 would probably hold it without the screws anyway.

We tabbed all of ours on both sides.
Tabbed the inside first all the way around and then cut off the flange and tabbed the outside, then pulled a radius with thickened epoxy.

Have always wanted to make everything under the gunnels and backside of coming nice and smooth.
Spent 2 days of grinding and cutting out bad balsa with the Fein tool.
Haven't used non epoxy resin for quite sometime and had sort of forgot how bad the smell is. But since we're in a rush we made some vinylester putty to fill in and also glue up g10 up under the gunnel, then pulled filets in all the corners, even got them sanded and ready for primer in 1 day.
Going to roll on some primer and paint this weekend to finish, yep no spraying for this project.
 

Forum statistics

Threads
38,154
Messages
448,719
Members
12,482
Latest member
UnaVida

Latest Posts

Trending content

Back
Top Bottom