Sam's is your source for Hatteras and Cabo Yacht parts.

Enter a part description OR part number to search the Hatteras/Cabo parts catalog:

Email Sam's or call 1-800-678-9230 to order parts.

Aft Deck Sag Problem

  • Thread starter Thread starter Vincentc
  • Start date Start date
  • Replies Replies 23
  • Views Views 11,178

Vincentc

Legendary Member
Joined
Jun 3, 2008
Messages
1,514
Status
  1. OWNER - I own a Hatteras Yacht
Hatteras Model
43' DOUBLE CABIN (1970 - 1984)
I need help.

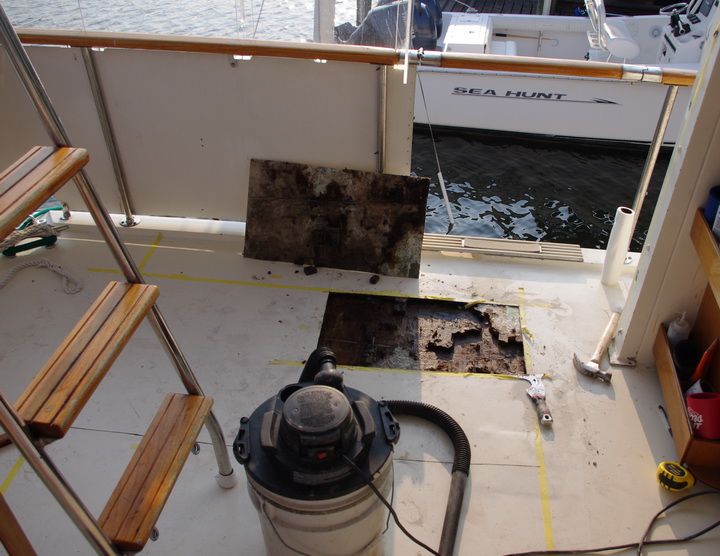
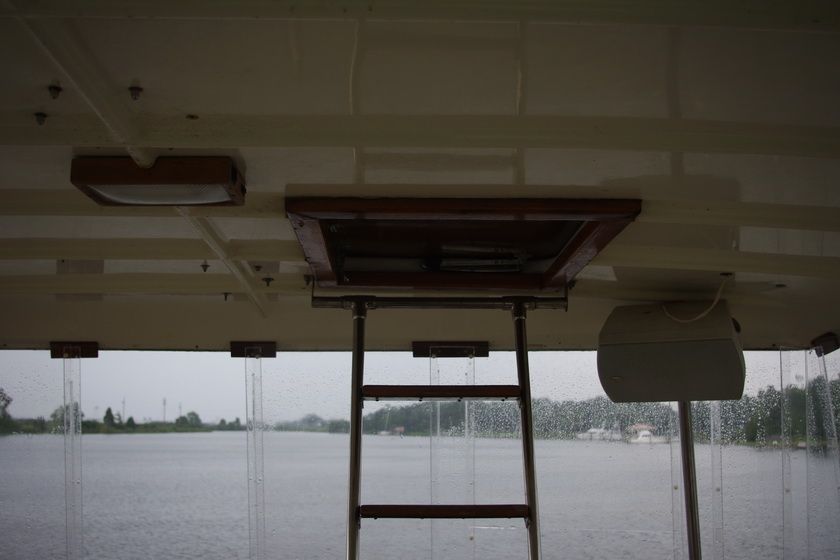
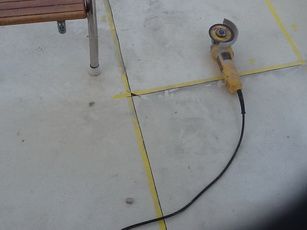
The port side aft deck in the area of the FB ladder recently developed a sag.
Having deal with wet core in the deck near the bow pulpit I assumed wet core was the cause of the sag.

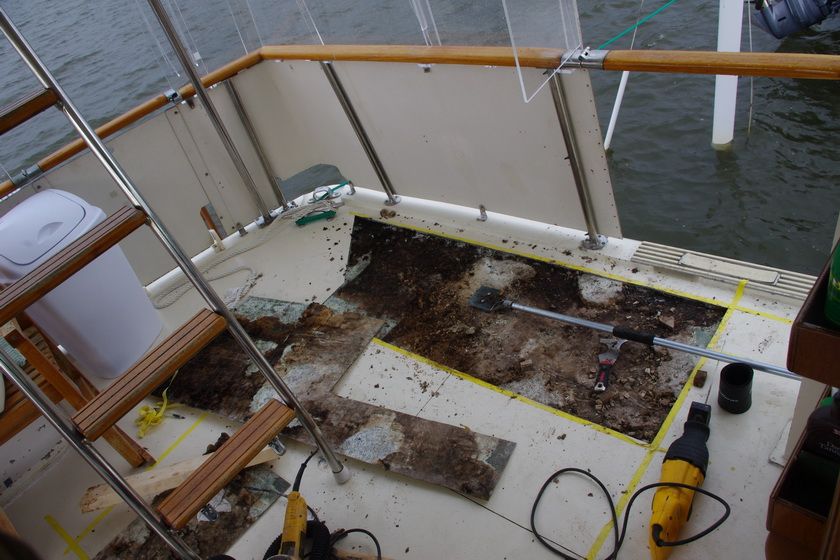
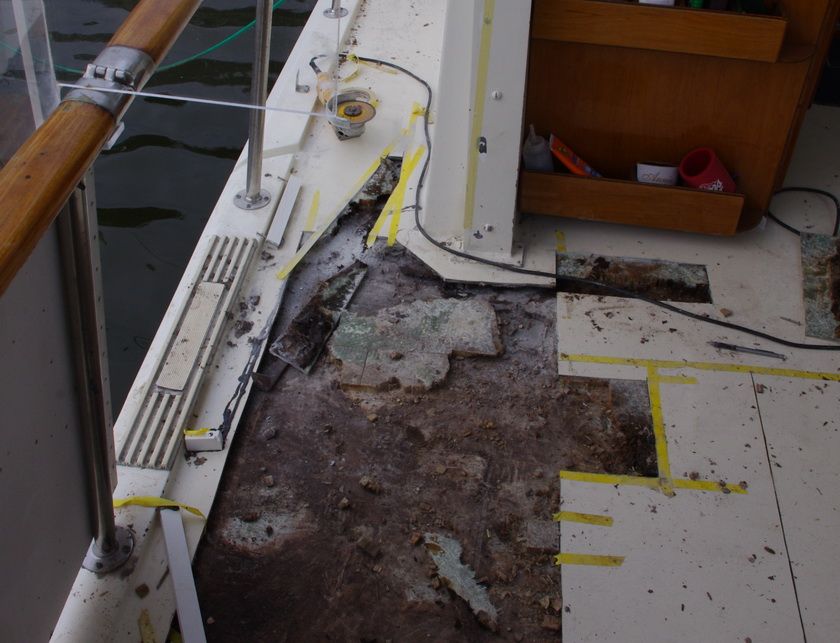
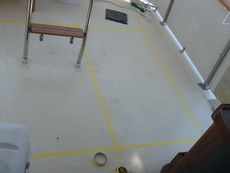
I identified the areas of the sag with a batten and marked off an area to cut out and remove the upper fiberglass skin.
After cutting a panel I tried to lift it at the area with the greatest sag, and found that it is firmly secured to DRY balsa core.
Before I go cutting up more of my aft deck, or giving up and sealing the slots that I just cut, I need a consult.

Any thoughts on the cause of my deck sag and suggestions for how to fix it will be most appreciated.

photo1r.jpg


photo2r.jpg


photo3r.jpg
 
My 1979 43 dc has a slight sag on the stb'd side aft deck, about2 ft aft of the entry gate, is just enough to cause some water ponding but a appears not to be "soft".

Will watch this post with interest and hope we get some expert advice..( evil grin)
 
Hope the "expert"controversy isn't discouraging the posting of ideas regarding the deck sag problem. I would be happy to read a reasoned guess.

i am about to take a tube of West six10 epoxy down to the boat, fill the hasty cut and try to convince my wife we will have live with the sag and occasional puddle.

The expression, measure twice cut once, might be changed to, don't assume you know the cause of the problem, and think twice before cutting.

Regards
 
I would v out the cut about 3-4" on either side of the cut and put down several layers of chopped mat. I'm afraid if you don't you will have wet balsa shortly. I have no ideas about the sag.
 
I would v out the cut about 3-4" on either side of the cut and put down several layers of chopped mat. I'm afraid if you don't you will have wet balsa shortly. I have no ideas about the sag.

Thanks, good point regarding a bevel.
 
There may just be some lack of bonding between the inner and outer skin. All I would do is remove the coring from it trying to get back to a non sag area replace the coring and refiberglass the sag. Build it back up with epoxy and cloth and no more sag. Doesn't seem like a big deal as long as the failure isn't to extensive. We're talking older boats here and although they're built quite well they are getting a bit long in the tooth as am I. You do want to taper it as much as you can to get as much bonding area as posible. Fair it nicely paint it and it's gone. Bill
 
Bill,
Your suggestion makes sense, however, Removing the upper fg skin my not be that easy or pretty. It was very well bonded to the balsa core in the center of the depression. I feel like I am doing boat surgery blindfolded and would love to be able to look at the sag from the underside before more cutting and removing.
Is it practical to remove and replace the headliner?
Has anyone done this?

Thanks
 
The expurt has entered the building! There are (probably) 1"x6" wood beams that are stretching the span of the lower skin (between lower skin and headliner, running port to starboard). These beams are attached to lower skin with a pink fiberglass 'structural filler', as well as some screws. The pink structural filler is about 1/3" thick and very brittle. It's possible something heavy dropped on the part of deck and busted that layer of structural filler apart leaving a 1/3" space between lower skin and 1"x6" wood. With weakened support in that area, it sagged over time.

I have headliners down in my 1976 43Dc in v-berth and main saloon, not in rear stateroom - so not 100% sure those 1"x6" exist there. To check, press the headliner at the seam – if you feel wood go back from seam 5.5” or so I bet it is as described above. The v-berth only had 1”x1” wood screwed to lower deck with triangle shims for height adjustment. These are there to to staple headliner to, and are not attached as structural member.

Main Saloon
repair 027.webp

V-berth
repair 020.webp
 
Last edited:
Wow! Mighty impressive! :)

Are you going to use the oem-style headliner material or something else when it goes back together?
 
Sghaford,
Very helpful information. Impressive project. Hope you will post more on your project. I appreciate learning from the experience of others vs my mistakes.

I found Sky's post on his headliner replacement project. Very informative.

Thanks
 
I too found Sky's post about headliner very informative - as matter of fact gave me the cojones to cut the existing the headliner down so I could add proper support. I think I'm going with stock headliner install rather than panels, I really like the look of the seams every 2' apart. Sure are allot of staples to remove! I'm going to post pictures under the original thread where I asked about best core material to use - went with Boatsb 3 layers of 1/4 mahogany plywood. This was big project - nearly the entire section of the forward deck replaced and upper deck, well, you can see from where the light is shining thru.

I'm suppose to finally launch tomorrow, so I need to get back to work as I want to take day off. Below is some more eye candy - Good Luck Vincent and, everybody have a Great 4th of July!

Top.webp

Top3.webp

top2.webp
 
Thanks Sghaford for the photos and shared experience. Very helpful

Intimidated by the scope of a headliner r&r I was ready to seal it up for a later project, but then I went down to the boat and studied it some more and realized that the deck in the area of one of the cuts had a lot of flex. I took hold of the angle grinder and cut a smaller square.

IMGP9001.jpg


There is a lot of bad core with occasional "islands" of good balsa, apparently protected by resin. The islands make removal of the deck upper skin difficult. Also the bottom skin is not very thick. I am going to move ahead with uncovering the bad core and filling it back, without removing the headliner. I will put some support posts in place since core removal will not leave much support and the posts may restore some deck camber.

I have been using a sharp hard scraper and a hammer to separate the fg skin from the balsa islands. That is tedious. There must be a better way.

Tips/Suggestions appreciated

Happy Independence Day to you all.
 
vincent, i have the same issue with my flybridge deck, i will be attacking it later this winter, please take pictures, and remember any tricks that you figure out........
now my advice to you is GET TO WORK, the rendezvous is right around the corner.
 
If you can get your hands on one, try a Fein Multimaster tool and use a scraper blade. You will find it very effective in separating the fiberglass from the balsa. Take it slow and let the tool do the work.
 
Bill,
Mambeaux had probably better advice, leave it alone till summer is over. Since I didn't listen to Jack, I will try to listen to you. If I can just get it cleaned out and covered up, I can postpone the cosmetics, and cover it up with a rug.

Robert,
Thanks for advice regarding the multitool. I have a knockoff brand, but the blade is only about 3 inches long and does not reach very far under the fg upper skin.

Have a good independence day.
 
I have yet to find a good tool or procedure to remove the upper fg skin, but I did find a better way.

IMGP9009rliftingoutpanel.jpg


IMGP9014rdeckcutout.jpg


The long handle scraper helped but it was still tedious to pry the skin off from the balsa islands. The rot is pervasive. Even what looks like good balsa may be water soaked or rotted at the bottom and sound at the top.

I am thankful for Sghaford's photo post, which reminded me to put some support under the deck. Cutting the top skin removes much of the deck support, I think. The 1x5 wooden cross beam do not appear to me to provide that much support. It was not necessary to remove the headliner to put in 2x4 supports.

IMGP9017r.jpg


IMGP9018raftcabin.jpg


Probably 80% of the coring in the area I've opened up so far is bad and it extends back to the aft port cleat, which makes me wonder how that might affect the security of the cleat. The core rot is worst close to the rub rail I guess because the deck camber would tend to collect the water there.
 
It rained today and I noticed that the wood trim around the hatch opening to the fb was leaking. I wonder if that is related to water leaks into the coring of the hardtop.

IMGP9015r.jpg


Regards,
 
I have gone as far forward as I dare looking for the end of the core rot, and source of the water into the core.

IMGP9023rc.jpg


The rot appears to continue well forward of where I stopped cutting and my best guess regarding the source of the water is the port side cabin window frames. Back when I pulled the window frames to fix leaks around the frame, I noticed that the window cut outs exposed the cabin side wall balsa core and the balsa coring was seriously wet and deteriorated. I suspect that the water flowed down through the cabin side core space and into the deck coring space. Something to think about if you have had leaking around your window frames. It does not appear that Hatteras sealed the core around the window cut out when they built Lilly Marie in 1982 or 3.

I don't imagine I will ever know the cause of the leak because I do not intend to cut out any more of the decking forward of this point.

Going aft is another matter. There still is some area around the aft port cleat which needs to be cleaned out and dried out back by the aft cleat. I will fill the core area under and around the cleat with filled epoxy in the areas where I cannot fit plywood.

Regards,
 
I'd like to know how this project turned out; I'm having soft and sagging aft deck problems and don't want to do exploratory surgery if I can help it. I was leaning toward removing the aft cabin headliner to remove any soft wood and and shoring it up from there but I'd like to learn from the experience of others first.

The pictures of the main salon ceiling are valuable since I plan on removing the mast and relocating the horns to maximize the real estate in front of the helm.

Thanks
Jim
 

Forum statistics

Threads
38,156
Messages
448,741
Members
12,482
Latest member
UnaVida

Latest Posts

Trending content

Back
Top Bottom