Sam's is your source for Hatteras and Cabo Yacht parts.

Enter a part description OR part number to search the Hatteras/Cabo parts catalog:

Email Sam's or call 1-800-678-9230 to order parts.

Advice Needed in Removing Perko Stern Light

Nick in Manitou

Active member
Joined
Jan 15, 2019
Messages
140
Status
  1. OWNER - I own a Hatteras Yacht
Hatteras Model
53' EXTENDED DECKHOUSE (1983 - 1988)
As we have a minor leak in the overhead, I am trying to remove the Perko stern light that may be the source of the incoming moisture.

I can't find a drawing online that shows how this light is installed.

I got the top off, the rear plate (exposing the wires) and removed three screws from the bottom of the area where the bulb is.

I have slipped a thin putty knife under parts of the light, but it still seems to be secured to the deck.

I can see the end of a bolt sticking up in the center of the plate beneath the bulb, but that bolt would only be removable from the underside.

I must be overlooking something. Does anyone have experience with these? Could you tell me how to get this light off the deck?

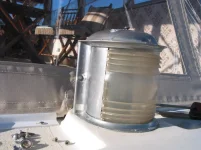
The first photo shows the type of light I am wrestling with.

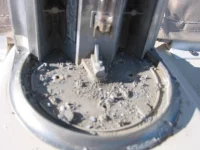
In the second photo (although the photo is blurry), you can see the three holes where I removed the three screws that I assumed were holding the light to the deck.

Also in the second photo, one can see the end of what might be a bolt coming up from underneath.

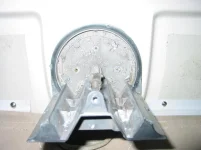
The third photo is taken from above the light looking almost directly down (with the top of the photo being aft) and shows the holes where the three screws were removed and one can just barely see what looks to the the end of the bolt coming up from below the bulb.

Any suggestions?

Thanks,
Nick
 

Attachments

  • IMG_7561.webp
    IMG_7561.webp
    89.8 KB · Views: 130
  • IMG_7563.webp
    IMG_7563.webp
    60.4 KB · Views: 129
  • IMG_7565.webp
    IMG_7565.webp
    87.5 KB · Views: 129
I would contact Perko. Their website has installation instructions but I couldn't tell which light you had.
 
Inside the light there is a sticker that says something like, "Perko Series 109-110-111 Navigation Lights" and describes the type of bulbs required.

I might have typed something incorrectly, but I went to the Perko website and was not successful at all.

I will try again!

Thanks for the suggestion.

Nick
 
My guess is it is beaded in 5200. rock it back and forth and get aggressive with putty knife.
 
I went back to the Perko website and with some perseverance was able to locate a bit of information about a newer version of this light (although it is listed in their "Legacy Products" area.

It looks as though the "newer" version of the one I have is a 0111 Stern light and it is listed as Black Polymer. The one I have is made of what I have always heard called "pot metal". Its finish is peeling and the material itself is blistering in places. If I can get the old one off, perhaps it is time to go with a newer model that will last a while and not have as leaky a design.

I couldn't find an image of how either the one I have or the newer one are actually assembled, so I still don't know for sure if I have overlooked a screw or bolt. Perhaps tomorrow it will reveal itself...

Nick
 
I just replace the same light on my boat. 3 small Roberts head screws in base, held mine down with assistance of 5200. I had to drill the brass screw heads, which are soft, and pry the fixture up. Clean re-bed and replace with new. The new one was black plastic with the same 3 screw holes in base.

From the pic, looks like you can see the 3 screws holding it down, triangle pattern.

Easy job.

Tim
Fish Tales
65c
 
Tim, Those things in the third photo that look like the screws that hold the unit down are the holes where the screws were - I already removed the screws and the light is still very soundly attached to the deck.

I think that RiverRandy is probably correct in suggesting that the PO probably used an effective adhesive to attach the light.

I just spoke with Sam's Marine and they have a replacement unit in plastic for $111.82 (Sam's part number 78603). I am considering whether or not I should opt for a different style light that is out there on the internet and is designed to have the wires enter through the bottom instead of the back. (By having the wires enter through the bottom the other design might be a little more water resistant.)

Anyone have any suggestions or experience with the newer plastic units or another design you have replaced one of the originals with? (Again, this is a unit that mounts on the aft end of the flybridge deck and not on the transom.)

Thanks!
Nick
 
What about that new, what looks to be unbedded canvas track?? .....Pat
 
Pat, I was told that what I should do is remove and waterproof the wiring and mounting for the stern light using 4200. Also, I was told to remove all the screws in the area and after drying out the holes as well as I can, use 4200 in those as well. These instructions came from someone local that a lot of folks have said knows what he is doing.

As it has been raining for weeks around here and more is expected in the next day or so, I figure that I will get up there with a hair dryer and do my best to ensure that the holes are dry...then install the 4200, inserting the screws while the 4200 is still fresh.

I have not found any soft spots in the deck, so I am hoping that the degradation of the core is minimal.

I am new to all this, so please let me know if this advice is off the mark!

Thanks,
Nick
 
I would check to see if an LED fixture might be a possibility.
 
Well with a putty knife and a light hammer I succeeded in getting whatever material the PO had used to try to seal this light to the deck to finally let go.

Now the question is how best to seal the wiring hole to ensure that if any moisture gets into/under the stern light that it does not have a chance to get into the boat.

I am trying to figure out if I should go with a base mounting stern light or a newer version of the light that just came off.

IMG_7570.webpIMG_7569.webp
 
If you can clean it up, I'd go with a lamp housing that has the wires coming up through the bottom, not the back. You might be able to fiberglass that hole to be smaller, if you can clean it up to get a clean surface to apply it to. Use 4200 to glue the new one to the deck. A plastic fixture would be better. If you want the old look, you could paint it silver and no one would know the difference.
 
Jim, I was tempted to go with a different design where the wires come up from underneath as you suggested, but the current budget drove me to find a good price on Perko's current (plastic) version of the same light that I took off, so (for now) I am going that way.

The area did clean up very well and I filled the hole where the wires come up trough the deck with 4200. I also removed all the screws in that region of the deck, filled their holes with 4200 and replaced the screws.

Between removing and replacing the light and filling the local screw holes with 4200, it would be great if the water infiltration stopped. With the exception of getting the stern light to let go of the deck, the process has been rather simple.

Painting the light...I had not thought of that...hmmm...

Nick
 
Nick, been a few years since I replaced mine but I used a plastic one. The pot metal on mine would crumble with finger tip pressure!

As I recall, there are indents on the base bottom as well as the back piece. I drilled out the bottom one and wired it through that. I did use 5200 on the base and a glob of silicon around the wire to be double sure it would not leak.

FYI, the port and starboard ones are a much bigger pain to swap out!

If you switch to an LED, check they meet CG visibility standards.
 
Last edited:

Forum statistics

Threads
38,152
Messages
448,690
Members
12,482
Latest member
UnaVida

Latest Posts

Trending content

Back
Top Bottom